In our last lesson, you gained fine-grained control over database interactions by writing custom JPQL and native SQL queries with the @Query annotation. You learned to read, project, and even modify data with precision. Now, we'll address a crucial question that arises when you perform multiple database operations in a single business function: what happens if one of them fails?
This lesson introduces you to declarative transaction management in Spring. You will learn how to use the @Transactional annotation to group a sequence of operations into a single, all-or-nothing unit of work. By the end of this lesson, you will be able to ensure your application's data remains consistent and reliable, even in the face of unexpected errors. This is the final and one of the most critical topics in our module on data persistence.
The All-or-Nothing Principle
Imagine a simple bank transfer: you need to debit money from one account and credit it to another. These are two separate database operations (UPDATE statements). If the debit succeeds but the credit fails (perhaps due to a system crash), money has vanished from one account without appearing in the other. The database is now in an inconsistent, corrupted state.
This is where transactions come in. A transaction is a mechanism that guarantees a set of operations follows the ACID properties (Atomicity, Consistency, Isolation, Durability). For our purposes, the most important one to grasp right now is Atomicity.
- Atomicity: Ensures that all operations within a transaction are treated as a single, indivisible unit. Either all of them succeed, and the transaction is committed, or if any one of them fails, the entire set of changes is rolled back as if nothing ever happened.

To understand the problem in a practical Spring context, let's watch a short video that simulates this exact issue.
Java Spring Boot [2024] Part 17: Transactions @Transactional
The "Peachez Programming" channel provides a clear, concise demonstration of why transactions are necessary.
First, watch the introduction from the beginning to understand the bank transfer analogy and the basic function of @Transactional. Then, skip ahead and watch the demonstration from this segment. You'll see how, without a transaction, an insufficient funds error leaves the database in an inconsistent state (one account is credited, but the debit fails), and how this problem is resolved later.
The Solution: Declarative Transactions with @Transactional
Spring makes managing transactions straightforward through declarative transaction management. Instead of manually writing code to begin, commit, or roll back transactions, you simply "declare" that a method should be transactional. The primary way to do this is with the @Transactional annotation.
When you annotate a method (or class) with @Transactional, Spring works its magic behind the scenes. It uses Aspect-Oriented Programming (AOP) to create a proxy around your service bean. This proxy intercepts calls to the annotated method and wraps them in transaction management logic.
Here's a simplified view of what happens:
- A transaction is started before your method code executes.
- Your method code runs.
- If the method completes successfully, the transaction is committed.
- If the method throws an unhandled
RuntimeExceptionorError, the transaction is rolled back.
This video from the "Code Decode" channel provides an excellent debugging session that shows this behavior in action. You'll see how, without the annotation, a save() call immediately writes to the database, but with the annotation, the write is deferred until the very end of the method.
Transaction Management in hibernate in spring boot Interview questions | with Example | Code Decode
This video demonstrates the practical effect of adding @Transactional to a service method.
Watch the segment from this point. The presenter debugs a service method twice: once without @Transactional and once with it, clearly showing the difference in when data is committed to the database.
Key Concepts and Best Practices
Using @Transactional is simple, but understanding its nuances is key to using it effectively.
Where to Place @Transactional
The standard practice is to place @Transactional on public methods in your service layer beans (e.g., classes annotated with @Service). The service layer is responsible for orchestrating business logic, which often involves coordinating multiple repository calls. This is the natural boundary for a transaction.
Pitfall: @Transactional does not work on private methods. Because Spring uses proxies, it can only intercept calls made from outside the object. A call from one method to another private method within the same object (this.myPrivateMethod()) will not be intercepted, and no transaction will be started for the private method. The "Mastering Spring Boot @Transactional" diagram you saw earlier highlights this in point 3.
Rollback Rules
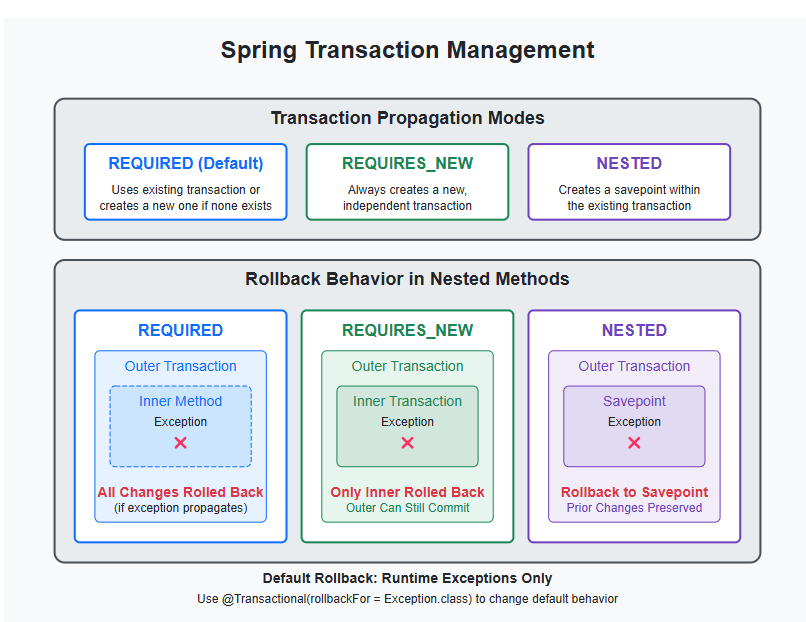
By default, a transaction will only roll back for unchecked exceptions (RuntimeException and its subclasses) and Errors. It will not roll back for checked exceptions (any subclass of Exception that isn't RuntimeException).
You can customize this behavior using the rollbackFor and noRollbackFor attributes. For example, to ensure a transaction rolls back even for a checked SQLException:
@Transactional(rollbackFor = SQLException.class)
public void performDatabaseWork() throws SQLException {
    // ... logic that might throw SQLException
}
This is a common source of confusion, so it's a critical detail to remember. The Baeldung article "Transactions with Spring and JPA" provides a good reference on this.
Transactions with Spring and JPA
This article explains the declarative approach to managing rollbacks.
Please read the section titled Transaction Rollback. Focus on the code examples for the declarative approach using rollbackFor and noRollbackFor.
Read-Only Transactions
For operations that only read data (e.g., a series of SELECT statements) and do not modify it, you can provide a performance hint to the persistence provider by setting the readOnly flag.
@Transactional(readOnly = true)
public UserProfileDTO getUserProfile(Long userId) {
    // ... logic that only fetches data
}
This can lead to optimizations at the JPA and database level, such as preventing dirty checking of entities and setting the underlying database connection to read-only mode.
Transaction Propagation
What happens when a method marked as @Transactional calls another method that is also marked @Transactional? This is controlled by the propagation behavior.
The default propagation level is REQUIRED. This means:
- If a transaction is already active, the method will join that existing transaction.
- If no transaction is active, a new one will be created.
This is usually what you want. It ensures that a series of service calls within a single top-level operation all participate in the same "all-or-nothing" transaction.
Another common propagation level is REQUIRES_NEW. This means:
- The method will always start a new, independent transaction.
- If an existing transaction is active, it will be suspended while the new transaction executes.
This is useful for tasks that must succeed or fail independently of the calling transaction, such as logging an audit record to the database.
Hands-On: Ensuring Atomic Operations
Let's apply this to our group-manager project. We'll create a service method that performs multiple database writes and see how @Transactional protects our data integrity.
Our scenario: We want to create a method that deletes a User. When a User is deleted, all Posts they authored should also be deleted. This must be an atomic operation.
-
Create a New Service
In your service package (e.g.,com.example.groupmanager.service), create a new class calledUserService. Annotate it with@Service.package com.example.groupmanager.service; import com.example.groupmanager.repository.PostRepository; import com.example.groupmanager.repository.UserRepository; import org.springframework.beans.factory.annotation.Autowired; import org.springframework.stereotype.Service; import org.springframework.transaction.annotation.Transactional; @Service public class UserService { @Autowired private UserRepository userRepository; @Autowired private PostRepository postRepository; // We will implement the methods here }Note: If you already created a
UserServicein a previous lesson, simply add the new methods to it. -
Implement the Unsafe Method
Add the following method to yourUserService. Notice it has no@Transactionalannotation yet. We will intentionally throw an exception after deleting the posts to simulate a failure.// Inside UserService.java public void deleteUserAndPostsUnsafe(Long userId) { System.out.println("--- Deleting user and posts (UNSAFE) ---"); // First, delete all posts by this user // In a real app with proper foreign key constraints, you'd handle this differently (e.g., cascading deletes), // but for this demo, we do it manually. postRepository.deleteAll(postRepository.findByUserId(userId)); System.out.println("Posts for user " + userId + " deleted."); // Simulate a failure before deleting the user if (true) { throw new RuntimeException("Simulating a network failure before deleting user!"); } // This part will never be reached userRepository.deleteById(userId); System.out.println("User " + userId + " deleted."); }You'll also need to add the
findByUserIdmethod to yourPostRepositoryif it doesn't exist:// In PostRepository.java List<Post> findByUserId(Long userId); -
Implement the Transactional Method
Now, add the safe, transactional version of the method. It's identical, but with the@Transactionalannotation.// Inside UserService.java @Transactional public void deleteUserAndPostsSafe(Long userId) { System.out.println("--- Deleting user and posts (SAFE & TRANSACTIONAL) ---"); postRepository.deleteAll(postRepository.findByUserId(userId)); System.out.println("Posts for user " + userId + " deleted."); // Simulate a failure before deleting the user if (true) { throw new RuntimeException("Simulating a network failure inside a transaction!"); } userRepository.deleteById(userId); System.out.println("User " + userId + " deleted."); } -
Update
DataLoader.javato Test Both Scenarios
Let's modify ourDataLoaderto call these new service methods. We'll need to inject theUserService.First, add the service as a field:
@Autowired private UserService userService;Then, replace the entire
runmethod with the following code. It sets up data, then attempts the unsafe deletion, and finally (in a commented-out section) the safe one.@Override public void run(String... args) throws Exception { // --- Clean and setup data --- postRepository.deleteAll(); userRepository.deleteAll(); tagRepository.deleteAll(); User user1 = userRepository.save(new User("Alice", "alice@example.com", "pass1")); User user2 = userRepository.save(new User("Bob", "bob@example.com", "pass2")); Post post1 = new Post("Alice's First Post", "Content."); post1.setUser(user1); postRepository.save(post1); Post post2 = new Post("Alice's Second Post", "More content."); post2.setUser(user1); postRepository.save(post2); System.out.println("--- Sample Data Loaded ---"); System.out.println("Initial user count: " + userRepository.count()); System.out.println("Initial post count: " + postRepository.count()); System.out.println("Posts for user Alice (ID " + user1.getId() + "): " + postRepository.findByUserId(user1.getId()).size()); // --- Scenario 1: Unsafe Deletion --- System.out.println("\nATTEMPTING UNSAFE DELETION of user Alice (ID " + user1.getId() + ")"); try { userService.deleteUserAndPostsUnsafe(user1.getId()); } catch (Exception e) { System.err.println("Caught expected exception: " + e.getMessage()); } System.out.println("\n--- State after UNSAFE deletion attempt ---"); System.out.println("Final user count: " + userRepository.count()); System.out.println("Final post count: " + postRepository.count()); userRepository.findById(user1.getId()) .ifPresent(u -> System.out.println("User Alice STILL EXISTS in the database.")); System.out.println("Posts for user Alice: " + postRepository.findByUserId(user1.getId()).size() + " <-- DATA INCONSISTENCY!"); // --- Scenario 2: Safe Deletion --- /* System.out.println("\nATTEMPTING SAFE DELETION of user Alice (ID " + user1.getId() + ")"); try { userService.deleteUserAndPostsSafe(user1.getId()); } catch (Exception e) { System.err.println("Caught expected exception: " + e.getMessage()); } System.out.println("\n--- State after SAFE deletion attempt ---"); System.out.println("Final user count: " + userRepository.count()); System.out.println("Final post count: " + postRepository.count()); System.out.println("Posts for user Alice: " + postRepository.findByUserId(user1.getId()).size() + " <-- DATA IS CONSISTENT!"); */ } -
Run and Observe
Run the application. The console output for the unsafe scenario will show that Alice's posts were deleted, but Alice herself was not. The database is now inconsistent. -
Test the Safe Method
Now, comment out the "Unsafe Deletion" block inDataLoader.javaand uncomment the "Safe Deletion" block. Rerun the application.This time, observe the output. Although the exception is still thrown and caught, the
postRepository.count()andpostRepository.findByUserId(...)calls show that nothing was deleted. The transaction was rolled back, preserving the integrity of your data.
Conclusion
You have now completed the final piece of the Spring Data JPA puzzle. Managing transactions is a fundamental requirement for any robust backend application, and with @Transactional, Spring provides a powerful and elegant way to handle it.
Key Takeaways:
- A transaction ensures a sequence of operations is atomic (all or nothing).
- The
@Transactionalannotation is Spring's primary tool for declarative transaction management. - Place
@Transactionalon public methods in the service layer to define transaction boundaries. - By default, transactions roll back on
RuntimeExceptions but not on checkedExceptions. UserollbackForto customize this. - Use
@Transactional(readOnly = true)for methods that only fetch data to enable performance optimizations. - Propagation rules, like the default
REQUIRED, define how nested transactional calls behave.
This lesson concludes our module on Data Persistence. You've come a long way, from basic entity mappings to complex queries and now, robust transaction management. In our next module, we will shift our focus from data to security, exploring how to protect your API with Spring Security and JSON Web Tokens (JWT).