Welcome to the first lesson in our module on API security! In our previous module, you mastered the intricacies of data persistence with Spring Data JPA, culminating in a deep understanding of how to ensure data integrity using @Transactional. You now have a solid foundation for building the data layer of a robust application. Now, we shift our focus from protecting data in the database to protecting the endpoints that access that data.
This lesson introduces you to the powerful Spring Security framework. Your experience with JWT-based authentication in the MERN stack has already given you a strong appreciation for why API security is critical. Here, we will begin exploring the how within the Spring ecosystem. Our goal is to add Spring Security to your project and explore the powerful "out-of-the-box" auto-configuration that it provides, including its default login form and authentication mechanisms.
What Happens When You Add Spring Security?
In the world of Spring Boot, many powerful features are enabled with a simple addition to your project's dependencies. Spring Security is a prime example of this "convention over configuration" philosophy. Just by adding the spring-boot-starter-security dependency, you fundamentally change your application's behavior.
The short video from Java Brains below demonstrates this "magic" perfectly. You'll see how adding a single dependency instantly secures an application.
Adding Spring Security to new Spring Boot project - Java Brains Brain Bytes
This video shows the immediate, tangible effects of including the Spring Security starter in a project.
Watch the first segment from the beginning of the demo. Pay close attention to two things: The pom.xml dependency being added. The application's behavior before and after the dependency is added. Notice the sudden appearance of a login form.
As you just saw, once Spring Security is on the classpath, Spring Boot's auto-configuration kicks in and does four main things by default:
- Secures All Endpoints: Every single HTTP endpoint in your application now requires authentication. No unauthenticated user can access
/users,/posts, or any other API you've built. - Generates a Login Form: It provides a default, auto-generated login page at
/loginfor browser-based users to authenticate. - Creates a Default User: It creates a default user with the username
userand a unique, randomly generated password that is printed to your application's console log on startup. - Handles Authentication Flow: It manages the process of checking credentials, handling login errors (like "Bad credentials"), and creating a security session upon successful login.
The following article provides a great textual summary of this default behavior.
Spring Security Authentication Tutorial: Basic Auth and Form Login | Spring Boot 123
This article from springboot-123.com clearly outlines the default behavior you can expect.
Read the sections Observing Spring Security’s Default Behavior. This reinforces what you saw in the video, including the console output for the generated password.
How It Works: The Security Filter Chain
This immediate and powerful change isn't magic; it's a well-defined mechanism centered around the concept of Servlet Filters. A filter is an object that can intercept and process HTTP requests before they reach your controllers (@RestController) and after the response is generated.
When you add Spring Security, it inserts a chain of security-related filters into your application's request processing pipeline. This is called the SecurityFilterChain. Every incoming request must now pass through this chain. The default filter chain is responsible for checking if a user is authenticated and, if not, redirecting them to the login page.
The Java Brains video provides an excellent high-level analogy of this process.
Adding Spring Security to new Spring Boot project - Java Brains Brain Bytes
This segment explains the concept of filters and how Spring Security uses them to intercept all requests.
Please watch from this segment for a conceptual overview of the servlet filter mechanism. Don't worry too much about the term "servlet" itself; think of it as the underlying technology that handles web requests in a Java application.
Default Authentication Strategies: Form Login and HTTP Basic
Out of the box, the default SecurityFilterChain enables two primary authentication strategies simultaneously:
- Form-Based Authentication: This is what you see in the browser—a user-friendly HTML form for entering a username and password. This flow is handled by the
UsernamePasswordAuthenticationFilter. - HTTP Basic Authentication: This is a simpler mechanism intended for non-browser clients, like
curl, Postman, or another microservice. The client sends the username and password encoded in theAuthorizationheader of every request. This is handled by theBasicAuthenticationFilter.
Spring Security is intelligent enough to determine which strategy to use. If a request comes from a browser (identified by the Accept header, which typically includes text/html), it will trigger a redirect to the login form. If the request comes from a programmatic client, it will expect an Authorization: Basic ... header and respond with a 401 Unauthorized status if it's missing or invalid.
The "Selenium Express" video, though using a slightly older configuration style, has a great segment that shows both of these filters being active by default.
#3 Spring Security Fundamentals | Basic Authentication Vs Form-Based Authentication | FULL COURSE
This video highlights the two default authentication filters and explains how the server chooses between them.
First, watch the segment from here, where the instructor points out the UsernamePasswordAuthenticationFilter and BasicAuthenticationFilter in the application logs. Then, watch from this part to understand how the server detects whether a request is from a browser versus a REST client, activating the appropriate authentication flow.
Hands-On: Securing the group-manager Project
Now, let's apply this to your group-manager project and see the default behavior firsthand.
1. Add the Spring Security Dependency
Open your pom.xml file. Just like you added starters for Web and Data JPA, add the starter for Security. If you were creating a new project from scratch using an IDE wizard, you would select it from the dependencies list as shown below.
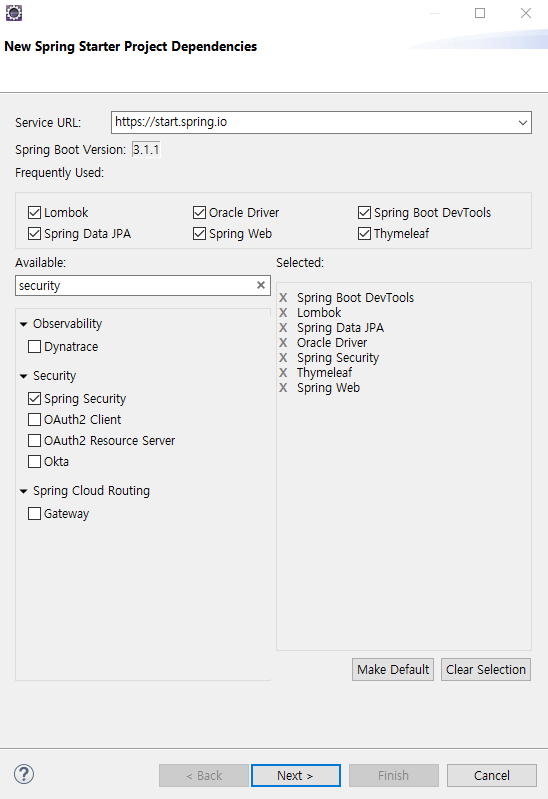
Add the following block within your <dependencies> section in pom.xml:
<dependency>
    <groupId>org.springframework.boot</groupId>
    <artifactId>spring-boot-starter-security</artifactId>
</dependency>
After adding it, let your IDE (like IntelliJ or VSCode) resolve the new dependency.
2. Run the Application and Observe
Restart your group-manager application. Now, open a web browser and navigate to one of your existing endpoints, for example, http://localhost:8080/users.
Instead of seeing a JSON array of users, you will be redirected and presented with a generic login page.

3. Authenticate with the Default Credentials
Check your application's console output in your IDE. You should see a log message containing a generated password, similar to this:
Using generated security password: a1b2c3d4-e5f6-7890-g1h2-i3j4k5l6m7n8
Go back to the login form in your browser.
- Username:
user - Password: Copy and paste the generated password from your console.
Click "Sign in". You should now be successfully authenticated, and your browser will display the JSON output from the /users endpoint.
4. Overriding the Default User for Development
Constantly copying a new password on every application restart is tedious during development. You can easily override the default user by setting properties in your application.properties file.
Open src/main/resources/application.properties and add the following lines:
spring.security.user.name=admin
spring.security.user.password=password
Important Note: This method of setting a plain-text password is for development and testing only. In a production environment, you must never store credentials this way. We will later build a system to load user details from the database.
Now, restart your application. You will no longer see a generated password in the logs. Navigate to http://localhost:8080/users again. When prompted, use the credentials you just defined (admin/password) to log in.
Conclusion
In this lesson, you took the first crucial step into securing your Spring Boot application. You've seen the impressive power of Spring Boot's auto-configuration, where simply adding a dependency can enable a comprehensive, albeit basic, security setup.
Key Takeaways:
- Adding the
spring-boot-starter-securitydependency is all it takes to enable Spring Security. - By default, all endpoints become protected, requiring authentication.
- Spring Security auto-configures both form-based login (for browsers) and HTTP Basic authentication (for APIs/tools).
- A default user (
user) is created with a password logged to the console, which can be easily overridden inapplication.propertiesfor development convenience. - This entire mechanism is orchestrated by a
SecurityFilterChainthat intercepts all incoming requests.
You've now experienced the default behavior. In our next lesson, we will take control. You will learn how to define your own SecurityFilterChain to create custom security rules, such as making some endpoints public (e.g., for user registration) while keeping others protected.