Hello! In our last lesson, we mastered the try-with-resources statement, a crucial tool for ensuring that resources like file streams are closed safely and automatically. This practice is fundamental to building resilient backend applications.
Today, we'll apply that knowledge directly to one of the most common tasks in software development: file input and output (I/O). We will focus on reading from and writing to text files efficiently using Java's BufferedReader and BufferedWriter classes. These are the standard tools for handling text-based data, whether it's configuration files, logs, or data exports—all common scenarios in the enterprise applications you're aiming to build.
1. The Need for Speed: Why Buffering Matters
When your program interacts with a file on disk, it's communicating with the operating system, which in turn controls the physical hardware. These operations are significantly slower than operations that happen purely in memory (RAM).
If you were to read or write a file one character at a time using basic classes like FileReader or FileWriter, each interaction could potentially be a separate, slow request to the disk. For large files, this becomes a major performance bottleneck.
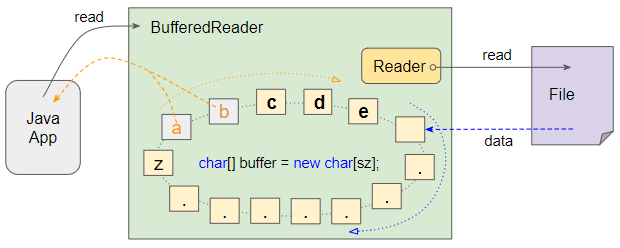
This is where buffering comes in. Instead of going to the disk for every single character, BufferedReader and BufferedWriter use an internal, in-memory buffer (essentially, an array of characters).
- Reading:
BufferedReaderreads a large chunk of data from the file into its buffer at once. When your code requests characters, it gets them from this fast, in-memory buffer, avoiding slow disk access until the buffer is empty and needs a refill. - Writing:
BufferedWritercollects the characters your program wants to write in its buffer. It only writes to the actual file on disk when the buffer is full (or when you explicitly tell it to). This "batching" of write operations dramatically reduces the number of slow disk interactions.
The following diagram illustrates how BufferedReader acts as an intermediary, using its internal char[] buffer to efficiently serve data to the Java application.
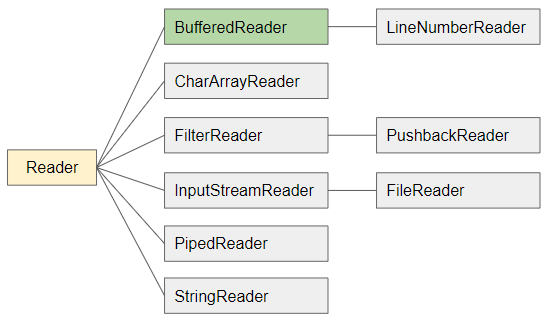
These classes are part of the java.io package and are designed using the Decorator pattern. They "wrap" or "decorate" other Reader or Writer objects (like FileReader and FileWriter) to add buffering functionality.
2. Reading Text Files with BufferedReader
To read from a text file, you'll typically wrap a FileReader inside a BufferedReader. The FileReader handles the connection to the physical file, and the BufferedReader provides the efficient, buffered reading on top of it.
The most common way to read a text file is line by line, using the readLine() method. This method reads an entire line of text and returns it as a String. When it reaches the end of the file and there are no more lines to read, it returns null.
This leads to a very common and elegant pattern for processing a whole file, which you'll see used widely in Java codebases.
// A common pattern for reading all lines from a file.
while ((line = reader.readLine()) != null) {
    // Process the line here
}
Let's break down that while loop condition:
reader.readLine()is called, reading the next line from the file.- The result (the line as a
String, ornull) is assigned to thelinevariable. - The entire expression's value is then compared to
null. - If the line is not
null, the loop body executes. If it isnull, the loop terminates.
The following video provides a concise demonstration of this process, correctly using the try-with-resources statement that you're now familiar with.
How to READ FILES with Java in 8 minutes! 📖
This video from Bro Code walks through reading a text file line by line, covering file paths, try-with-resources, and exception handling.
Watch from the beginning to see how the objects are created and used within a try-with-resources block (object creation). Pay close attention to the explanation of exception handling (catching exceptions) and the final demonstration of the while loop that reads the file line by line.
3. Writing Text Files with BufferedWriter
Writing to files follows a similar pattern. You wrap a FileWriter with a BufferedWriter to gain the performance benefits of buffering.
Key methods of BufferedWriter include:
write(String s): Writes a string to the buffer.newLine(): Writes a platform-independent newline character. This is better than manually writing\nbecause it uses the correct line separator for the operating system (\non Linux/macOS,\r\non Windows).flush(): Forces any data currently in the buffer to be written to the disk immediately. Theclose()method (whichtry-with-resourcescalls for you) automatically flushes the buffer, butflush()is useful if you need to ensure data is written at a specific moment without closing the stream.
To append text to an existing file instead of overwriting it, you can use a special constructor for FileWriter:
new FileWriter("my-file.txt", true); // The 'true' flag enables append mode.
This next article offers a great, no-nonsense guide to using BufferedWriter, including a fantastic analogy to explain buffering.
Master Java BufferedWriter: A No-Fluff Guide to Efficient File Handling - DEV Community
This guide provides practical examples and best practices for using BufferedWriter.
First, read the introduction and the section The "Why" for an excellent analogy about buffering. Then, review the code examples under "How to Use BufferedWriter", which show basic writing and appending. Finally, read the sections on "Best Practices" and the FAQs to reinforce the importance of try-with-resources and other key concepts.
4. Your Turn: A Practical File Processing Task
Now, let's combine reading and writing in a single task. This is a very common pattern in backend development, for example, in ETL (Extract, Transform, Load) jobs where you read data from one source, modify it, and write it to another.
Your Task:
Write a Java program that reads a text file named input.txt, converts the content of each line to uppercase, and writes the transformed lines to a new file named output.txt.
-
Create the Input File:
In the root directory of your Java project, create a new file namedinput.txtand add the following content:Java is an object-oriented programming language. It is used for building robust backend systems. File I/O is a fundamental skill. -
Write the Java Code:
Create a new Java class. Inside themainmethod, implement the logic usingBufferedReaderandBufferedWriter. You can declare both resources in the sametry-with-resourcesblock, separated by a semicolon.import java.io.BufferedReader; import java.io.BufferedWriter; import java.io.FileReader; import java.io.FileWriter; import java.io.IOException; public class FileProcessor { public static void main(String[] args) { String inputFile = "input.txt"; String outputFile = "output.txt"; try (BufferedReader reader = new BufferedReader(new FileReader(inputFile)); BufferedWriter writer = new BufferedWriter(new FileWriter(outputFile))) { String currentLine; while ((currentLine = reader.readLine()) != null) { // 1. Transform the line to uppercase String upperCaseLine = currentLine.toUpperCase(); // 2. Write the transformed line to the output file writer.write(upperCaseLine); // 3. Write a new line after it writer.newLine(); } System.out.println("File processing complete. Check " + outputFile); } catch (IOException e) { System.err.println("An error occurred during file processing: " + e.getMessage()); e.printStackTrace(); } } } -
Run and Verify:
Run your program. It should create a new file,output.txt, in your project directory with the following content:JAVA IS AN OBJECT-ORIENTED PROGRAMMING LANGUAGE. IT IS USED FOR BUILDING ROBUST BACKEND SYSTEMS. FILE I/O IS A FUNDAMENTAL SKILL.
This exercise directly applies everything we've covered today and reinforces the try-with-resources lesson by managing multiple resources safely. You can also consult the "FileCapitalizer" example in the DEV Community article you just reviewed if you need a reference.
Conclusion
You have now learned how to perform one of the most essential operations in Java: reading and writing text files. By using BufferedReader and BufferedWriter, you ensure your code is not just correct, but also efficient, preventing I/O from becoming a bottleneck in your applications.
Key Takeaways:
- Buffering is for performance:
BufferedReaderandBufferedWriterreduce slow disk I/O operations by using an in-memory buffer, making file handling much faster. - They are wrappers: These classes "decorate" other
Reader/Writerobjects (likeFileReader/FileWriter) to add buffering capabilities. - The
readLine()loop is key: Thewhile ((line = reader.readLine()) != null)pattern is the standard, efficient way to process a text file line by line. - Always use
try-with-resources: It guarantees that your file streams are always closed and flushed, preventing data loss and resource leaks.
In our next lesson, we will move beyond simple text. We will explore how to serialize and deserialize entire Java objects using ObjectInputStream and ObjectOutputStream. This will allow you to save the complete state of an object to a file and load it back later—a powerful technique for persisting application data.