Welcome back! In our previous lesson, we built on your exception handling skills by creating custom exception classes. This allowed us to make our error-handling logic more precise and self-documenting—a crucial practice for building the robust backend systems you're aiming for.
Today, we'll tackle another fundamental aspect of robust Java applications: resource management. When you work with external resources like files, network sockets, or database connections, you must ensure they are properly closed, even when errors occur. Failing to do so can lead to resource leaks, which can degrade or even crash an application. This lesson will introduce you to the try-with-resources statement, a modern and elegant Java feature designed to handle this task automatically and safely.
1. The Problem: The Pitfalls of try-finally
Before Java 7, developers relied on the try-catch-finally block to guarantee that resources were closed. While functional, this approach is verbose and prone to error.
Imagine you need to read from a file. You open a stream, read the data, and then you must close the stream in a finally block to ensure it's closed whether the read operation succeeds or fails.
The code looks something like this:
Scanner scanner = null;
try {
    scanner = new Scanner(new File("test.txt"));
    while (scanner.hasNext()) {
        System.out.println(scanner.nextLine());
    }
} catch (FileNotFoundException e) {
    e.printStackTrace();
} finally {
    if (scanner != null) {
        scanner.close(); // What if this also throws an exception?
    }
}
This code has a few problems:
- Verbosity: The resource management logic in the
finallyblock clutters the code, obscuring the primary task of reading the file. - Error-Prone: It's easy to forget the
finallyblock or the null check, leading to resource leaks orNullPointerExceptions. - Masked Exceptions: The
scanner.close()method can also throw anIOException. If the code in thetryblock throws an exception, andclose()also throws one, the second exception from thefinallyblock will "mask" or overwrite the original, more critical exception. This can make debugging incredibly difficult. Your experience with compliance and security audits should give you an appreciation for how critical it is to preserve the full context of an error.
2. The Solution: The try-with-resources Statement
The try-with-resources statement, introduced in Java 7, solves these problems elegantly. It automates the closing of resources, resulting in cleaner and safer code.
The core requirement for a class to be used in a try-with-resources statement is that it must implement the java.lang.AutoCloseable interface. This interface has a single method, close(). Many standard Java classes, especially in I/O and JDBC, already implement this interface.
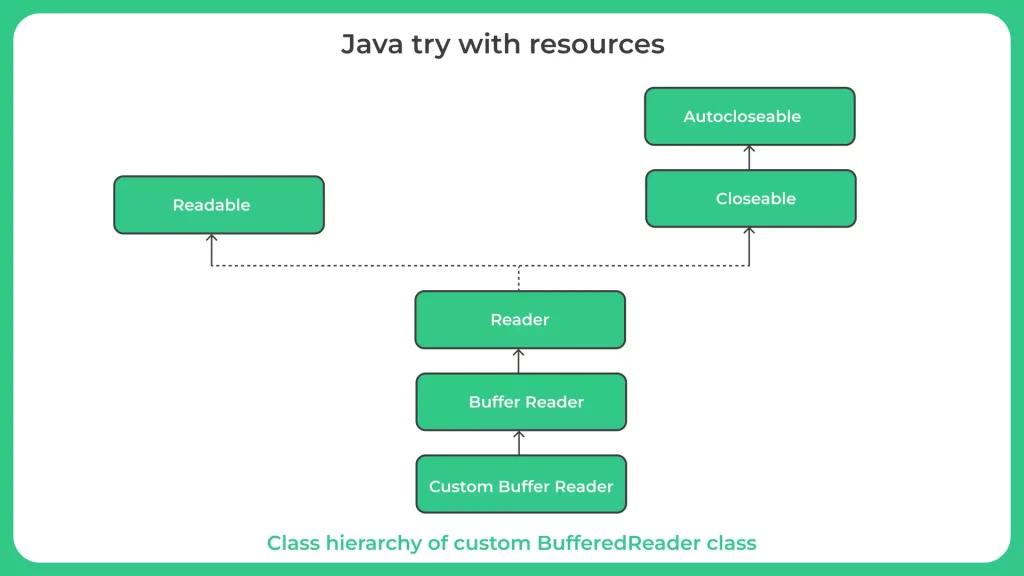
The syntax is simple: you declare and initialize the resource within parentheses after the try keyword.
try (Scanner scanner = new Scanner(new File("test.txt"))) {
    while (scanner.hasNext()) {
        System.out.println(scanner.nextLine());
    }
} catch (FileNotFoundException fnfe) {
    fnfe.printStackTrace();
}
Notice the difference. There's no finally block. The Java runtime guarantees that the scanner.close() method will be called automatically when the try block is exited, for any reason.
The following article gives a fantastic overview of this statement, comparing it directly to the old try-finally approach and detailing its benefits.
Java's try-with-resources Statement Explained - Medium
This article provides a thorough explanation of try-with-resources, starting with the problem it solves and then detailing its syntax and benefits.
Read the introduction to set the context. Then, study the section "Understanding the Syntax", paying close attention to the definition of a resource and the basic syntax. Finally, read the entire section "Benefits of try-with-resources" to understand why this feature is a significant improvement over traditional try-finally blocks.
3. Advanced Usage and Exception Handling
The try-with-resources statement has a few more powerful features that are essential for building complex applications.
Managing Multiple Resources
You can manage multiple resources in a single try block by separating their declarations with a semicolon.
try (BufferedReader br = new BufferedReader(new FileReader("input.txt"));
     BufferedWriter bw = new BufferedWriter(new FileWriter("output.txt"))) {

    String line;
    while ((line = br.readLine()) != null) {
        bw.write(line);
        bw.newLine();
    }
} catch (IOException e) {
    e.printStackTrace();
}
An important detail here is the closing order: resources are closed in the reverse order of their declaration. In the example above, bw would be closed first, and then br would be closed. This is the correct logical order, as you might want to finish writing before you close the source you're reading from.
Suppressed Exceptions
This is where try-with-resources truly shines. It correctly handles the "masked exception" problem. If an exception is thrown from within the try block, and another is thrown from the close() method, the original exception is preserved and propagated. The exception from the close() method is attached to the original one as a suppressed exception.
You can then retrieve these suppressed exceptions from the primary exception in your catch block using the getSuppressed() method. This ensures that no error information is lost.
The following video provides an exceptionally clear and detailed walkthrough of managing multiple resources, the closing order, and the concept of suppressed exceptions.
This video by Jakob Jenkov dives deep into the mechanics of try-with-resources, using custom classes to demonstrate exactly how multiple resources and exceptions are handled.
First, watch the segment on multiple resources to see how they are declared and to understand the reverse-closing order. The most important part is the detailed explanation of exception handling, where the presenter shows what happens when exceptions are thrown from both the try block and the close() method. Finally, see how to programmatically access suppressed exceptions in a catch block.
4. Your Turn: Creating a Custom AutoCloseable Resource
The power of try-with-resources is not limited to Java's built-in I/O classes. You can make any of your own classes compatible by implementing the AutoCloseable interface. This is a common pattern in enterprise applications for managing connections, sessions, or transactions.
Let's create a simple simulation of a database connection that needs to be closed.
Task:
-
Create a
DatabaseConnectionClass:- Create a new class named
DatabaseConnection. - Make it implement the
AutoCloseableinterface:public class DatabaseConnection implements AutoCloseable. - Add a constructor that prints a message:
public DatabaseConnection() { System.out.println("Opening database connection."); } - Implement the
close()method from theAutoCloseableinterface. Have it print a message:@Override public void close() throws Exception { System.out.println("Closing database connection."); } - Add a method to simulate work:
public void executeQuery(String query) {
    System.out.println("Executing query: " + query);
}
- Create a new class named
-
Use it with
try-with-resources:- In your
mainmethod, create an instance ofDatabaseConnectioninside atry-with-resourcesblock. - Inside the block, call the
executeQuerymethod. - Run the code. You should see the "Opening," "Executing," and "Closing" messages printed in the correct order, proving that
close()was called automatically.
public static void main(String[] args) { try (DatabaseConnection dbConnection = new DatabaseConnection()) { dbConnection.executeQuery("SELECT * FROM users"); } catch (Exception e) { e.printStackTrace(); } } - In your
-
Experiment with Exceptions (Optional but Recommended):
- Modify the
executeQuerymethod to throw aRuntimeException. - Run the code again. Observe that the "Closing database connection." message is still printed before the exception stack trace. This proves that the resource is closed even when an error occurs.
- Modify the
This exercise solidifies the concept by having you build the mechanism yourself, which aligns well with your preference for hands-on learning.
Conclusion
You've now mastered the try-with-resources statement, a vital tool for writing safe and modern Java code. By ensuring resources are always closed, you prevent subtle but serious problems like resource leaks, which are critical to avoid in the high-performance backend systems you aim to build.
Key Takeaways:
- The
try-with-resourcesstatement provides automatic resource management for any object that implements theAutoCloseableinterface. - It drastically reduces boilerplate code compared to the traditional
try-catch-finallyblock, making code cleaner and less error-prone. - Multiple resources can be declared in a single
tryblock and are closed in the reverse order of their declaration. - It improves exception handling by preserving the original exception and attaching any exceptions from the
close()method as "suppressed exceptions."
In our next lesson, we will put this new skill to immediate use. We'll dive into file I/O by learning to read from and write to text files using BufferedReader and BufferedWriter, two classic AutoCloseable resources.