Hello and welcome to the next lesson in your journey to becoming a data center professional.
In our last session, we configured RAID arrays, creating logical storage volumes from multiple physical disks. Today, we get hands-on with those physical components. You'll learn how to perform some of the most common tasks in a data center: replacing essential hardware.
This lesson directly addresses the learning outcome: Install and replace components (drives, RAM, PSU) in a rack-mount server, using hot-swap capabilities where available. We will focus on the "how" – the physical steps and safety procedures – and the "why" – particularly the concept of hot-swapping, which is critical for maintaining server uptime. Mastering these physical tasks complements the logical configuration skills you've already started building.
1. The Concept of Hot-Swapping
In a data center environment, the goal is to keep servers running 24/7. Taking a server offline to replace a failed component is a significant disruption. Hot-swapping (or hot-plugging) is a technology that allows you to remove and replace components while the server is still running.
Not all components are hot-swappable. The most common examples are hard drives and redundant power supply units (PSUs). Their design allows them to be safely disconnected and reconnected to the system's power and data buses without interrupting operations. Other components, like RAM or the CPU, typically require the system to be powered down and are considered cold-swap.
2. Replacing Hard Drives in a RAID Array
In the previous lesson, you learned to configure a RAID 1 or RAID 5 array for redundancy. What happens when a drive in that array fails? Thanks to RAID and hot-swap technology, you can replace it without any downtime.
The server will indicate a failed drive, usually with an amber or red LED light on the drive carrier. Your job is to physically replace that drive.
PowerEdge: How To Install or Hot Swap a Replacement Hard Drive
This Dell knowledge base article provides a step-by-step guide for physically replacing a hot-swappable hard drive. It covers the entire process from removing the old drive to installing the new one.
Please read the sections titled 'Physical disk removal from server and carrier' and the instructions that follow for installing the new drive. Pay close attention to the use of the release button and drive carrier. You'll find these instructions just below the 'Pre-removal Instructions'.
The process described in the article is the standard procedure in any data center:
- Identify: Confirm which drive has failed via the indicator LED.
- Release: Press the release button to pop open the carrier handle.
- Remove: Slide the entire drive carrier out of the server chassis.
- Swap: Remove the failed drive from the carrier (usually held by four screws) and secure the new, replacement drive in the carrier.
- Insert: Slide the carrier with the new drive back into the empty slot until it connects with the backplane.
- Secure: Close the handle to lock the drive in place.
Once the new drive is locked in, the RAID controller will detect it and, for redundant arrays (like RAID 1, 5, 6, 10), automatically begin the rebuild process. It will use the data and parity information from the other drives to reconstruct the lost data onto the new drive, restoring the array to a healthy state.
To see this in action, the article you just reviewed links to a helpful video.
PowerEdge: How To Install or Hot Swap a Replacement Hard Drive
This short video from Dell demonstrates the hot-swap process for a hard drive in a rack server, providing a clear visual for the steps you just read about.
In the article you just read, scroll down to the section 'Videos on how to replace a disk...' and watch the video titled 'PowerEdge Rack Hot Swap HDD Replacement'. It will bring the text instructions to life.
3. Replacing a Hot-Swap Power Supply Unit (PSU)
Just like hard drives, server PSUs are designed for redundancy and high availability. Most servers have two or more PSUs. If one fails, the other(s) take the full load, and the server continues to run. You can then hot-swap the failed unit.
The process is similar to replacing a drive: identify the failed unit (again, typically via an LED status indicator), unplug its power cord, unlatch it, and slide it out.

Let's watch a practical demonstration.
Swapping out a Hot Plug Power Supply in Running Server - 432
This video shows the process of identifying and replacing a faulty hot-swap PSU on a running server. It's a great real-world example of troubleshooting and maintaining a server without downtime.
Watch the segment from 03:40 to 05:15. The presenter first identifies the failed PSU by checking the status LEDs, then unplugs and replaces it while the server remains powered on. Notice how the new PSU's LEDs confirm it's working correctly (both AC and DC power are good).
This ability to replace a critical power component without scheduling a maintenance window is a cornerstone of data center operations.
4. Installing and Upgrading Server RAM (Cold-Swap)
Unlike drives and PSUs, memory modules (DIMMs) are cold-swap. This means you must completely power down the server and unplug it from its power source before you can install or replace RAM. This is also where anti-static precautions are most critical.
Server RAM Fundamentals
Before we get to the physical installation, it's important to understand a few things about server RAM that differentiate it from standard desktop memory. Since this is a key area for technical interviews, getting the theory right is as important as the practice.
TechMike's How To: Upgrading RAM in a Server
This article from TechMikeNY gives a concise overview of the key features of server RAM and the rules for installation.
Please read the sections 'First, Let’s Cover the Basics of Server RAM' and 'RAM Upgrade Do’s And Don’ts'. Focus on understanding what ECC and Registered RAM are, and the rules for mixing modules of different capacities and speeds.
Key points from the reading:
- ECC (Error-Correcting Code) RAM: Can detect and correct single-bit memory errors, which is vital for server stability.
- Registered (Buffered) RAM: Contains a register that reduces the electrical load on the memory controller, allowing a server to support a large number of memory modules.
- Mixing RAM: You can mix speeds and capacities, but the system will run all modules at the speed of the slowest module, and you must follow specific installation order rules for capacity.
The Physical Installation Process
Now, let's walk through the physical process.
- Power Down & Safety: Shut down the server OS, then disconnect the power cords. Move the server to an anti-static mat and wear an ESD wrist strap.
- Open the Chassis: Remove the server's top cover.
- Access the DIMMs: You will likely need to remove a plastic air shroud or baffle, which is designed to direct airflow over the CPUs and RAM.
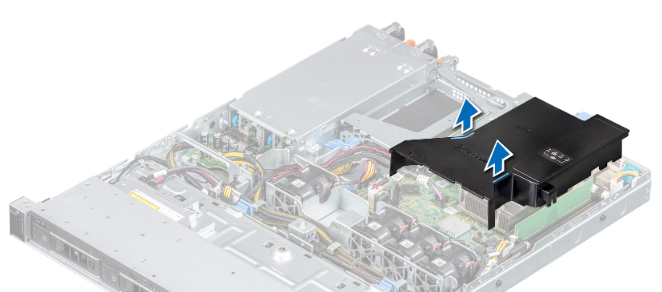
- Install the DIMMs: This is the most crucial step, and it has specific rules for optimal performance. Let's watch an expert do it.
Dell PowerEdge R730 Server Memory Overview & Upgrade | How to Install Memory | Supported R730 DIMMs
This video from Cloud Ninjas provides an exceptionally detailed guide to installing RAM in a Dell PowerEdge server. It covers not just the physical action but also the critical theory behind memory channel population.
This video is packed with valuable information. Please watch carefully from 03:17 to 11:13. Memory Channels (03:17 - 06:07): Pay close attention to the explanation of how DIMM slots are organized into channels controlled by each CPU. The concept of 'balancing channels' by populating the white slots first across both CPUs is a key performance principle. Installation Technique (06:07 - 11:13): Observe the physical installation. Note the tips on opening the tabs, aligning the notch on the DIMM (which is off-center), and ensuring the module is fully seated by listening for the two 'clicks' as the tabs lock into place.
The key to server memory installation is balance. As the video explains, each CPU controls a set of memory channels. For the best performance, you must distribute the memory modules evenly across the channels and, in a dual-CPU system, across both processors. Server motherboards and air baffles are almost always color-coded and labeled to guide you. The rule is typically to populate the first slot of each channel (e.g., the white slots) before moving to the second slot of each channel (the black slots), and so on.
Conclusion
In this lesson, we moved from logical configuration to physical action, covering the essential maintenance tasks of replacing server components.
Key Takeaways:
- Hot-swap components like HDDs and PSUs can be replaced while the server is running, maximizing uptime. The process involves identifying the failed unit, using release latches, and swapping it out.
- Cold-swap components like RAM require the server to be fully powered down.
- When replacing a drive in a redundant RAID array, the controller will automatically rebuild the data onto the new drive.
- Server RAM installation requires adherence to specific rules regarding memory channels to ensure balanced loading and optimal performance. Always follow the color-coding and labels on the motherboard.
- Safety is paramount. Always use proper ESD protection when handling internal components.
In our next lesson, we'll learn how to access a server's remote management interface (IPMI/iLO/iDRAC). This powerful tool allows you to do things like monitor the health of the components we discussed today (e.g., check PSU status or watch the RAID rebuild progress) and control the server remotely, as if you were standing right in front of it.