Hello and welcome to our next lesson!
In our previous session, we looked at the external design of servers, comparing tower, rack, and blade form factors to understand how they fit into different environments. Now, we're going to move inside the server to configure one of its most critical subsystems: storage.
Today's lesson addresses the learning outcome: Configure a hardware RAID array (e.g., RAID 1, 5, 10) and explain the trade-offs of the chosen level for a given scenario. This is a fundamental skill for any data center or systems administration role. It's not enough to just set up a server; you need to ensure the data it holds is both safe and accessible at the required speed. Mastering this topic will enable you to make and justify critical infrastructure decisions, a skill highly valued by employers.
We will cover:
- The core concepts of RAID: what it is and why it's essential.
- The most common RAID levels and their trade-offs in terms of performance, capacity, and redundancy.
- A practical look at how to configure RAID arrays using server hardware management interfaces.
1. What is RAID?
RAID stands for Redundant Array of Independent Disks. At its heart, RAID is a technology that combines multiple physical disk drives into a single logical unit. The operating system sees this group of disks as one single volume, but behind the scenes, a RAID controller manages how data is written to and read from the individual disks.
Why do we do this? The two primary goals are:
- Data Redundancy: To protect against data loss if one or more disk drives fail.
- Performance Improvement: To increase the speed at which data can be read from or written to the disks.
Different RAID configurations, known as "RAID levels," prioritize these goals differently.
Let's start with a foundational reading from Dell that introduces the concept.
RAID Made Simple: Complete Guide for Dell Systems
This guide from Dell provides a clear and straightforward introduction to RAID, explaining what it is and why it's a crucial technology in servers.
Please read the first two main sections: 'Understanding RAID: What It Is and Why It Matters' 'Why Choose RAID for Your Dell System?' Focus on how RAID turns multiple drives into a single logical unit and the main benefits it provides.
Hardware vs. Software RAID
In a server environment, you will almost exclusively work with Hardware RAID. This means a dedicated physical card or a chip on the motherboard (a RAID controller) has its own processor and memory to manage the RAID array. This offloads the complex task of RAID management from the server's main CPU, ensuring better performance and reliability.
The alternative, Software RAID, uses the main CPU to manage the disks. While cheaper (since no extra hardware is needed), it consumes system resources and is generally not used for critical server workloads. Given your ECE background, you can think of this as the difference between having a specialized co-processor for a task versus emulating its function on the general-purpose CPU. The hardware solution is almost always superior for demanding applications.
2. The Trade-offs: Choosing the Right RAID Level
The most important part of working with RAID is understanding that there is no single "best" level. The choice is always a trade-off between Performance, Redundancy (Safety), and Capacity.
The core techniques used to achieve this balance are:
- Striping: Data is split into blocks and written across multiple disks simultaneously. This dramatically improves performance but offers no redundancy.
- Mirroring: Data is duplicated and written to two or more disks. This provides excellent redundancy but at the cost of usable capacity (you only get the capacity of one disk).
- Parity: A calculated value is created from the data blocks and stored on a disk. If a disk fails, the RAID controller can use the parity information on the remaining disks to reconstruct the lost data. This offers a balance between redundancy and capacity.
This image provides a great visual summary of how the most common RAID levels use these techniques.

Now, let's dive into the specifics of each common RAID level. This is the knowledge you'll use to answer interview questions like, "For a database server that needs high performance and fault tolerance, what RAID level would you recommend and why?"
[PDF] Choosing the Right RAID Level
This technical white paper from Microchip provides an excellent, in-depth look at the characteristics, pros, cons, and typical use cases for each RAID level. The diagrams are particularly helpful for visualizing how data is handled.
Please read the following sections, paying close attention to the diagrams and the 'Usage', 'Pros', and 'Cons' for each: 7.1 RAID 0 (Striping) 7.2 RAID 1 (Mirroring) 7.4 RAID 5 (Striping with Parity) 7.5 RAID 6 (Striping with Dual Parity) 7.6 RAID 10 (Striping and Mirroring) As you read, try to formulate an answer for the database server question I posed above.
Summary of Trade-offs
Let's consolidate what you've learned into a quick-reference table. This is a powerful tool for comparing the levels at a glance.
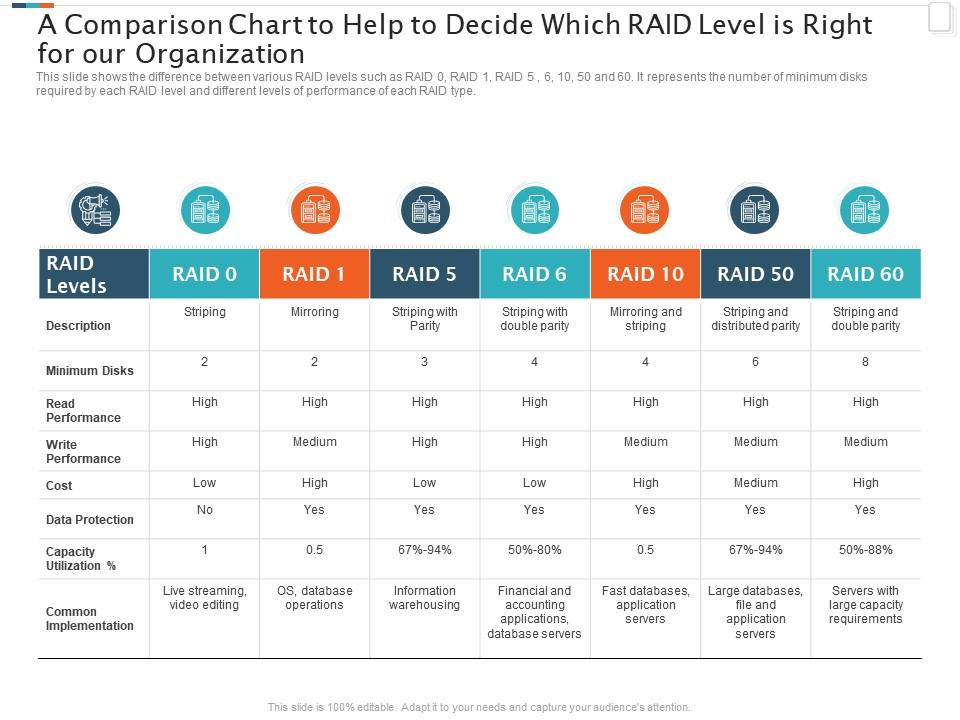
Here are some common scenarios you'll encounter in a data center and the typical RAID choices:
| Scenario | Recommended RAID Level | Justification |
|---|---|---|
| Server Operating System Drive | RAID 1 | The OS needs to be highly available. RAID 1 provides excellent redundancy with a simple mirror. If one drive fails, the server continues to run from the other. Performance is not the primary concern. |
| Database Server (High I/O) | RAID 10 | Databases perform many small, random read/write operations. RAID 10 offers the best performance for this workload (due to striping) and excellent protection (due to mirroring), without the write penalty of parity RAID. |
| General File Server / Application Server | RAID 5 or RAID 6 | These workloads need a good balance of capacity, performance, and protection. RAID 5 offers a great cost-per-gigabyte with single-drive failure protection. RAID 6 is used when data is more critical and two-drive failure protection is required. |
| Video Editing / Scratch Disk | RAID 0 | In this rare case, raw speed is the only priority, and the data is temporary or easily recreated from another source. The high risk of data loss is acceptable in exchange for maximum performance. |
3. Practical Application: Configuring a Hardware RAID Array
Now that you understand the theory, let's see what this looks like in practice. You'll configure hardware RAID through a utility that you access during the server's boot process, before the operating system loads. The user interface varies by vendor (e.g., Dell's PERC, HPE's Smart Array), but the concepts are universal.
We'll watch two videos showing this process on servers from two major vendors: Dell and HP.
First, let's see how it's done on a Dell PowerEdge server. Pay attention to how the administrator creates two separate RAID arrays (called "Virtual Disks") for different purposes.
How to Configure RAID for Dell PowerEdge Servers
This video from TechMikeNY demonstrates configuring RAID on a Dell server using the PERC controller utility. It's a great example of a common real-world task.
Watch from 00:33 to 03:39. Focus on these key steps: Clearing existing configuration (a crucial first step). Creating a RAID 1 array (often for the OS). Creating a RAID 5 array using the remaining disks (for data). Configuring a hot spare drive, which automatically takes over if another drive in the array fails.
Next, let's see the same process on an HP Enterprise (HPE) server. Notice that the interface is graphical, but the underlying tasks—selecting disks, choosing a RAID level, and creating a logical drive—are exactly the same.
Setting Up Disk Array's - HPE Smart Storage Administrator - 1158
This video from My PlayHouse (Morten Hjorth) walks through the HPE Smart Storage Administrator. This shows that while the tools differ, the RAID concepts are identical across platforms.
Please watch the following segments: Deleting an Array: from 07:49 to 08:56. This is equivalent to 'clearing the config' in the Dell video. Creating a RAID 1 Array: from 08:56 to 11:45. Creating a RAID 5 Array with a Hot Spare: from 16:53 to 20:13. Note how the presenter explicitly creates an array with three disks and then assigns the fourth as a dedicated spare for that array.
By watching both videos, you've seen how the theoretical concepts of RAID levels and hot spares are applied in practice across different hardware, preparing you for the diverse environments you'll find in a data center.
Conclusion
In this lesson, we bridged the gap between RAID theory and practical application. You now have the framework to make informed decisions about storage configurations based on specific operational needs.
Key Takeaways:
- RAID is a trade-off between Performance, Redundancy, and Capacity.
- Hardware RAID controllers are standard in servers to provide reliable, high-performance storage management without burdening the CPU.
- Common RAID levels have distinct use cases: RAID 1 for OS drives, RAID 10 for high-performance databases, and RAID 5/6 for general-purpose storage.
- Configuration is done through pre-boot utilities (like Dell's PERC or HPE's Smart Storage Administrator), where you create logical volumes (Virtual Disks) from physical disks.
In our next lesson, we will continue our hands-on exploration of server hardware. We will focus on the outcome: "Install and replace components (drives, RAM, PSU) in a rack-mount server, using hot-swap capabilities where available." This will build directly on today's topic, as you learn how to physically manage the drives that make up your RAID arrays.