Hello! Welcome to the next lesson in our journey through server hardware.
In our last session, we focused on monitoring servers remotely. You learned how to access the Baseboard Management Controller (BMC) through interfaces like iDRAC and ipmitool to check hardware health and review system event logs.
Today, we shift from passive monitoring to active control. This lesson will equip you with the skills to manage a server as if you were physically sitting in front of it, even if it's thousands of miles away. We'll cover the three essential pillars of remote server control, directly addressing the learning outcome: Use the remote management interface to perform power control, launch a remote console (KVM), and mount virtual media.
Mastering these skills is non-negotiable for any data center or systems administration role. When an interviewer asks how you'd provision a new server or fix a non-booting machine in a remote data center, this lesson provides the answer.
1. The Three Pillars of Remote Control
Before we dive into specific vendor interfaces like iDRAC or iLO, let's understand the fundamental capabilities they all provide. A great way to see these concepts in their raw form is by looking at an open-source solution called PiKVM, which uses a Raspberry Pi to provide remote management for any computer.
Your background in electronics will make the underlying principles here quite intuitive. PiKVM essentially builds a DIY remote management device by combining a video capture module (for the 'V' in KVM), a USB device emulator (for the 'K' and 'M'), and GPIO-controlled relays (for power control).
IPMI and Remote Management for Any Motherboard! PiKVM
This video from Wolfgang's Channel on the PiKVM project perfectly breaks down the core functions of a remote management system. It's a great way to understand the 'how' and 'why' before we look at the polished enterprise versions.
Please watch the following segments: PiKVM Features (01:22 - 02:24): Pay close attention to the four main features the presenter outlines. These are the building blocks of remote control. Web Interface Demo (05:04 - 05:32): Observe how the web interface allows the user to perform the key actions: viewing the display, rebooting the server, accessing the BIOS, and mounting an ISO file. As you watch, think about how each feature solves a specific problem you might face when a server is not physically accessible.
As you saw, the essential functions are:
- Power Control: The ability to turn a machine on, off, or restart it.
- KVM (Keyboard, Video, Mouse): A "remote desktop" for the server's direct console output, including the BIOS/UEFI screens that appear before the operating system loads.
- Virtual Media: The ability to make the server "see" a remote ISO file as if it were a local USB stick or CD/DVD.
Enterprise solutions like Dell's iDRAC and HPE's iLO provide these exact same capabilities in a highly integrated and robust package.
2. Remote Control in the Enterprise: A Practical Tour
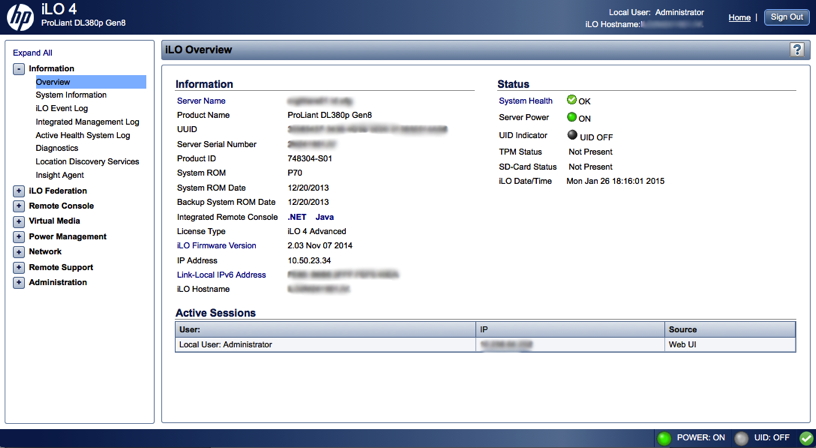
Now, let's see how these features are presented in a typical enterprise remote management interface. The specific labels and locations may vary between Dell iDRAC and HPE iLO, but the functionality is identical.
A. Power Control
This is more than just an on/off switch. Remote management interfaces give you granular control over the server's power state. The common options are:
- Momentary Press (On/Off): Simulates a quick press of the physical power button. If the OS is running, this will trigger a graceful shutdown.
- Press and Hold (Force Off): Simulates holding the power button down for several seconds. This is an abrupt shutdown and should only be used if the server is completely unresponsive.
- Reset (Force Reset): Simulates a press of the physical reset button. This is also an abrupt action that immediately reboots the server without shutting down the OS.
- Power On / Power Off: Turns the server on or off.
For a quick demonstration of where to find these controls, let's look at the HPE iLO interface.
This short demo from HPE shows the iLO 6 interface. We'll focus on the power control and remote console sections.
Watch the first 24 seconds (00:00 - 00:24). The presenter points out the power status icon and the menu for power operations.
B. Remote Console (KVM-over-IP)
The remote console is your virtual window into the server. It streams the server's video output to your browser and sends your keyboard and mouse inputs back to the server. This is often called KVM-over-IP. Its most critical use is for tasks that happen outside the main operating system, such as:
- Configuring BIOS/UEFI settings.
- Interacting with the bootloader (like GRUB).
- Troubleshooting a failed OS boot.
- Installing a new operating system.
Let's continue with the HPE demo to see a remote console being launched.
The same HPE demo video shows the process of launching the HTML5 remote console.
Watch the segment from 01:30 to 01:55. Notice how the user can launch a full-screen console directly from the web UI and send keyboard commands like Ctrl+Alt+Delete.
Dell's iDRAC provides an identical function. The following guide provides clear, step-by-step instructions for launching the Virtual Console in different iDRAC versions.
How to Launch the iDRAC Virtual Console
This Dell support article is a practical reference for accessing the remote console on a Dell server. It's good to be familiar with the process for different vendor UIs.
Quickly read the sections 'Launching the iDRAC virtual console using web interface' and 'Launching the iDRAC virtual console using a URL'. This shows the two main ways to get the KVM session started.
C. Virtual Media
This is arguably the most powerful feature for deploying and recovering servers. Virtual Media allows you to mount an ISO image (e.g., a Linux installer, a firmware update disc, or a recovery tool) from your local machine or a network share and present it to the server as if it were a physical USB CD-ROM drive.
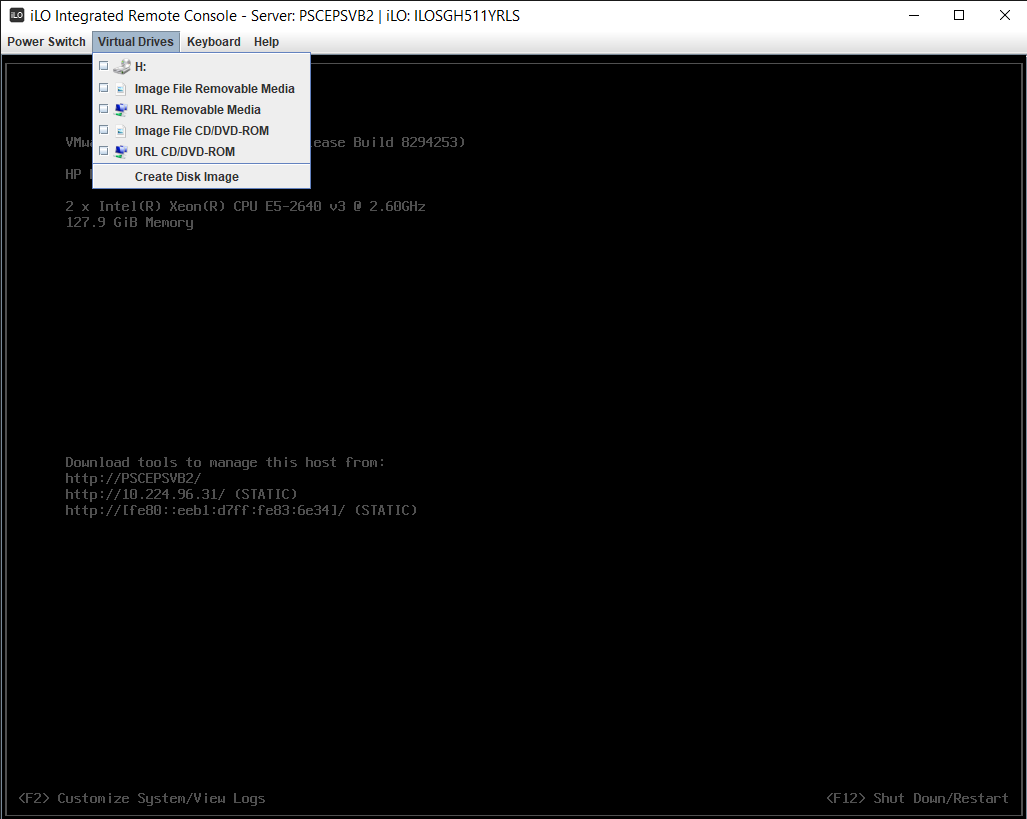
To fully grasp the concept and its practical uses, please read the following article. It does an excellent job of explaining not just the "how" but also the "why."
How to use Virtual Media in iDRAC and IPMI
This article from Netrouting provides a deep dive into using Virtual Media with both iDRAC and IPMI. It covers the core concept, different ways to mount media, and common troubleshooting steps.
Please read the following sections: '1 — What “virtual media” actually is': This section gives a concise definition. '6 — Mounting ISOs: local file vs HTTP(S) vs NFS': This is crucial for interviews. Understand the difference between streaming an ISO from your laptop versus having the BMC pull it from a network share. What are the pros and cons? 'Final tips & recommended workflow (practical)': This summarizes the best practices for using virtual media effectively.
3. Practice Drill: Remote OS Installation Workflow
Let's put all three components together in a scenario you will perform countless times in your career.
Your Task: You are assigned a brand-new, bare-metal server in a remote data center. You need to install Ubuntu Server 22.04 on it.
Here is the step-by-step workflow you would follow, using only the remote management interface:
- Access and Login: Open a web browser, navigate to the server's iDRAC/iLO IP address, and log in.
- Mount Media:
- Navigate to the Virtual Media section.
- Choose to map a CD/DVD or connect virtual media.
- Select "Choose File" (or similar) and browse your local machine for the
ubuntu-22.04-live-server-amd64.isofile. - Click the "Map Device" or "Connect" button to attach the ISO to the server.
- Launch Console: Open the Remote Console (Virtual Console/KVM). You should now have a window showing the server's screen, which is likely blank or sitting at a POST screen.
- Set Boot Order:
- Inside the console window, find the "Next Boot" or "Boot Control" menu.
- Select Virtual CD/DVD/ISO as the one-time boot device. This tells the server to boot from our mounted ISO on the next restart, instead of its hard drives.
- Power Cycle:
- Using the Power Controls menu in the main iDRAC/iLO window or within the KVM, select Reset or Power Cycle.
- Install the OS:
- Watch the server boot up inside the remote console window. It will now boot into the Ubuntu installer from the virtual ISO.
- Use your keyboard and mouse in the console window to proceed with the entire Ubuntu Server installation, just as if you were physically at the machine.
- Cleanup: Once the installation is complete and the server reboots, remember to go back to the Virtual Media section and unmount or disconnect the ISO file.
This workflow combines all three pillars of remote control to accomplish a real-world task efficiently and without any physical intervention.
Conclusion
You have now moved from being a remote observer to a remote operator. You have the fundamental skills to control a server's power, see its console, and attach bootable media from anywhere with a network connection.
Key Takeaways:
- Remote management interfaces provide three core control functions: Power Control, Remote Console (KVM-over-IP), and Virtual Media.
- Power Control gives you precise, out-of-band control over the server's power state, which is essential for recovering hung systems.
- The Remote Console provides direct, low-level access to the server's video and input, crucial for BIOS/UEFI configuration and OS-level troubleshooting when SSH is unavailable.
- Virtual Media is the standard mechanism for remotely installing operating systems, running diagnostics, or applying updates from bootable ISO images.
In our next lesson, we will dive deeper into the diagnostic side of remote management. We'll learn how to interpret server hardware logs to identify trends indicating impending component failure, moving from reactive fixes to proactive maintenance.