Hello! Let's dive into the next step of your Linux system administration journey.
In our previous lesson, you learned how to create and manage user and group accounts. That was about controlling who can log in to the system. Now, we'll focus on controlling what they can do once they're there. This is a critical aspect of securing any multi-user system, from a single server to an entire data center.
This lesson directly addresses the learning outcome: Modify file permissions and ownership using chmod and chown to secure system resources. We will dissect how Linux handles file access and give you the tools—your "katana," so to speak—to control it precisely. By the end, you'll be able to explain not just how to change permissions, but why you'd choose one permission set over another, a key skill for any technical interview.
1. Understanding the Linux Permissions Model
Before you can change permissions, you need to be able to read them. The permissions model in Linux is built on three simple concepts:
- Ownership: Who do the permissions apply to?
- User (u): The owner of the file.
- Group (g): The group that owns the file.
- Other (o): Everyone else.
- Permissions: What can they do?
- Read (r): View the contents of a file or list the contents of a directory.
- Write (w): Modify a file or modify the contents of a directory (create/delete/rename files within it).
- Execute (x): Run a file (if it's a program or script) or enter a directory (using
cd).
- File Type: Is it a file, directory, or something else?
To see all this information, we use the ls -l command (long listing format).
Let's watch a short video that breaks down the output of ls -l and introduces these core concepts.
How to use chmod | Manage File Permissions in Linux
The video 'How to use chmod' from Akamai Developer provides a clear, concise explanation of how to interpret file permissions in the terminal.
Watch from 00:46 to 05:37. Focus on understanding the four parts of the permission string: file type, user permissions, group permissions, and other permissions.
Here is a visual breakdown of that same ls -l output to reinforce what you just saw:

A Crucial Distinction: Files vs. Directories
The meaning of r, w, and x changes depending on whether you're applying them to a file or a directory. This is a very common point of confusion, so it's vital to understand the difference.
The next segment of the video explains this perfectly.
How to use chmod | Manage File Permissions in Linux
Let's continue with the Akamai Developer video to understand how permissions behave differently for files and directories.
Watch from 12:37 to 14:52. Pay close attention to the meaning of 'execute' on a directory—it means you can cd into it.
To summarize this critical point:
| Permission | On a File | On a Directory |
|---|---|---|
| Read (r) | View the file's content. | List the names of files inside the directory (ls). |
| Write (w) | Change the file's content. | Create, delete, or rename files within the directory. |
| Execute (x) | Run the file as a program or script. | Enter the directory (cd). |
Without execute (x) permission on a directory, you cannot access any files inside it, even if you have read (r) permission on those files!
2. Modifying Permissions with chmod
The chmod (change mode) command is your primary tool for modifying these permissions. There are two ways to use it: symbolic mode and absolute (or octal) mode.
Symbolic Mode
Symbolic mode is intuitive. You use letters to specify who (u, g, o, a for all), an operator (+ to add, - to remove, = to set exactly), and which permission (r, w, x).
Examples:
chmod u+x myscript.sh: Adds execute permission for the user.chmod g-w shared_file: Removes write permission for the group.chmod o=r public_doc: Sets the permissions for others to be read-only.chmod ug+w,o-w project_dir: You can combine operations. Here, we add write for user/group and remove it for others.
Watch this segment to see it in action.
How to use chmod | Manage File Permissions in Linux
The Akamai Developer video demonstrates how to use chmod in symbolic mode.
Watch from 06:51 to 10:09. Observe how the +, -, and = operators work to modify permissions for different owners.
Absolute (Octal) Mode
Absolute mode uses numbers and is the method you'll most often see in documentation and scripts because it's concise. Each permission is assigned a numerical value:
- Read (r) = 4
- Write (w) = 2
- Execute (x) = 1
You add these numbers to get the desired permission set for each owner category (user, group, other).
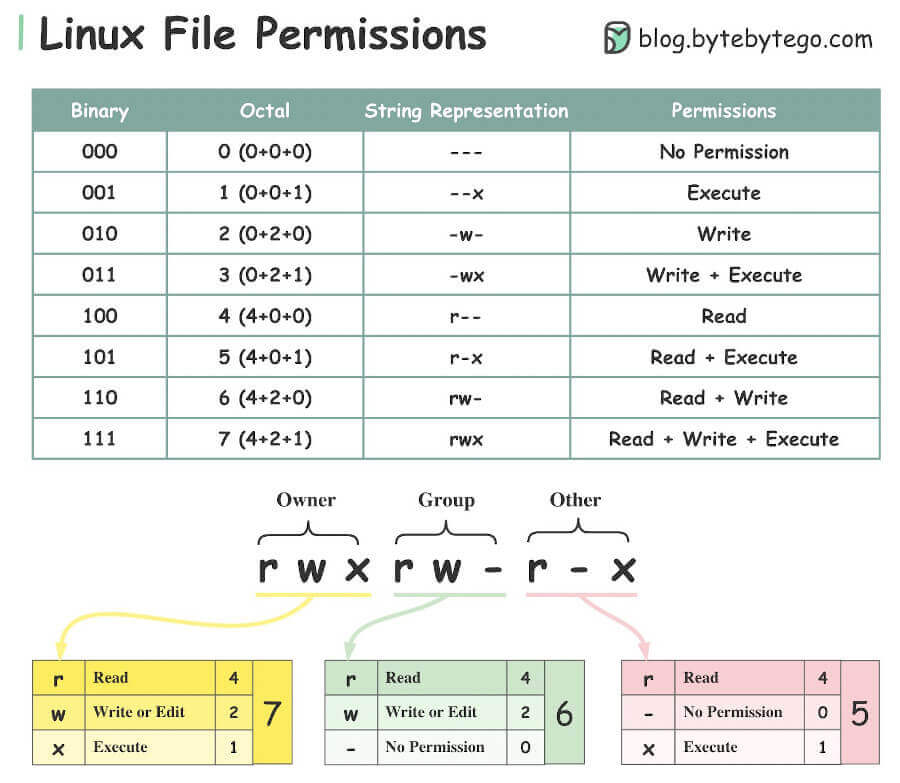
A three-digit number represents the permissions for user, group, and other, in that order.
chmod 755 my_script.sh- User: 7 (4+2+1) = rwx
- Group: 5 (4+1) = r-x
- Other: 5 (4+1) = r-x
chmod 644 config.txt- User: 6 (4+2) = rw-
- Group: 4 = r--
- Other: 4 = r--
Let's see the video demonstration for this method.
How to use chmod | Manage File Permissions in Linux
Now, let's look at the numerical method, which is very common in practice.
Watch from 10:09 to 12:37. Focus on how the numbers 4, 2, and 1 are summed up to create the final permission set for each of the three owner categories.
3. Changing Ownership with chown
What if the wrong user or group owns a file? The chown (change owner) command solves this. This is where our previous lesson on creating users and groups connects directly.
The basic syntax is chown [new_user]:[new_group] filename.
sudo chown bob project.txt: Changes the user owner tobob.sudo chown :developers project.txt: Changes the group owner todevelopers. (Note the leading colon).sudo chown bob:developers project.txt: Changes both the user and group owner simultaneously.sudo chown -R bob:developers /srv/project_data: The-R(recursive) flag is extremely useful and powerful. It applies the ownership change to a directory and all files and subdirectories inside it.
This video provides a practical demonstration.
File Ownership and Chown - Linux Tutorial 22
In 'File Ownership and Chown' by Caleb Curry, you'll see how to transfer ownership between different users and groups.
Watch from 00:00 to 02:39 and then from 03:25 to 05:34. This will show you how to change the group owner and the user owner, and you'll see the immediate effect this has on file access.
4. Your Turn: A Real-World Scenario
It's time for hands-on practice. We'll follow a detailed guided exercise that brings together everything from this lesson and the last one. You'll create a shared directory for a development team, set the correct ownership, and apply permissions to ensure only team members can access it.
This is a classic system administration task. Please open the terminal in your Linux VM and follow along.
Linux chmod and chown – How to Change File Permissions and Ownership in Linux
The article 'Linux chmod and chown' from freeCodeCamp includes an excellent, step-by-step guided exercise. We will use this to apply your new skills.
Find the section titled 'Linux Permissions Guided Exercise' and follow all 18 steps in your terminal. This will require you to use commands from the previous lesson (useradd, groupadd, passwd, su) and today's lesson (chown, chmod). Don't just copy-paste; take a moment with each command to understand what it's doing.
5. Interview Prep Challenge
To solidify your understanding and prepare for technical questions, try to solve these challenges without looking at the solution first.
The resource below contains a set of problems. Try these specific ones:
- Question 6: Make
/work/shellexecutable. - Question 9: Create a new directory
/work/sample. Set its permissions such that only the user can read. - Question 10: Change the group of the shell binary to the ‘admin’ group.
- Question 11: Change the owner of the shell binary to the ‘student’ user.
You'll need to create some placeholder files/directories and users/groups to simulate the environment described. The commands to do so are your solution!
Practice Linux Permissions Basics with 13 Easy Questions [Part I]
The article 'Practice Linux Permissions Basics' from Pentester Academy Blog offers a great set of challenges. Answering these will test your practical application of chmod and chown.
First, read questions 6, 9, 10, and 11 in the 'Challenge Statement' section. Try to write down the commands you would use to solve them. Then, check your work against the solutions provided in the 'Solution' section further down in the article.
Conclusion
Great work! You now have the essential tools and concepts to control file and directory access on a Linux system. This is a cornerstone of system security and administration.
Key Takeaways:
- Permissions are viewed with
ls -l. - Access is defined for three classes: User, Group, and Other.
- The three basic permissions are Read (r), Write (w), and Execute (x), and their meanings differ for files versus directories.
chmodchanges permissions, using either intuitive symbolic mode (u+x) or fast octal mode (755).chownchanges ownership, using theuser:groupsyntax. The-Rflag makes it recursive.- Proper permissions are fundamental to creating secure, collaborative environments, like the
dev-teamfolder you configured.
In our next lesson, we will shift from configuring the system itself to managing the software on it. You will learn how to install, update, and remove software packages using a package manager like apt.