Hello! Welcome to the first lesson of our "Linux System Administration" module.
In our last session, we focused on a crucial skill: teaching yourself how to use any command with man pages and --help. You even used this skill to look up the useradd command. Today, we put that foundation to immediate use.
This lesson addresses the learning outcome: Manage user accounts and group memberships from the command line. This is one of the most fundamental responsibilities of a Linux administrator. In a data center environment, you will constantly be creating accounts for new services, managing access for engineers, and removing accounts for security purposes. Understanding not just how to do this, but why it works the way it does, is critical for both job performance and technical interviews.
We'll start by looking under the hood at the files that store user information, then move to the practical commands for creating, modifying, and deleting users and groups.
1. The Architecture of User Management
Before we start typing commands, it's essential to understand what those commands are actually manipulating. In Linux, user and group information is stored in a few key plain text files. While you should never edit these files directly, understanding their structure is key to troubleshooting and grasping the concepts.
To get a clear overview of these files and the different types of users, let's watch the beginning of the following video.
Working With Users and Groups (Linux Zero to Hero 2022)
This video, 'Working With Users and Groups' from Engineer Man, provides a concise explanation of the core concepts. We'll start with the different user types and the three most important configuration files.
Watch from the beginning to 03:50. Focus on: The distinction between normal users, the root user, and users with sudo access. The purpose of the three main files: /etc/passwd, /etc/group, and /etc/shadow. The basic structure of each file (colon-separated values).
To summarize and visualize what you just saw:
- /etc/passwd: A public list of all user accounts. It defines the username, user ID (UID), primary group ID (GID), home directory, and default shell. It does not contain the password.
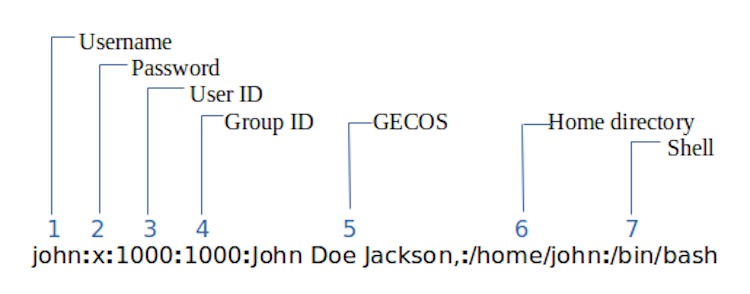
- /etc/group: A public list of all groups. It defines the group name, group ID (GID), and which users are supplementary members.
- /etc/shadow: A highly restricted file that only the
rootuser can read. It contains the encrypted (hashed) user passwords and password aging policies (e.g., when it expires).

For a more detailed written breakdown of these files, you can refer to the following resource. It's not required reading, but it's an excellent reference if you want to understand every single field.
Linux User and Group Management Files
The Linux Professional Institute provides this detailed guide to the user and group configuration files. It's a great resource to bookmark for future reference.
Read the sections titled 'The File /etc/passwd', 'The File /etc/group', 'The File /etc/shadow', and 'The File /etc/gshadow'. This will give you a field-by-field explanation of how user and group data is structured.
Now that you know the theory, let's get practical.
2. Managing User Accounts
These are the core commands for day-to-day user administration. All of these commands require elevated privileges, so you will need to prefix them with sudo.
useradd: Creates a new user.passwd: Sets or changes a user's password.usermod: Modifies an existing user's attributes.userdel: Deletes a user.
Let's see these commands in action.
Working With Users and Groups (Linux Zero to Hero 2022)
We'll continue with the 'Working With Users and Groups' video to see how these commands are used to manipulate the files we just learned about.
Watch from 03:50 to 06:38. Pay close attention to: The use of useradd and the importance of the -m flag to create a home directory. How to set a user's password with passwd. Using usermod -s to change a user's default shell. The process of deleting a user with userdel.
A crucial point mentioned in the video is creating the user's home directory. Some Linux distributions do this by default, but many do not. As a best practice, you should always be explicit.
sudo useradd -m username: The-mflag tellsuseraddto make the user's home directory (/home/username).sudo userdel -r username: The-rflag tellsuserdelto remove the user's home directory when deleting the account.
In a corporate environment, be cautious with userdel -r. Company policy may require you to archive a former employee's data rather than deleting it outright.
3. Managing Groups and Memberships
Users are rarely managed in isolation. We use groups to grant permissions to a collection of users at once, which is far more efficient.
- Primary Group: Every user has exactly one primary group. When a user creates a new file, that file is typically owned by the user's primary group.
- Secondary (or Supplementary) Groups: A user can be a member of many secondary groups. This is how you grant a user access to different projects or resources. For example, a user might have their own primary group (
bob) but also be in thedevelopers,testers, andvpn-userssecondary groups.
The main commands are:
groupadd: Creates a new group.groupdel: Deletes a group.usermod: Also used to add users to groups.
Let's see a quick demonstration.
Working With Users and Groups (Linux Zero to Hero 2022)
The final segment from the Engineer Man video covers group creation and adding users to groups.
Watch from 06:38 to 07:26. The most important command here is usermod -aG. -G specifies the list of secondary Groups. -a tells usermod to append to the list, rather than replacing it. Forgetting -a is a common mistake that will remove the user from all other secondary groups!
4. Your Turn: Practical Scenario
Time to apply your "katana." Let's walk through a common administrative task in your Ubuntu VM.
Scenario: A new hire, Chandra, is joining the engineering team. Another employee, David, is moving to the QA team.
Follow these steps in your terminal.
-
Create Groups: The
engineeringandqagroups don't exist yet. Create them.sudo groupadd engineering sudo groupadd qa -
Create New User: Create the user account for
chandra. Make sure to create her home directory and set her default shell to/bin/bash.# The -m flag creates the home directory # The -s flag sets the shell sudo useradd -m -s /bin/bash chandra -
Set Initial Password: Set a temporary password for
chandra. The system will prompt you to enter the new password twice.sudo passwd chandra -
Add to Group: Add
chandrato theengineeringgroup as a secondary member.# Remember: -a for append, -G for secondary groups sudo usermod -aG engineering chandra -
Verify New User: Use the
idcommand to check that everything is configured correctly forchandra.id chandraThe output should show her UID, her primary group (which will be
chandraby default), and that she is also in theengineeringgroup. -
Modify Existing User: Now, let's handle David. Assume he already has a user account. You just need to add him to the
qagroup.# First, let's create the 'david' user so the command works. sudo useradd -m david # Now, add him to the qa group. sudo usermod -aG qa david -
Check Your Work: Verify David's new group membership.
id david
This exercise, which is adapted from the "Linux Exercise 1 - User and Group Management" resource, mirrors exactly the kind of tasks you would perform as a system administrator.
Conclusion
Excellent work. You have now mastered the fundamental command-line tools for managing who has access to your Linux system. This is a non-negotiable skill for any administration role.
Key Takeaways:
- User and group data is stored in
/etc/passwd,/etc/group, and/etc/shadow, but you should always use commands likeuseraddinstead of editing them directly. - User Commands:
useradd -m <user>: Creates a user and their home directory.passwd <user>: Sets a user's password.userdel -r <user>: Deletes a user and their home directory.
- Group Commands:
groupadd <group>: Creates a new group.usermod -aG <group> <user>: Adds a user to a secondary group. Never forget the-a(append)!
- Verification:
id <user>andgroups <user>are your best friends for confirming that your changes were successful.
In our next lesson, we will build directly on this knowledge. Now that you can create users and groups, you need to control what they can access. We will explore how to modify file permissions and ownership using chmod and chown to secure system resources.