Hello! Welcome to your final lesson in this module.
In our last session, you learned how to construct powerful command pipelines using redirection and pipes. You can now chain simple utilities together to perform complex data processing. But what happens when you encounter a command in a script or an online guide that you've never seen before? How do you figure out what it does and how to use it effectively?
This lesson is all about self-sufficiency. Today's learning outcome is to access and interpret man pages and built-in help (--help) to learn unfamiliar commands independently. Mastering this skill is arguably one of the most important steps to becoming a competent Linux professional. It's the difference between memorizing a list of commands and truly understanding the system. For your job interviews, being able to say "I don't know that specific option offhand, but I know exactly how to look it up and interpret the documentation" is a very powerful statement.
Let's begin.
1. The Quick Reference: --help
The fastest way to get information about a command is to ask the command itself for help. Most Linux commands respond to a --help option (and sometimes a shorter -h option) by printing a brief usage summary directly to your terminal. This is your go-to method for a quick reminder of a command's syntax or a specific option.
Let's Practice:
In your Ubuntu VM, try running the ls command with the help flag:
ls --help
You'll see a structured output that typically includes:
- Usage: A template showing how to structure the command.
- A list of options: Both the short form (e.g.,
-l) and the long form (e.g.,--format=long) are usually listed. - Brief descriptions of what each option does.
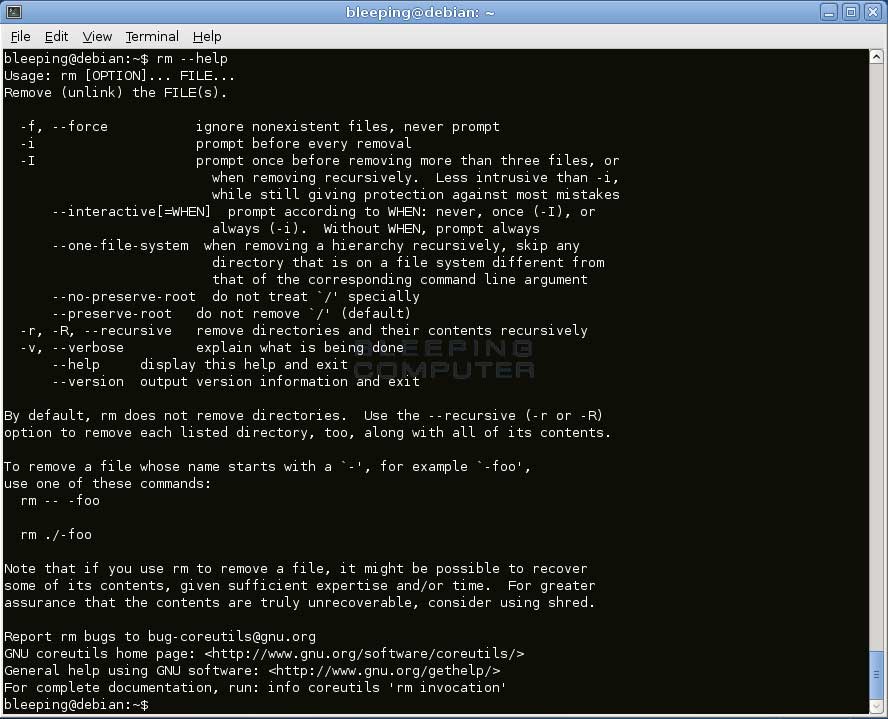
The --help output is excellent for jogging your memory, but it's often too brief to explain complex behaviors or provide examples. For a complete understanding, you need the official manual.
2. The Official Manual: man Pages
Every standard Linux command comes with a "manual page," or man page. This is the definitive source of documentation. You can access it by typing man followed by the command name.
man ls
This will open the manual page in a special viewer (typically the less pager, which you've seen before). Now, how do you get around inside it?
Let's watch a video that provides a definitive guide to using man pages. We'll start with the essentials: navigation and searching.
Mastering Linux Man Pages - A Definitive Guide
This video, 'Mastering Linux Man Pages' from the Linux Training Academy, will be our main guide. First, we'll focus on how to move around and find what you're looking for.
Watch from the beginning to 08:08. The key skills to pick up are: Quitting: Press q to exit the man page. Basic Scrolling: Use the arrow keys, Page Up/Page Down, or j (down) and k (up). Searching: Press / followed by your search term (e.g., /sort) and hit Enter. Press n to jump to the next match and Shift+N to go to the previous one. Jumping: Press g to go to the top of the page and Shift+G to go to the bottom.
Now that you can navigate, you need to understand the language of man pages.
3. How to Read a man Page
Man pages follow a standard structure and use special formatting to convey information concisely. Understanding this structure is key to interpreting them correctly.
Key Sections
A man page is divided into sections, such as:
- NAME: The command's name and a one-line description.
- SYNOPSIS: This is the most important part for learning syntax. It's a template for how to use the command.
- DESCRIPTION: A more detailed explanation of what the command does.
- OPTIONS: A complete list of all available command-line options and what they do. This is your dictionary.
- EXAMPLES: Practical examples of how to use the command (if available).
- SEE ALSO: A list of related commands and their man pages.
Decoding the SYNOPSIS
The SYNOPSIS section has its own mini-language:
- bold text: Must be typed exactly as shown.
underlineoritalic text: A placeholder that you must replace with an appropriate value (e.g.,filename).[ ](square brackets): Anything inside these is optional.|(pipe symbol): Indicates that you can only use one of the separated options, not both (e.g.,[-a | -b])....(ellipsis): Means the preceding item can be repeated.
Let's see a practical demonstration of how to apply these rules.
Mastering Linux Man Pages - A Definitive Guide
Continuing with the same video, this segment deciphers the man page conventions and applies them to the ls command.
Watch from 08:08 to 24:15. This is the core of the lesson. Focus on: The meaning of bold, underline, brackets, and ellipsis (08:08 - 10:26). How to interpret the SYNOPSIS for ls to understand which parts are optional (10:26 - 13:58). The difference between short (-F) and long (--classify) options. How to find valid values for an option's argument (like --block-size=SIZE). How to combine multiple single-character options (e.g., ls -lh is the same as ls -l -h).
4. Advanced man Usage
To really demonstrate your expertise, you should be aware of a few more advanced concepts related to the Linux manual.
Manual Sections
You might have noticed a number in parentheses at the top of the man page, like LS(1). This number indicates the manual section. The manual is organized into categories:
| Section | Description |
|---|---|
| 1 | General user commands |
| 2 | System calls (for programmers) |
| 3 | Library functions (for programmers) |
| 4 | Special files (devices) |
| 5 | File formats and conventions (e.g., config files) |
| 6 | Games |
| 7 | Miscellaneous |
| 8 | System administration and privileged commands |
Sometimes, the same name exists in multiple sections. A classic example is passwd.
passwd(1)is the command to change a password.passwd(5)describes the format of the/etc/passwdfile.
By default, man passwd will show you the entry from the lowest-numbered section, which is passwd(1). To see the entry from section 5, you must specify it:
man 5 passwd
Finding Commands and Documentation
What if you don't know the name of the command you need?
man -k <keyword>orapropos <keyword>: Searches theNAMEline of all man pages for a keyword. This is perfect for discovery. For example,apropos "copy files"will suggest commands likecp.
What if a command has no man page?
- This usually means it's a shell built-in (part of
bashitself), not a separate program. Thecdcommand is a prime example. - Use
type <command>to check.type cdwill tell you it's a shell built-in. - To get help for built-ins, use the
helpcommand:help cd.
This next video segment covers these advanced topics, which will round out your knowledge.
Mastering Linux Man Pages - A Definitive Guide
The final segments of the video cover manual sections and how to handle commands that don't seem to have man pages.
Watch from 24:15 to 28:20 and then from 30:10 to 33:44. You will learn: The purpose of the different manual sections (1, 5, 8, etc.). How to specify a section, using unlink and arp as examples. What shell built-ins are and why they don't have their own man pages. How to use type to identify a built-in and help to get its documentation.
5. Your Turn: The man Page Scavenger Hunt
Time to put your skills to the test. Use the man command in your terminal to find the answers to these questions. This is exactly the kind of self-directed problem-solving you'll do on the job.
- Find the
cpoption: You want to copy a directory and all of its contents. Which option for thecp(copy) command accomplishes this? - Find the
useraddoption: When creating a new user with theuseraddcommand (a sysadmin command, so you might need to check section 8 withman 8 useradd), how do you specify a comment or description for the user, such as their full name? - Find the
grepoption: You are usinggrepto search for text in files. How can you make the search case-insensitive? - Built-in or not? Is the
historycommand a shell built-in or a separate program? How can you find its documentation?
Take your time to find the answers. The process of searching and reading is the most important part of the exercise.
Click to reveal answers
- The
-r,-R, or--recursiveoption. - The
-cor--commentoption. - The
-ior--ignore-caseoption. - Use
type history. It will report thathistoryis a shell built-in. You can read its documentation withhelp history.
Conclusion
Congratulations on completing this lesson and the module! You now have the single most important skill for a Linux user: the ability to learn independently. You don't need to memorize hundreds of commands and options. You just need to know how to find the information when you need it.
Key Takeaways:
- Use
command --helpfor a quick synopsis and reminder of options. - Use
man commandfor the complete, definitive manual. - Master navigation within
manpages:qto quit,/to search,nto find the next match. - Learn to decode the
SYNOPSISsection:[]means optional,...means repeatable. - Understand the different
manpage sections (1 for users, 5 for files, 8 for admins). - Use
aproposorman -kto discover commands by keyword. - For shell built-ins (like
cdorecho), usehelpto get documentation.
In our next module, "Linux System Administration," you'll start diving into the core tasks of a sysadmin. We will begin by learning how to manage user accounts and group memberships, and you now have the tools to explore those commands (useradd, usermod, groupadd) on your own.