Hello! Let's get started with your next lesson.
In our last session, we mastered the crucial skill of backing up and restoring network device configurations. We learned that before any significant change, a reliable backup is your safety net. Today, we're performing one of the most common and critical of those changes: a firmware upgrade.
Upgrading the firmware—the device's operating system—is a fundamental maintenance task for any network or systems administrator. Doing it correctly ensures network security and stability, while a mistake can lead to an outage or even damage the device.
This lesson directly addresses your goal of maintaining and troubleshooting server and network hardware in a data center environment. Our learning outcome is to perform a firmware upgrade on a network device and verify successful installation. We will follow a structured, professional methodology that you can confidently explain in a job interview.
1. The "Why" and "What" of Firmware Upgrades
Before we touch any commands, it's essential to understand why we upgrade firmware and what we're looking for. A firmware upgrade isn't just about getting the latest version; it's a calculated decision to improve the network.
How to Download and Upgrade Cisco Switch Firmware
The article 'How to Download and Upgrade Cisco Switch Firmware' provides an excellent overview of the rationale behind firmware upgrades. It helps answer the 'why' that's crucial for your job-readiness goals.
Please read the introduction and the first two main sections: 'Introduction - Why Firmware Upgrades Matter', 'Understanding Cisco Switch Firmware (IOS / IOS-XE)', and 'Why & When You Should Upgrade Cisco Firmware'. Focus on the table that lists the key reasons for upgrading: Performance, Security, New Features, Bug Fixes, and Compatibility.
As you read, the core takeaway is that firmware is the device's operating system (like Cisco IOS, IOS-XE, or NX-OS). Upgrading it is like applying a major update to a Linux server—it patches vulnerabilities, fixes bugs that could cause crashes, and can unlock new capabilities.
2. The Pre-Upgrade Checklist: A Recipe for Success
A successful upgrade is 90% preparation. Rushing this stage is how outages happen. A professional administrator follows a strict pre-upgrade checklist every single time.
Here are the essential steps:
- Backup the Configuration: This is non-negotiable. If the upgrade fails, you need a way to restore the device's configuration quickly. This directly uses the skill from our previous lesson.
# As a reminder from our last lesson copy running-config tftp: - Choose the Right Firmware: Not all versions are created equal. You must select a version that is stable and appropriate for your environment.
How to Download and Upgrade Cisco Switch Firmware
Let's return to the 'How to Download and Upgrade Cisco Switch Firmware' article to learn how to select a version.
Read the sections 'How to Choose the Right Firmware Version', 'How to Download Cisco Switch Firmware?', and the 'Pre-Upgrade Preparation Checklist'. Pay close attention to the table distinguishing between Recommended (Starred), MD (Maintenance Deployment), and ED (Early Deployment) releases. For production environments, you almost always want the 'Recommended' version.
- Check Available Storage: The new firmware image is a file that needs to be copied to the device's flash storage. You must ensure there is enough free space.
# On a Cisco device, this command lists the files and shows free space show flash: - Verify Firmware Integrity (Checksum): This is a critical step. When you download the firmware file, it could be corrupted during transfer. Installing a corrupt image can "brick" the device, making it unusable. To prevent this, vendors provide a checksum (usually an MD5 or SHA hash). You calculate the checksum of your downloaded file and compare it to the one provided by the vendor. If they match, the file is intact.
Let's see this verification step in action.
How to Upgrade Nexus 9000/3000 NXOS Software | Simplify Network Updates
This short clip from a Cisco video on upgrading a Nexus switch (a common data center device) shows the checksum verification process perfectly.
Watch the segment from 01:23 to 02:18. Notice how the engineer copies the official MD5 checksum from the Cisco website, runs a command on the switch to generate the checksum of the file on the switch's flash, and then compares the two to ensure they match.
This checklist—Backup, Choose, Check Space, Verify Integrity—is your mantra for any firmware upgrade.
3. The "How": Performing the Upgrade via CLI
Now for the hands-on part. We'll walk through the process of upgrading a typical Cisco switch using the Command Line Interface (CLI) and a TFTP server. The commands build directly on what you've already learned.
Cisco Switch Firmware Upgrade | Downgrade | Delete | Restore via TFTP | How to upgrade Cisco IOS
The video 'Cisco Switch Firmware Upgrade' provides a complete, step-by-step walkthrough of the entire process. It's an excellent practical demonstration of all the theory we've just discussed.
Please watch from 01:36 to 13:17. This covers the entire lifecycle of an upgrade. Follow along with these key stages: Connectivity (1:36 - 5:24): Setting up IP connectivity between the switch and the TFTP server. Pre-checks (5:24 - 6:06): Checking the current IOS version and available flash space. Backup & Delete (6:06 - 9:40): Backing up the current IOS image (a great pro-tip!) and then deleting it to make space. In many cases, you may not need to delete the old image if there's enough space. Transfer (9:40 - 11:50): Copying the new firmware image from the TFTP server to the switch's flash using copy tftp: flash:. Finalize and Verify (11:50 - 13:17): Setting the boot variable (telling the switch which image to load on startup), saving the configuration, reloading the switch, and finally verifying the new version with show version.
The core commands you saw are:
copy tftp: flash:: To transfer the new firmware to the switch.configure terminal->boot system flash:/<new-firmware-filename.bin>: To tell the switch to use the new image on the next boot.reload: To restart the switch and load the new firmware.show version: To verify the new version is active.
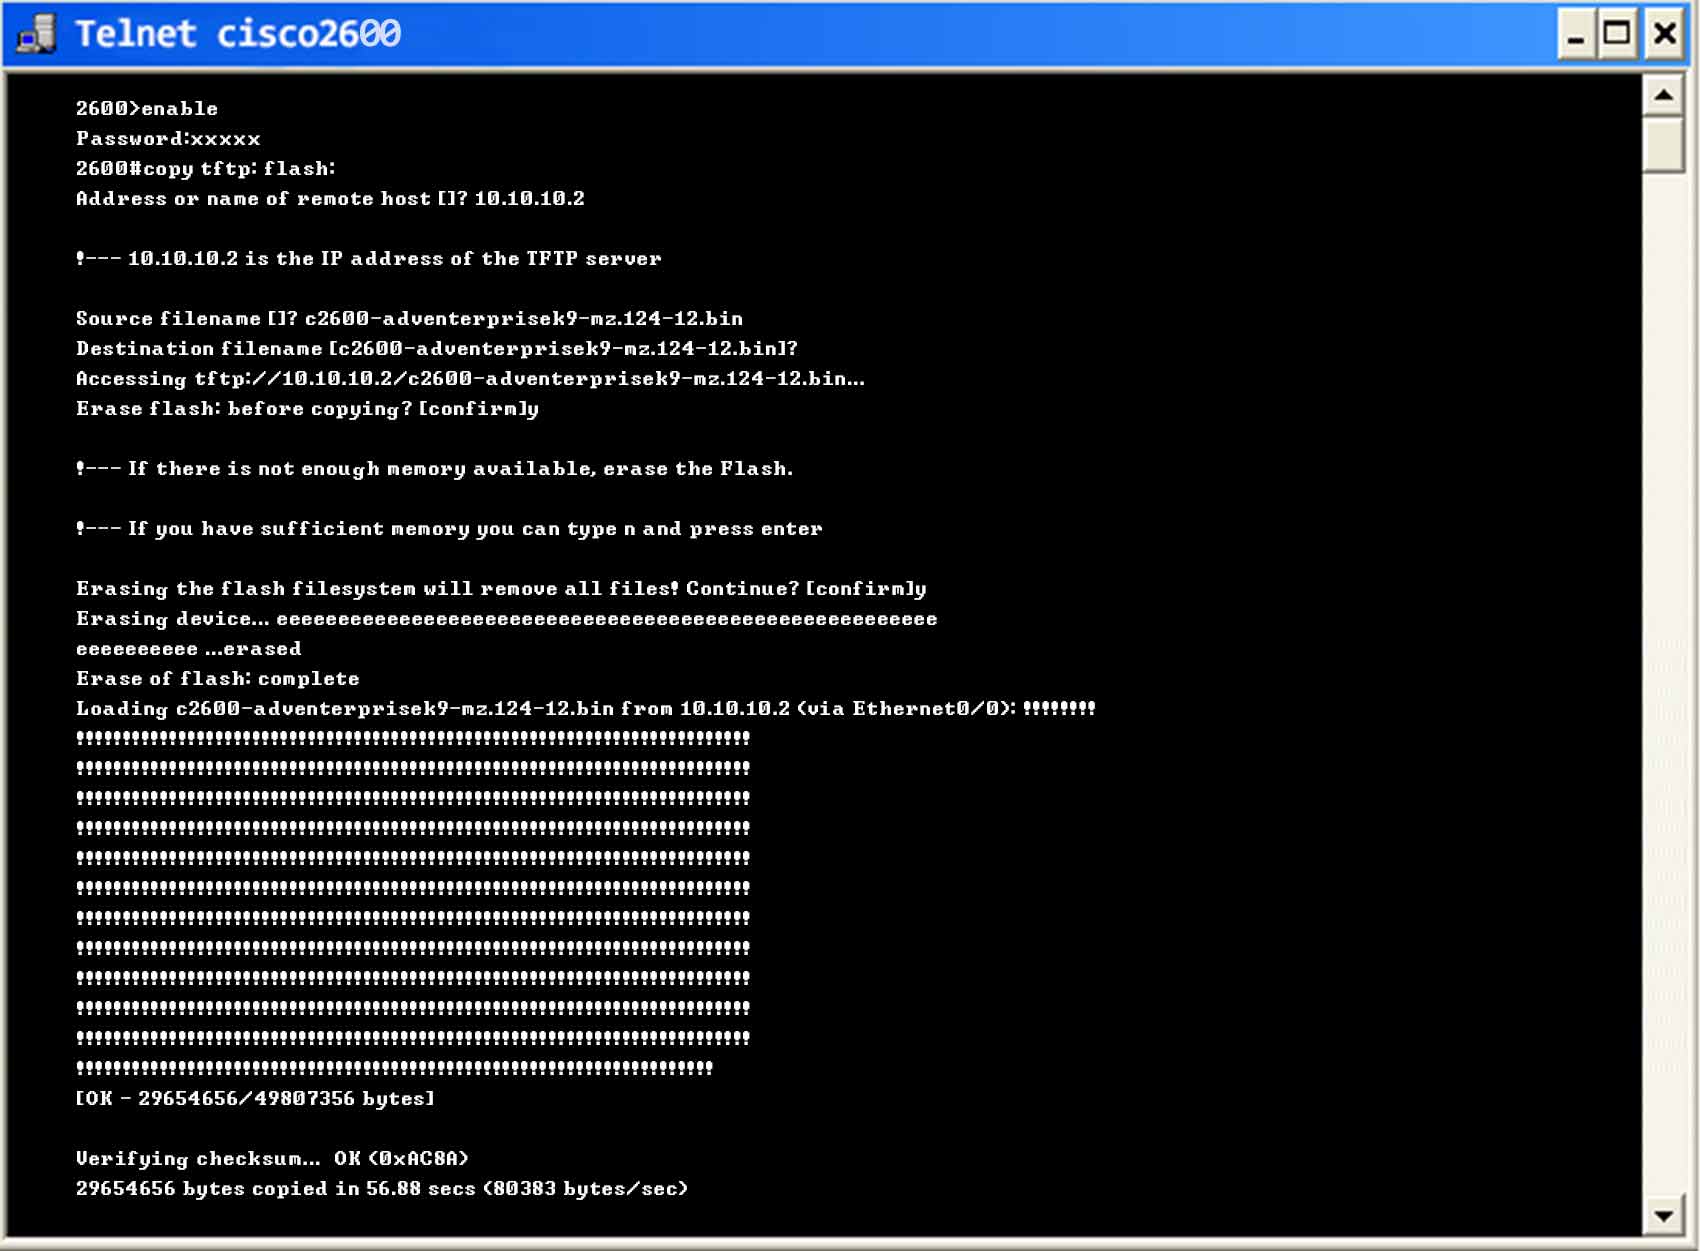
4. Verification and Rollback
After the device reboots, your job isn't done. You must verify two things: that the upgrade was successful and that the device is still functioning correctly.
Verifying the Upgrade
The show version command is your primary tool. Sometimes, a device will stage the new firmware to be active on the next reboot.

After the reboot, running show version again should show the new version as the active one.
Verifying Functionality and Rolling Back
A successful upgrade means the device still does its job. A quick post-upgrade checklist includes:
- Can you ping the device's management IP?
- Are the interfaces up that should be up? (
show ip interface brief) - Are VLANs and other configurations intact? (
show vlan)
If something goes wrong—for example, the new firmware has a critical bug—you need a rollback plan. If you have enough space on the flash to keep both the old and new firmware files, rolling back is as simple as changing the boot variable back to the old file and rebooting.
# In case of emergency, revert to the old firmware
configure terminal
boot system flash:/<old-firmware-filename.bin>
end
copy running-config startup-config
reload
This is why having enough flash space to hold two images is a significant advantage in production environments.
Conclusion
You now have a complete, professional workflow for performing one of the most essential tasks in network maintenance. This process demonstrates not just technical skill, but also careful planning and risk management—qualities that are highly valued in any data center or network operations role.
Key Takeaways:
- Firmware upgrades are crucial for security, stability, and features.
- Preparation is everything. Always follow a pre-upgrade checklist: back up the configuration, choose the recommended firmware version, check flash space, and verify the file's integrity with a checksum.
- The upgrade process typically involves transferring the new image (e.g., via TFTP), setting the boot variable to point to the new image, and reloading the device.
- Post-upgrade verification is mandatory. Use
show versionto confirm the new firmware is active and run operational checks to ensure the device is healthy. - Always have a rollback plan, which is easiest if you can keep the old firmware image on the device as a backup.
In our next and final lesson of this module, we will explore how to use SNMP to monitor interface utilization and interpret error counters on a network device. This is the perfect follow-up, as monitoring a device's health and performance is exactly what you would do after performing a major maintenance task like a firmware upgrade.