Hello!
In our last lesson, we acted as network detectives, using Wireshark to analyze packet captures and diagnose the root cause of protocol failures. This passive observation is key to understanding what is happening on your network. Today, we switch from observing to controlling. We'll learn how to build a basic firewall to explicitly permit or deny traffic, a foundational skill for securing any Linux server.
This lesson directly addresses the learning outcome: Explain the netfilter/iptables architecture and write basic firewall rules to allow or block traffic. We will demystify the relationship between netfilter (the kernel framework) and iptables (the command-line tool), and then put that theory into practice by building a secure, stateful firewall from the ground up.
For a potential employer, being able to articulate how a Linux firewall works—not just listing commands—demonstrates a deeper understanding that is highly valued.
1. The Netfilter/iptables Architecture
Before writing any rules, it's crucial to understand the structure you're working with. iptables is not the firewall itself; it's the user-space utility you use to configure the Netfilter hooks built into the Linux kernel. Think of Netfilter as a series of checkpoints in the kernel's network stack, and iptables as the tool you use to post rules at those checkpoints.
These checkpoints are organized into tables, and within each table, there are chains.
- Tables: Group rules by their general function. For today, we will focus almost exclusively on the
filtertable, which is the default and used for packet filtering (allowing/denying traffic). Other tables likenat(for network address translation) andmangle(for specialized packet alteration) exist for more advanced scenarios. - Chains: Represent points in the network stack where rules are evaluated. The
filtertable has three essential chains:INPUT: For packets destined for the local server itself.OUTPUT: For packets generated by the local server.FORWARD: For packets passing through the server, being routed from one network interface to another.
To get a clear visual and auditory explanation of these concepts, let's watch the beginning of a detailed guide on iptables.
iptables Complete Guide | HackerSploit Linux Security
This video from HackerSploit provides an excellent whiteboard explanation of the relationship between netfilter and iptables, and then defines tables and chains. This will build our conceptual model.
Watch from 00:45 to 07:11. Focus on understanding the difference between netfilter and iptables, the purpose of the filter, nat, and mangle tables, and the role of the INPUT, OUTPUT, and FORWARD chains.
How a Packet Traverses the Chains
Understanding the path a packet takes is key to placing your rules in the correct chain.
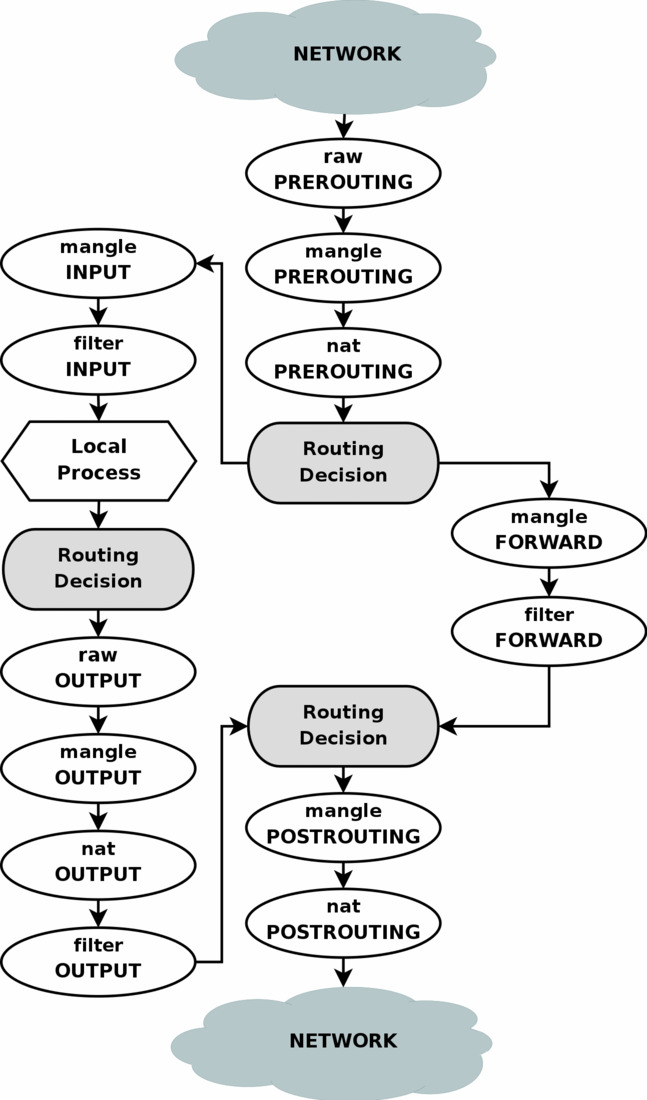
As the diagram shows, a packet is checked against the rules in a chain sequentially, from top to bottom. The first rule that matches the packet determines its fate. This leads to the concept of a target.
A target is what happens to a packet when it matches a rule's criteria. The most common targets are:
- ACCEPT: The packet is allowed to continue its journey.
- DROP: The packet is silently discarded. The sender receives no notification and will likely time out.
- REJECT: The packet is discarded, but a "port unreachable" error is sent back to the sender. This is more polite than
DROPas it provides immediate feedback.
The following segment of the video explains this process of rule evaluation and the different targets.
iptables Complete Guide | HackerSploit Linux Security
Now that we know the basic structure, let's see how packets are processed and what happens when they match a rule.
Continue watching from 07:11 to 11:00. This section explains how rules within a chain are evaluated in order and what the ACCEPT, REJECT, and DROP targets mean.
2. Practice: Building a Basic Stateful Firewall
Now, let's apply these concepts. The most secure firewall posture is "default deny": block everything, then explicitly allow only the traffic you need.
A word of caution: When working on a remote server, it is very easy to lock yourself out with iptables. Always ensure you have an alternative way to access the machine (like a web console from a cloud provider) before applying restrictive rules. Ideally, practice these steps on a local virtual machine first.
Step 1: Start with a Clean Slate
Before adding new rules, it's good practice to see what's already there and clear it out.
-
List current rules:
sudo iptables -L -v -n-L: List rules.-v: Verbose output (shows packet/byte counters and interfaces).-n: Numeric output (shows IP addresses and port numbers instead of trying to resolve names).
-
Flush all existing rules: This command clears all rules from all chains in the default (
filter) table.sudo iptables -F
Step 2: Set Default Policies
A policy is the default target for a chain. If a packet goes through all the rules in a chain without matching any of them, the chain's policy is applied.
For a secure server, we'll set the INPUT policy to DROP and leave OUTPUT as ACCEPT. This means we block all unsolicited incoming traffic but allow our server to make connections to the outside world.
# Block all incoming traffic by default
sudo iptables -P INPUT DROP


# Allow all outgoing traffic by default
sudo iptables -P OUTPUT ACCEPT


# If this isn't a router, block forwarding too
sudo iptables -P FORWARD DROP
At this moment, your server is secure but nearly useless—it can't receive any incoming connections, not even replies to its own requests!
Step 3: Write Essential ACCEPT Rules
Now we poke holes in our firewall for legitimate traffic. The order of these first few rules is critical.
-
Allow traffic on the loopback interface: Many local services communicate with each other using the
lointerface (IP address127.0.0.1). Blocking this will break things.sudo iptables -A INPUT -i lo -j ACCEPT-A INPUT: Append this rule to theINPUTchain.-i lo: Match traffic coming in on the interfacelo.-j ACCEPT: Jump to theACCEPTtarget.
-
Allow return traffic for established connections: This is the core of a stateful firewall. This rule tells
iptablesto automatically allow incoming packets that are part of a connection you already initiated (e.g., the reply from a web server you just contacted).sudo iptables -A INPUT -m conntrack --ctstate RELATED,ESTABLISHED -j ACCEPT-m conntrack: Use the connection tracking module.--ctstate RELATED,ESTABLISHED: Match packets that are part of an existing connection (ESTABLISHED) or related to one (like FTP data connections,RELATED).
-
Allow SSH connections: If you are on a remote server, this rule is your lifeline. Add it before you disconnect your current session.
sudo iptables -A INPUT -p tcp --dport 22 -j ACCEPT-p tcp: Match the TCP protocol.--dport 22: Match the destination port 22 (the standard SSH port).
With these three rules, you have a secure baseline. All unsolicited inbound traffic is dropped, but the server can function, and you can still manage it via SSH.

Step 4: Allow Application Traffic
Now, let's open ports for the services your server provides. Here are some common examples.
- Allow HTTP (web server) traffic:
sudo iptables -A INPUT -p tcp --dport 80 -j ACCEPT - Allow HTTPS (secure web server) traffic:
sudo iptables -A INPUT -p tcp --dport 443 -j ACCEPT
Step 5: Block Specific Traffic
Blocking can be just as important as allowing. The syntax is very similar.
- Block a specific malicious IP address:
# Use -I to insert the rule at the top of the chain to ensure it's hit first
sudo iptables -I INPUT -s 198.51.100.10 -j DROP
-I INPUT: Insert this rule at the top of theINPUTchain.-s 198.51.100.10: Match packets from the source IP198.51.100.10.
The HackerSploit video provides a great practical demonstration of writing these types of rules.
iptables Complete Guide | HackerSploit Linux Security
This part of the video walks through the practical commands for allowing and blocking traffic by source IP and port. It also covers the critical step of how to avoid locking yourself out.
Watch from 11:18 to 25:34. Pay attention to the demonstration of: Setting the default policy and the immediate consequence (getting locked out). The syntax for blocking a source IP address (-s). The syntax for allowing/blocking a specific service by protocol and port (-p tcp --dport 80). Allowing a specific IP to access a blocked service.
3. Managing Your Ruleset
Your firewall configuration is a living thing. You'll need to add, remove, and reorder rules over time.
-
List rules with line numbers: This is essential for deleting or inserting rules at a specific position.
sudo iptables -L --line-numbers -
Delete a rule: You can delete by its line number and chain.
# Delete rule number 3 from the INPUT chain sudo iptables -D INPUT 3 -
Rule Order Matters (
-Ivs.-A): Asiptablesstops processing once a rule matches, the order is critical.DROPrules for specific bad IPs should usually go at the top with-I(insert). More generalACCEPTrules can be added to the bottom with-A(append).
Computer Networking Tutorial - 40 - iptables Firewall Rules
This classic video from thenewboston uses a memorable (if quirky) analogy to explain exactly why rule order is so important and how to use -I to insert a rule at the top of a chain.
Watch from 07:45 to 10:41 to understand why a general DROP rule can override a specific ACCEPT rule if it comes first, and how to fix this by inserting your ACCEPT rule at the top.
Making Rules Persistent
By default, iptables rules are ephemeral and will be lost on reboot. To save them, you need to use a helper package. On Debian/Ubuntu systems, this is iptables-persistent.
-
Install the package:
sudo apt update
sudo apt install iptables-persistent
During the installation, it will ask if you want to save your current IPv4 and IPv6 rules. Say yes to both.
-
Save rules manually: If you change your rules later, you can save the new configuration by running:
sudo netfilter-persistent saveThis command writes your current
iptablesrules to configuration files that are loaded automatically at boot.
Conclusion
You have now learned both the theory behind Linux firewalls and the practical steps to build one. You understand that iptables is a tool to configure the kernel's netfilter framework, and you know how tables and chains work together to process packets. Most importantly, you can now write a basic, secure firewall ruleset that follows the "default deny" principle, allows essential services, and persists across reboots.
Key Takeaways:
- Architecture:
iptablesis the command-line tool;netfilteris the firewall framework inside the Linux kernel. - Tables and Chains: Rules are grouped into tables (like
filterandnat), and applied at specific checkpoints called chains (INPUT,OUTPUT,FORWARD). - Default Deny: The most secure posture is to set the default policy to
DROPand onlyACCEPTtraffic you explicitly trust. - Stateful Firewall: The single most important rule is allowing
RELATED,ESTABLISHEDtraffic, which makes the firewall stateful and vastly simplifies your ruleset. - Rule Order:
iptablesprocesses rules from top to bottom and stops at the first match. Use-Ito insert critical rules at the top and-Ato append less critical ones. - Persistence: Rules are lost on reboot unless saved with a tool like
iptables-persistent.
In our next lesson, we will put this knowledge to the test. You will be presented with scenarios where connectivity is broken due to a firewall misconfiguration. Your task will be to diagnose and resolve these issues by inspecting the iptables rules, solidifying your practical troubleshooting skills.