Hello! In our last lesson, we covered the Spanning Tree Protocol (STP) and how it creates a stable, loop-free Layer 2 network—a critical piece of logical infrastructure. Now, we shift our focus from the logical topology to the practical, hands-on task of diagnosing why one host can't communicate with another. This is one of the most common tickets you'll face as a network or data center technician.
Today's learning outcome is to troubleshoot host connectivity issues using ip, ping, traceroute, and mtr to isolate the point of failure. We'll approach this with a systematic methodology that you can directly apply on the job and clearly articulate in an interview. Think of it as a "troubleshooting ladder," where each step logically narrows down the problem.
1. The First Rung: Check Your Own House (ip command)
Before you can determine if you can reach a destination, you must verify that your own system is correctly configured. A misconfigured local machine is a common source of connectivity problems. The modern tool for this in Linux is the ip command, which is part of the iproute2 suite.
Let's start with a quick overview of the most essential ip commands for our purpose.
Basic Linux Network Troubleshooting
This video from Cumulus Networks provides a concise introduction to checking your interface status (ip link), IP address (ip addr), and basic reachability.
Watch from 00:56 to 02:16. Focus on the purpose of the ip link and ip addr commands. We will explore ping and traceroute from this video later.
Now, let's dive deeper and put this into practice.
A. Is the Interface Up? (ip link)
First, check the Layer 2 (Data Link) status of your network interfaces. An interface that is "down" can't send or receive traffic.
Run the command:ip link show or its shorter alias ip l.
You'll see output for each interface. The most important part is the state: UP or DOWN.
state UP: The interface is active and ready to transmit.state DOWN: The interface is administratively disabled or has a physical layer problem (e.g., the cable is unplugged).
If an interface is down, you can try to bring it up with sudo ip link set <interface_name> up. If it still doesn't come up, you likely have a Layer 1 (physical) issue.
B. Does it Have an Address? (ip addr)
Next, check the Layer 3 (Network) status. Your interface needs a valid IP address to communicate on the network.
Run the command:ip addr show or its shorter alias ipa.
Look for the inet line under your primary interface (e.g., eth0, ens3). This shows your IPv4 address and its subnet in CIDR notation (e.g., 192.168.1.50/24). If this is missing or incorrect, your host can't be routed.
Pro Tip: For a much cleaner, more readable output that's perfect for a quick check, use the -br (brief) and -c (color) flags.
ip -br -c a
This gives you a simple table showing each interface, its state, and its IP address(es).
C. Does it Know the Way Out? (ip route)
Finally, if you need to talk to anything outside your local subnet, your host needs a default gateway. This is the router your host sends all external traffic to.
Run the command:ip route show or its shorter alias ip r.
Look for the line that starts with default via ....
default via 192.168.1.1 dev eth0: This means your default gateway is at IP address192.168.1.1, and traffic will be sent out of youreth0interface to reach it.
If this line is missing, you will not be able to reach the internet or any other remote network.
For a comprehensive exploration of the ip command, including a fantastic practical scenario of diagnosing and fixing a missing default gateway, the following resource is invaluable.
Deep Dive: The ip Command in Linux
This 'Deep Dive' video from Prowse Tech covers the ip command in great detail. We'll focus on the section where he demonstrates fixing a connectivity issue caused by a missing default route.
Watch the scenario from 44:18 to 49:58. This is a perfect example of a real-world problem you might face. Observe how he uses ping to confirm the problem, ip route to diagnose it, and ip route add to fix it. This directly connects theory to practice.
2. The Second Rung: Can You Reach the Destination? (ping)
Once you've confirmed your local configuration is correct, the next step is to test basic reachability to your destination using the ping command. ping uses the ICMP protocol to send an "Echo Request" packet, and if the destination is reachable, it will respond with an "Echo Reply".
The golden rule of troubleshooting with ping is: Ping the IP address first, then the hostname.
ping 8.8.8.8: This tests pure network connectivity.ping google.com: This tests both network connectivity AND DNS resolution.
If the first command works but the second fails with an error like "Name or service not known", your problem is with DNS, not routing.
Let's see a demonstration.
Basic Linux Network Troubleshooting
Let's revisit the Cumulus Networks video to see ping in action and how to interpret its output.
Watch from 02:26 to 03:29. Notice the difference in output between a successful ping (0% packet loss) and a failed one (100% packet loss). In Linux, ping runs forever by default; use the -c flag (e.g., ping -c 4 8.8.8.8) to send a specific count.
This table summarizes how to interpret ping results:
| Result | Meaning | Next Step |
|---|---|---|
| Replies with low latency | Basic connectivity is working. | The problem is likely at a higher layer (e.g., a firewall on the destination, or the application itself). |
| 100% packet loss | No connectivity to the destination. | The host is down, a firewall is blocking ICMP, or there's a routing issue along the path. |
| High latency or some packet loss | Network congestion or a problem on a specific link. | Use traceroute or mtr to find where the delay or loss is occurring. |
| "Network is unreachable" | Your host doesn't have a route to the destination. | Check your local routing table with ip route. You may be missing a default gateway. |
The following article provides another practical example of using ping to diagnose a connectivity issue and ip route to fix it.
Linux network troubleshooting — Commands and examples
This article from Codilime demonstrates a real-world use case of troubleshooting a virtual machine that can't reach the internet.
Read 'Use case 1: virtual machine network connectivity issues'. Follow their logical steps: ip a to check the address, ping to test connectivity (which fails), ip route to discover the missing default route, and ip route add to fix it. This reinforces the troubleshooting ladder.
3. The Third Rung: Where Is the Failure? (traceroute and mtr)
If ping fails, the next question is where along the path the problem lies. Is it your local router, your ISP, or something closer to the destination? traceroute and mtr are the tools for this job.
traceroute
traceroute works by sending packets with a progressively increasing Time-To-Live (TTL) value. The first packet has a TTL of 1, so it's dropped by the first router (hop), which sends back a "Time Exceeded" message. traceroute records this router's IP. The next packet has a TTL of 2, so it makes it to the second router, and so on. This maps the entire path to the destination.
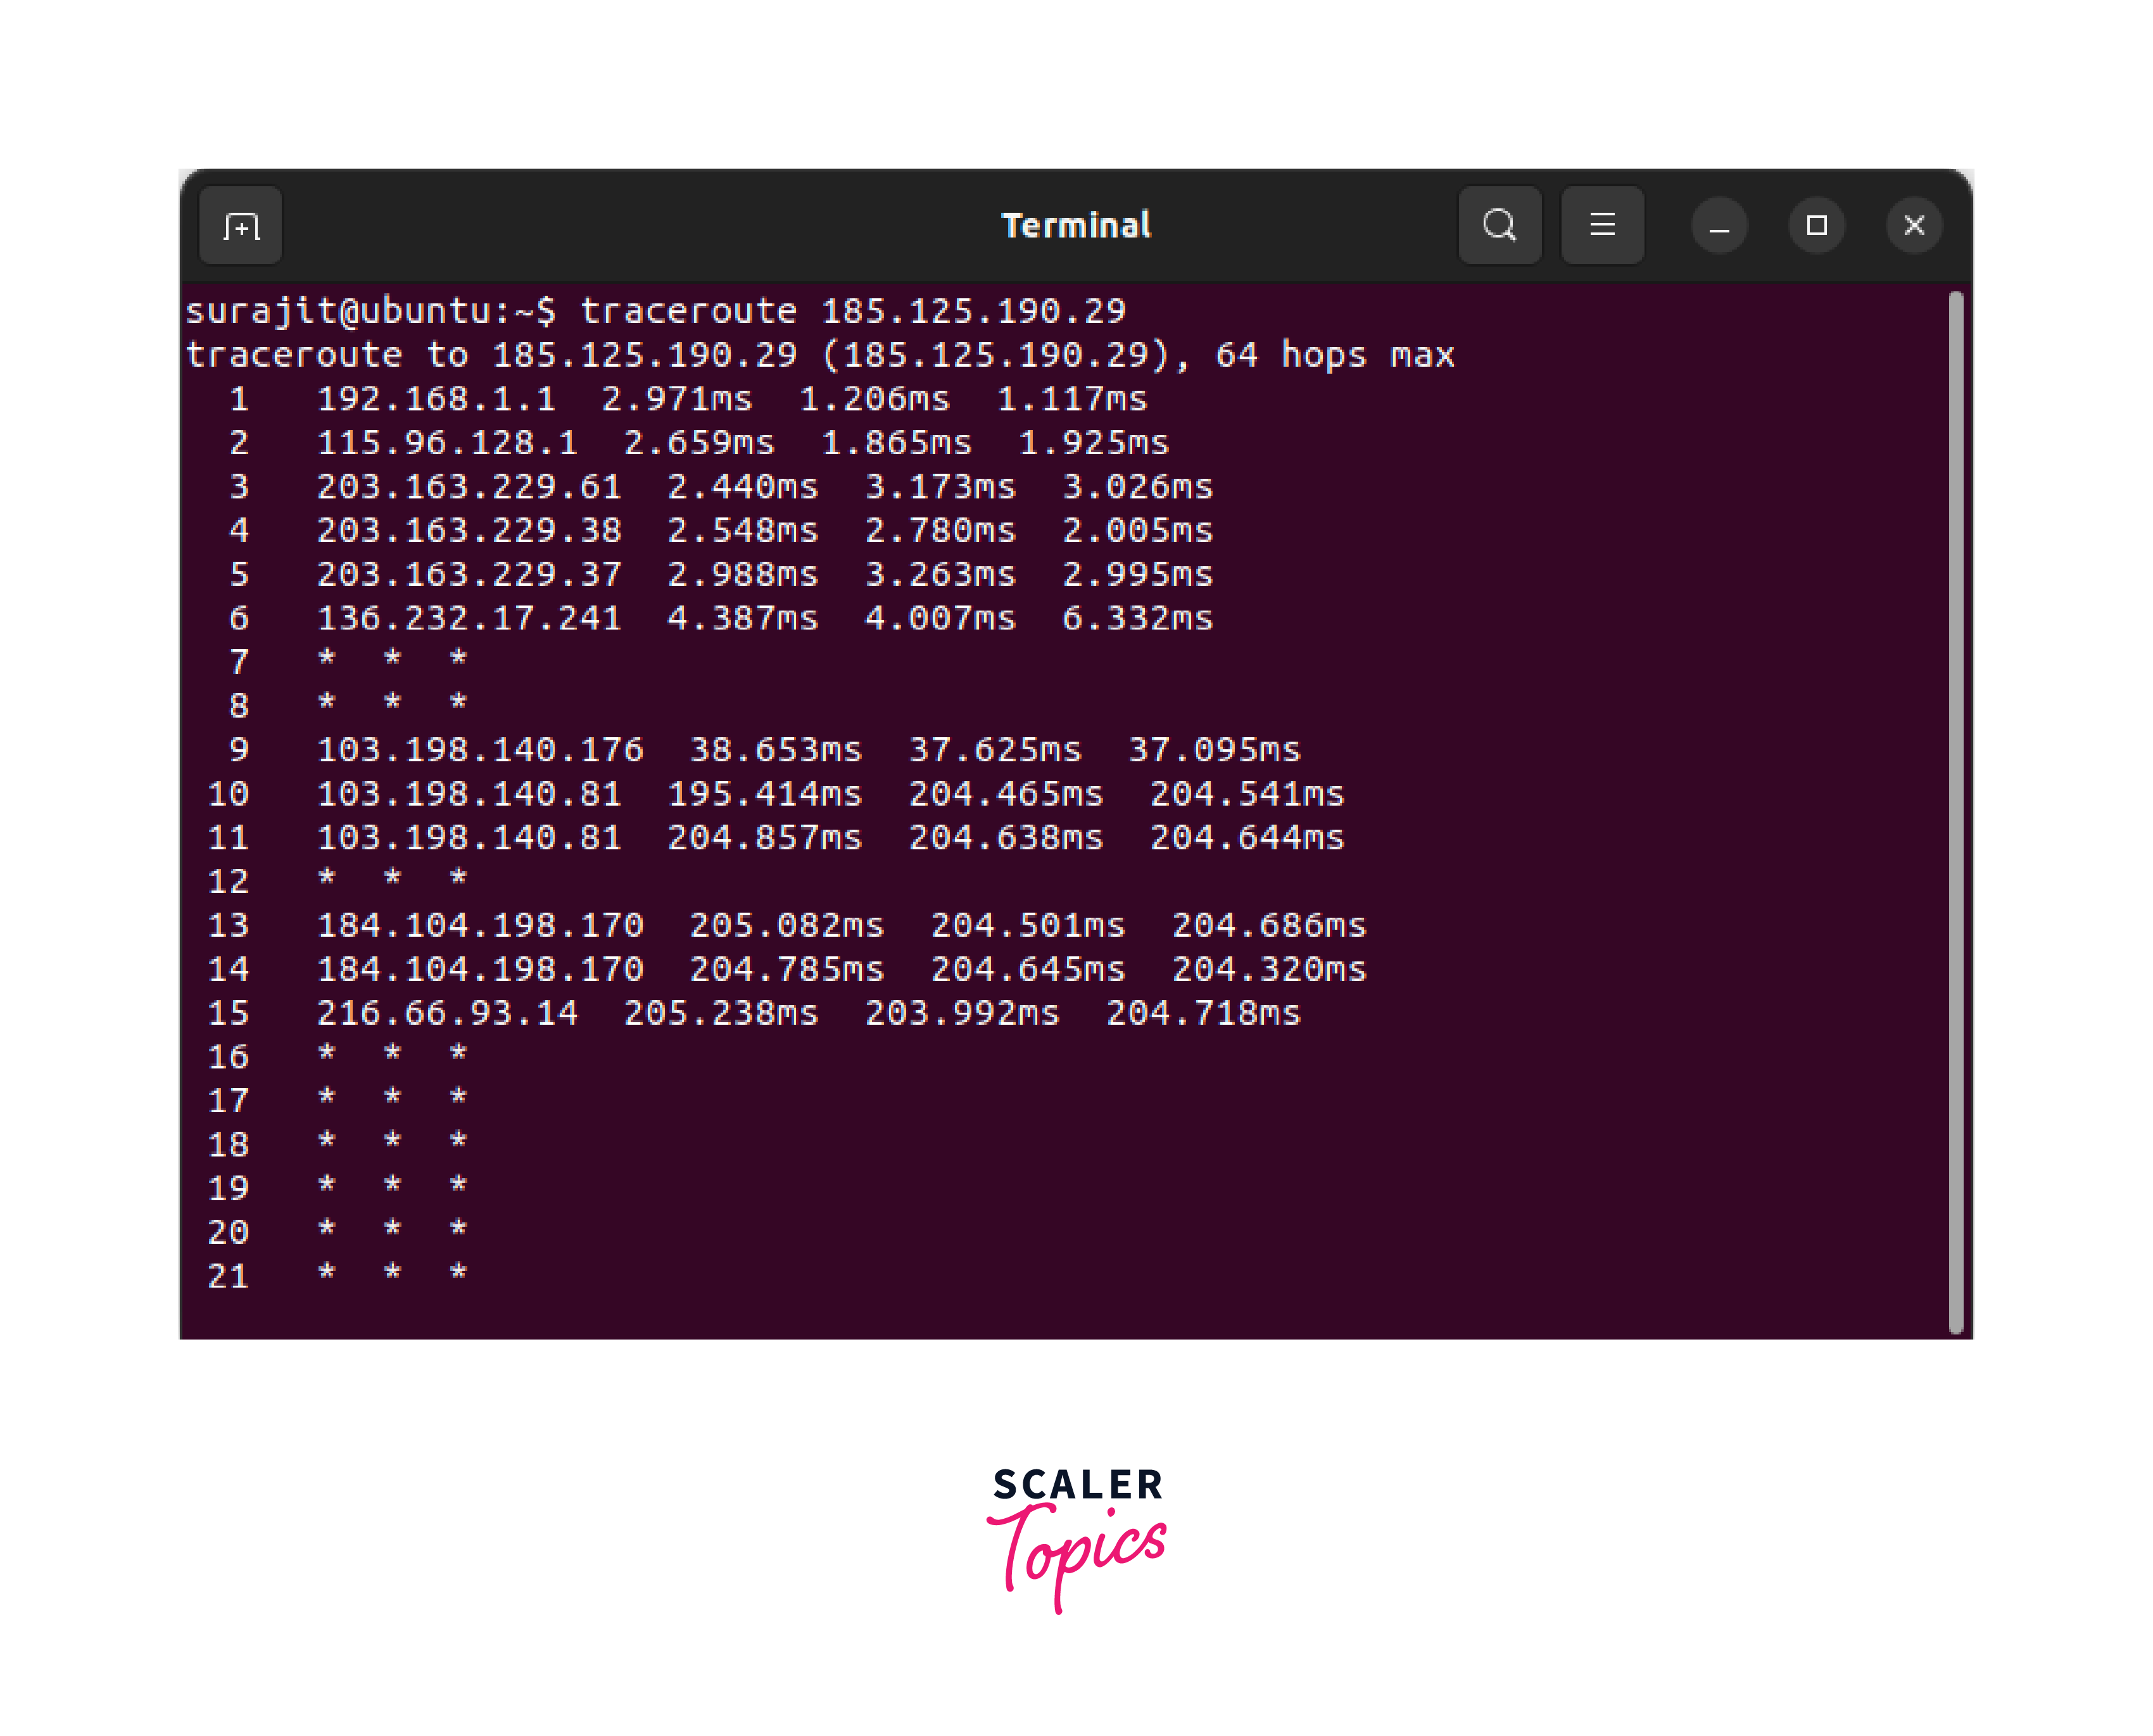
When reading traceroute output, look for two things:
- A sudden, large jump in latency that persists for all subsequent hops. This indicates a slow link.
- A point where the output stops with
* * *. This is where your packets are being dropped, pinpointing the location of the failure.
mtr: The Better Traceroute
While traceroute is good, mtr (My Traceroute) is even better. It combines the functionality of ping and traceroute into a single, real-time diagnostic tool. It continuously sends packets to each hop on the path and updates statistics for latency and packet loss. This is far more effective for identifying intermittent issues or packet loss at a specific hop.
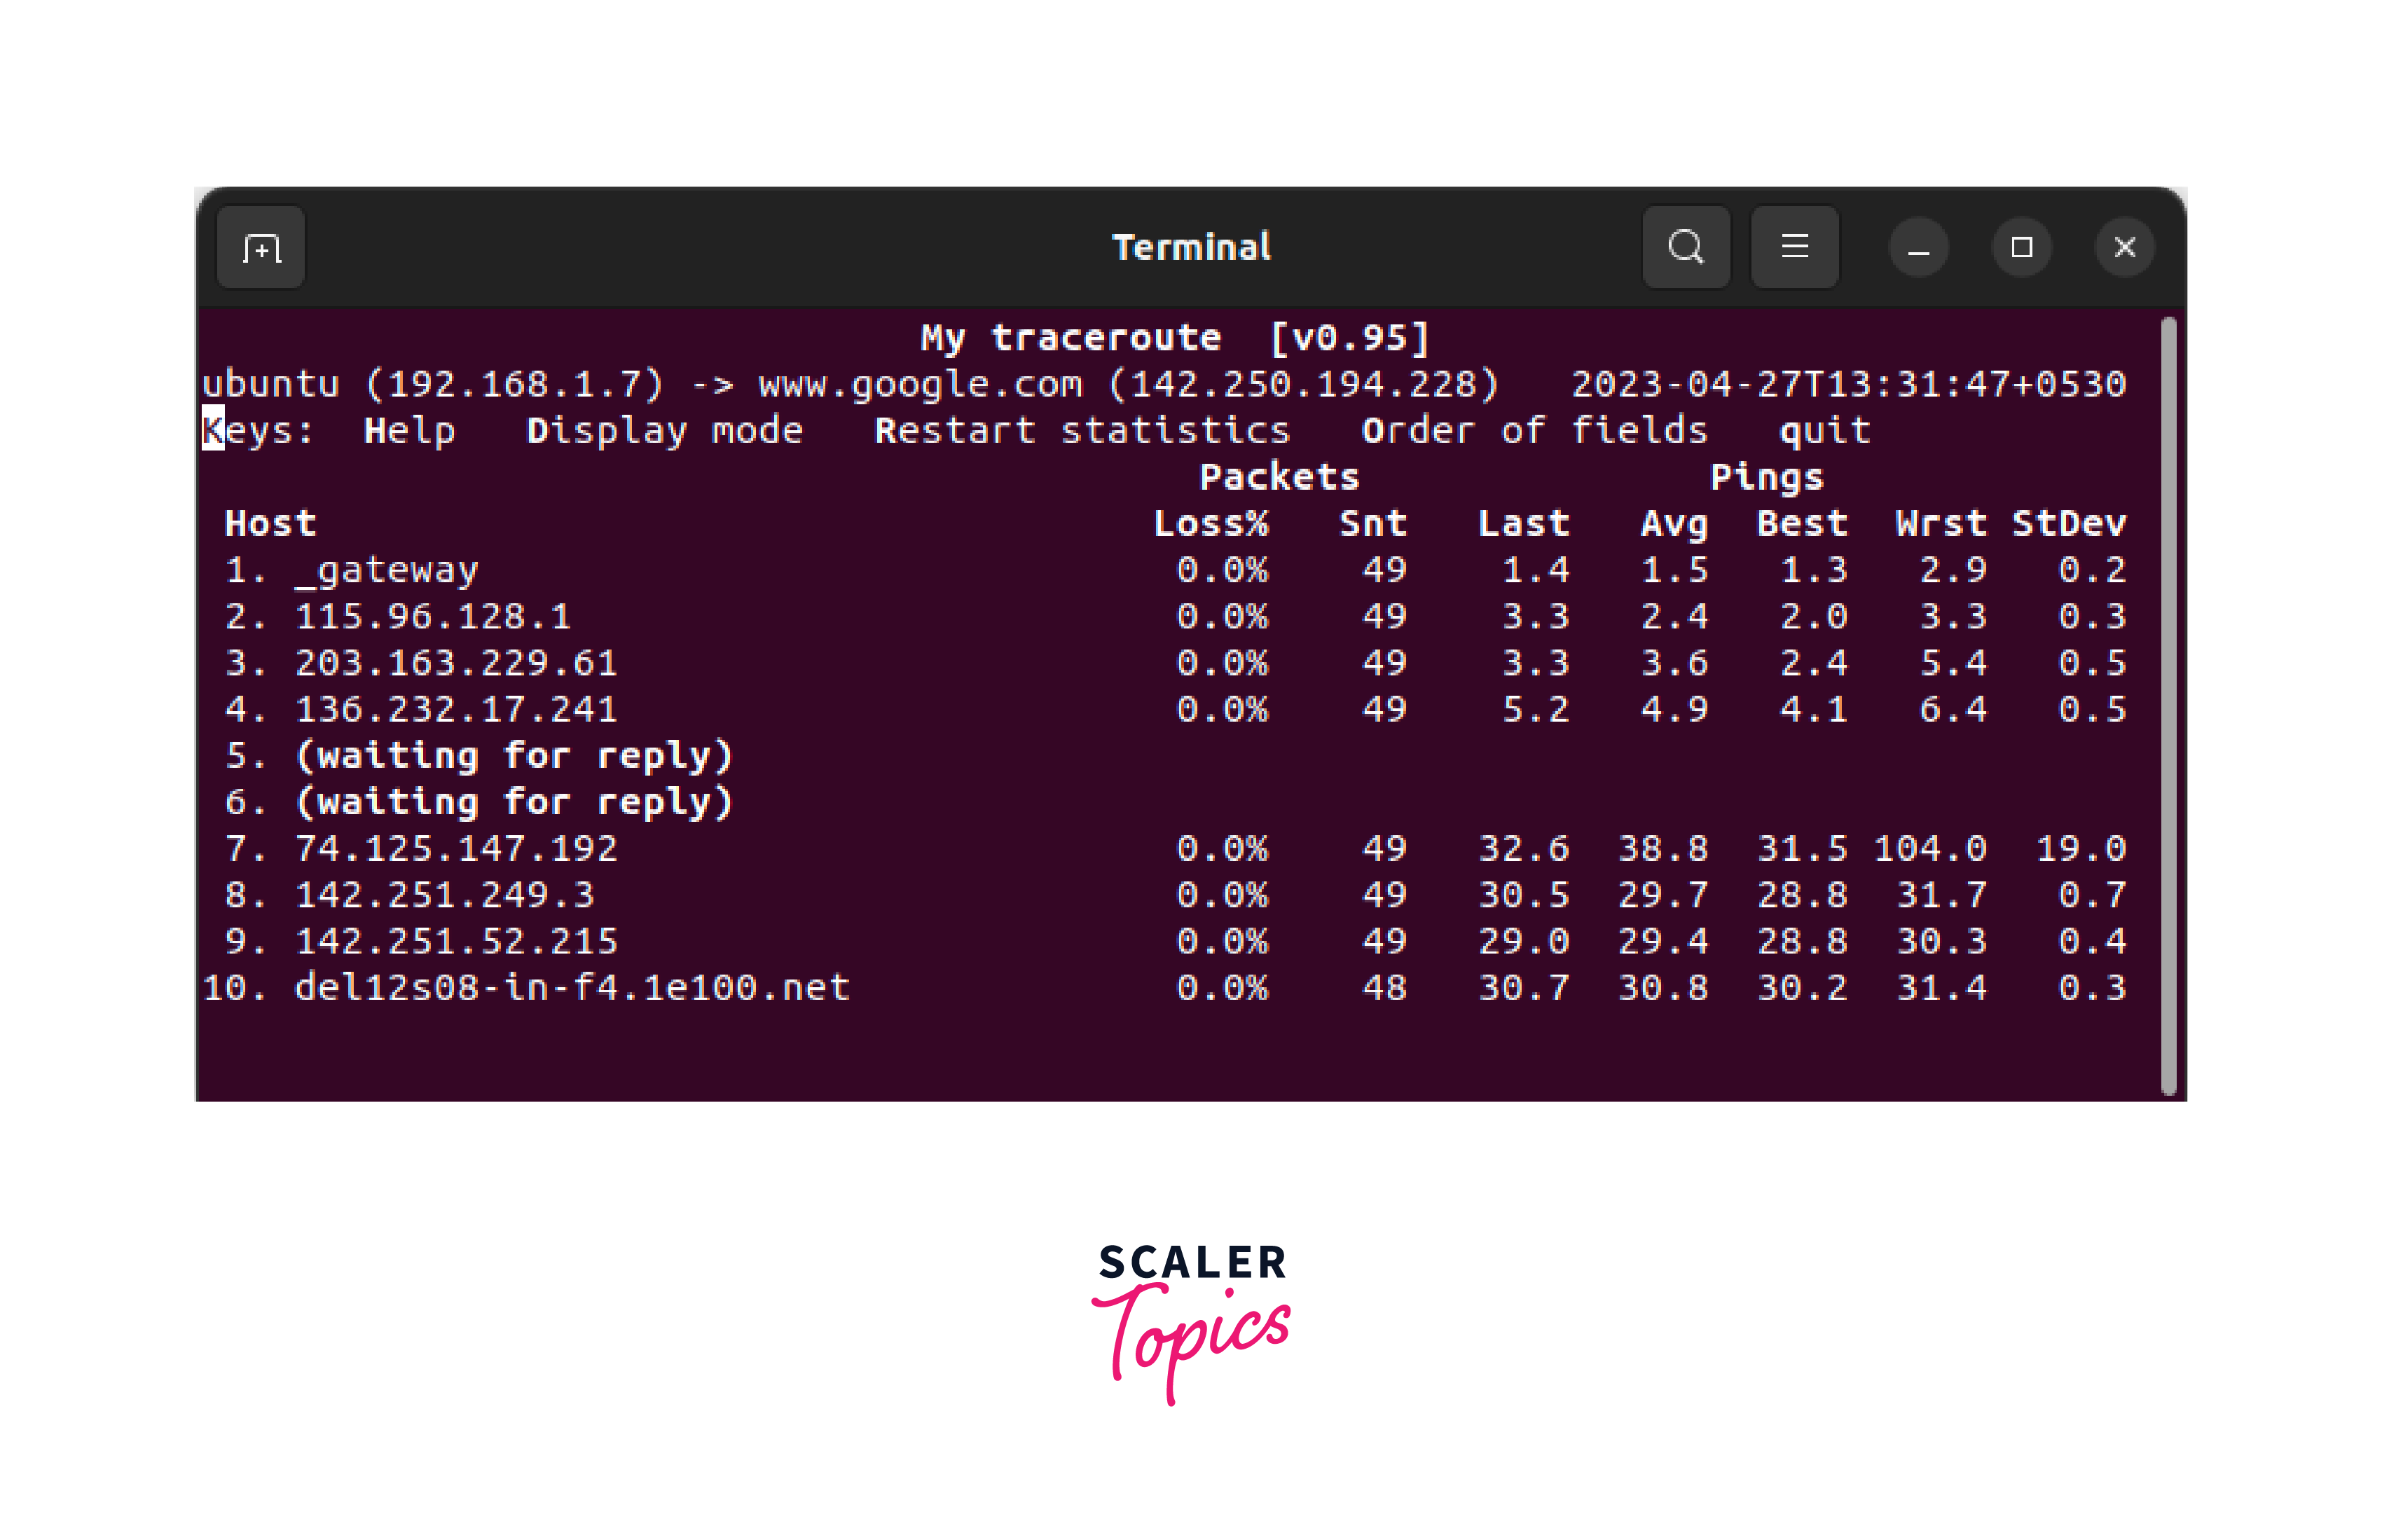
To use it, simply run mtr <destination>. You will get a live dashboard that you can watch. The Loss% column is often the most revealing; any value greater than 0% for a specific hop deserves investigation.
Conclusion
You now have a powerful and systematic toolkit for diagnosing host connectivity issues. By following this logical progression, you can quickly and efficiently isolate the point of failure, whether it's on your local machine, your local network, or somewhere out on the internet.
Key Takeaways:
- The Troubleshooting Ladder: A systematic approach is key.
- Local Check (
ip): Verify your interface state (ip link), IP address (ip addr), and default gateway (ip route). - Reachability Check (
ping): Usepingagainst an IP address to confirm basic connectivity. If that works, ping the hostname to check DNS. - Path Analysis (
traceroute/mtr): Ifpingfails, usetracerouteor, preferably,mtrto pinpoint exactly where on the network path packets are being dropped or delayed.
- Local Check (
- Essential Commands:
ip addr show(oripa): Your IP configuration.ip route show(orip r): Your routing table, including the default gateway.ping <ip/hostname>: Is it reachable?mtr <ip/hostname>: Where is it failing?
In the next lesson, we will dive even deeper. Once you've identified a connectivity problem, you may need to look inside the packets themselves to understand why a connection is failing. We will learn to analyze a packet capture to diagnose a common protocol issue, such as a failed TCP handshake or DNS resolution error, using powerful tools like tcpdump.