Hello! Welcome to the second lesson in our module on Virtualization and Linux Installation.
In our last session, we took a major step by defining and creating your first virtual machine using VirtualBox. We stopped right at the point where the VM booted from the Ubuntu Server ISO file, ready for installation. This perfectly simulates how a server boots from installation media in a data center.
Today, we'll focus on creating that installation media in the physical world. While we can use an ISO file directly with a VM, physical servers require a bootable device, which is almost always a USB drive. Mastering this skill is fundamental for any data center or systems administration role.
Our goal for this lesson is to create a bootable USB installer for a Linux distribution using a standard imaging tool. We will cover the "why" behind the process and then get hands-on with the tools of the trade.
1. What is an ISO file and Why "Flash" It?
You've already downloaded an Ubuntu Server .iso file. But what exactly is it? And why can't you just copy it to a USB drive?
An ISO image is a single file that contains a perfect, sector-by-sector copy of an entire optical disc, like a CD or DVD. This includes not just the visible files but also the file system structure and, most importantly, the bootloader information that a computer's firmware (BIOS or UEFI) needs to start the installation process.
Because of this special structure, you can't just drag and drop the ISO file onto a USB drive. Instead, you must use an imaging tool to "flash" or "burn" the image to the drive. This process writes the contents of the ISO directly onto the USB drive at a low level, effectively turning the USB stick into a clone of the original installation disc.
To get a clearer understanding, let's watch a short explanation.
Four Windows programs for creating bootable Linux USBs from ISOs
The video 'Four Windows programs for creating bootable Linux USBs' from Veronica Explains starts with an excellent history and explanation of what an ISO file is and why we use it for bootable media.
Watch the segment from 00:50 to 03:35. Focus on how the ISO format evolved from optical discs to become the standard for creating bootable USB installers today.
2. Your First Bootable USB: Using Balena Etcher
Now for the practical part. We'll use a tool called Balena Etcher to create our bootable drive. It's widely recommended for beginners because of its simple, three-step process and robust safety features that prevent you from accidentally overwriting the wrong drive.
Prerequisites
- A USB Flash Drive: You'll need a drive that is at least 4 GB in size, though 8 GB or larger is recommended.
- The Ubuntu Server ISO: You should already have this from the previous lesson. If not, you can download it from the Ubuntu Server website (be sure to get the LTS version).
CRITICAL WARNING: The process we are about to perform will completely and permanently erase all data on your selected USB drive. Double-check that you have backed up any important files from the drive before you proceed.
Now, let's see how it's done.
Four Windows programs for creating bootable Linux USBs from ISOs
We'll continue with the same video, which provides a clear walkthrough for using Balena Etcher.
First, watch from 03:35 to 04:38 for a final check of the requirements. Then, follow the demonstration of Balena Etcher from 04:51 to 07:55. You can follow along and create your own bootable USB now. The steps are: Download Balena Etcher from etcher.balena.io and install it. Select your downloaded Ubuntu Server ISO file. Select your target USB drive (be very careful here!). Click 'Flash!' and wait for the process to complete and verify.
Once Etcher says "Flash Complete!", you have successfully created a bootable Linux installer. Congratulations! This drive is now ready to install Ubuntu on any compatible physical computer.
3. The Power User's Tool: Understanding Rufus
While Etcher is great for its simplicity, in a professional setting you'll often encounter a tool called Rufus. It is more powerful and exposes advanced options that are critical for troubleshooting and ensuring compatibility with different types of hardware. Understanding these options is excellent knowledge for a job interview.
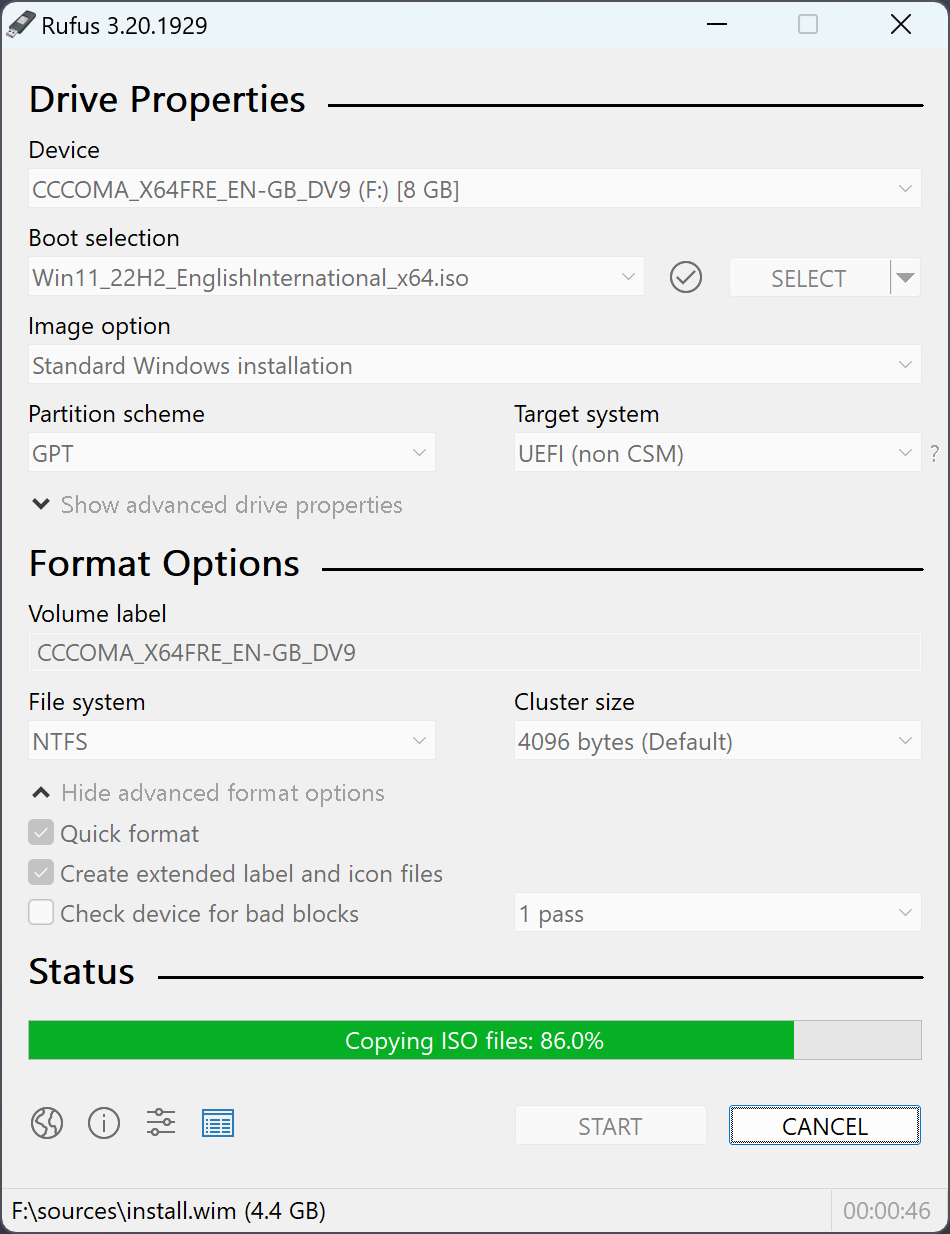
The most important option Rufus exposes is the Partition Scheme. This determines how the storage device is organized and is directly tied to the computer's firmware.
- MBR (Master Boot Record): The older standard, used with legacy BIOS firmware. It's highly compatible but has limitations (e.g., can't handle drives larger than 2 TB).
- GPT (GUID Partition Table): The modern standard, part of the UEFI firmware interface. It's more robust, supports much larger drives, and is the standard for all modern servers and PCs.
Choosing the wrong scheme can prevent a machine from booting from the USB. As a rule of thumb:
- For modern hardware (last ~10 years), use GPT for UEFI.
- For very old hardware, or if a UEFI system is in "Legacy/CSM" mode, use MBR for BIOS.
Let's watch a detailed guide on using Rufus to understand these options better.
From ISO to USB: Rufus Step-by-Step Guide for Beginners (In 10 Minutes)
The video 'From ISO to USB: Rufus Step-by-Step Guide' from PulsarTECH gives a fantastic breakdown of the advanced options in Rufus.
You don't need to create another USB stick right now, but watch these sections to understand the key concepts: Partition Scheme (03:35 - 04:44): Pay close attention to the explanation of MBR vs. GPT and when to use each. This is a very common source of booting issues. Troubleshooting Secure Boot (10:32 - 12:00): This is another critical real-world skill. Watch to understand what Secure Boot is and why you might need to disable it in the UEFI/BIOS to boot from a Linux USB.
For a simple text-based guide on using Rufus specifically for Ubuntu, you can also refer to this tutorial from the official Ubuntu documentation.
Create a bootable USB stick with Rufus on Windows
This official Ubuntu tutorial provides a concise, step-by-step written guide for using Rufus.
Quickly read through the sections 'USB selection', 'Select the Ubuntu ISO file', 'Write the ISO', and 'Write warnings'. This reinforces the basic steps and highlights the warnings Rufus provides.
4. The Linux Way: The dd Command
So far, we've used graphical tools on Windows. However, once you are working within a Linux environment, the primary tool for this job is a powerful command-line utility called dd. It's essential for any Linux administrator to know.
dd stands for "data duplicator" and performs a low-level, bit-for-bit copy from an input source to an output destination. This makes it perfect for writing ISO images. However, its power comes with a major risk: it does exactly what you tell it to, with no safety checks. If you specify the wrong output drive, you could wipe your primary hard drive. It's often nicknamed the "disk destroyer" for this reason.
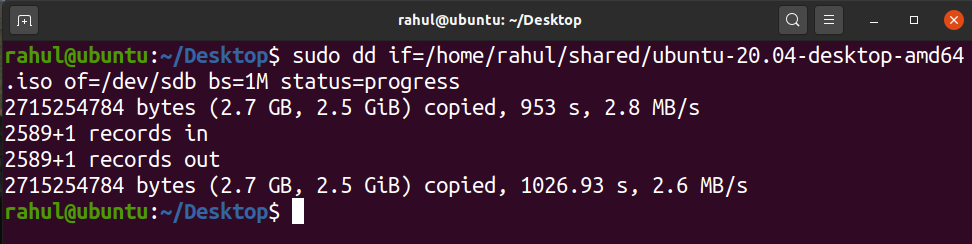
Let's review the process of using dd safely.
Create a Bootable USB from ISO using Linux DD Command
This article from Pendrive Linux, 'Create a Bootable USB from ISO using Linux DD Command', is an excellent and safe guide to using this powerful tool.
Read the following sections carefully: Start with the introductory section and the 'Important Warning Before Proceeding' to appreciate the power of dd. Read 'Important Notes Before Burning an ISO to USB'. This covers the critical safety steps like identifying the correct device with lsblk and unmounting it. Finally, read 'How to Burn a Bootable ISO to USB using DD'. Pay close attention to the command sudo dd if=/path/to/iso of=/dev/sdX ... and the explanation of each parameter (if, of, bs, status).
You won't use dd today, but keep this knowledge in your back pocket. It will become an indispensable tool once you're working on the Linux command line.
Conclusion
In this lesson, you've mastered a fundamental, practical skill for any hardware or server technician. You've not only learned the hands-on process of creating a bootable USB installer but also the theory behind it, which is crucial for troubleshooting and for demonstrating your expertise.
Key Takeaways:
- An ISO file is a bootable image that must be "flashed" or "burned" to a USB drive, not just copied.
- Balena Etcher is a simple, safe, and reliable tool for creating bootable media.
- Rufus is a more advanced tool that exposes critical settings like the Partition Scheme (GPT vs. MBR), which is vital for ensuring compatibility with a computer's firmware (UEFI vs. BIOS).
ddis the powerful, native command-line tool for this task in Linux, requiring extreme care to use correctly.
You are now fully prepared for the next step. In our upcoming lesson, we will return to the virtual machine we created. We will boot it from the ISO file (the virtual equivalent of the USB you just made) and walk through the entire process of installing the Linux server operating system.