Hello! In our last module, we focused entirely on the physical layer of servers—assembling PCs, understanding server-grade components, and even performing critical repairs like replacing a failed drive in a RAID array. You've now mastered the fundamentals of managing the physical machine.
Today, we move one layer up the stack from hardware to software. This lesson kicks off a new module by introducing a technology that revolutionised data centers: virtualization. We'll answer the question: how do you take one powerful physical server and safely run many different operating systems and applications on it at the same time?
This lesson directly addresses the learning outcome: Explain the concept of virtualization (Type 1 vs Type 2 hypervisors) and set up a virtual machine for OS installation. We'll cover the theory—the "why" that's crucial for job interviews—and then immediately apply it by creating our very first virtual machine (VM).
1. What is Virtualization?
In the past, the standard model was one server, one operating system, one primary application. A company might have a physical server for email, another for the company website, and a third for a database. This was simple but incredibly inefficient. Most of the time, those powerful servers were sitting idle, using only a fraction of their CPU and memory, all while consuming power and taking up physical space.
Virtualization solves this problem by creating a software-based, or "virtual," version of a computer. It allows a single physical machine, called a host, to run multiple independent virtual machines, called guests. Each guest has its own virtual hardware (CPU, RAM, storage, network card) and runs its own operating system and applications, completely isolated from the others.
The software that makes all this possible is called a hypervisor, or Virtual Machine Monitor (VMM).
To get a clear picture of this concept and its benefits, please watch the following video.
The video 'Virtualization Explained' from PowerCert Animated Videos provides a fantastic, easy-to-understand overview of why virtualization is so important.
Watch the beginning of the video from 00:00 to 02:16 to understand the core concept. Then, watch the summary of benefits from 05:46 to 07:53. Pay attention to the advantages mentioned, such as cost savings, portability, and disaster recovery. These are key talking points in any technical discussion about modern infrastructure.
2. Type 1 vs. Type 2 Hypervisors
Now that you know what a hypervisor does, it's important to understand that they come in two fundamental types. The distinction between them is a classic interview question and determines where and how virtualization is used.
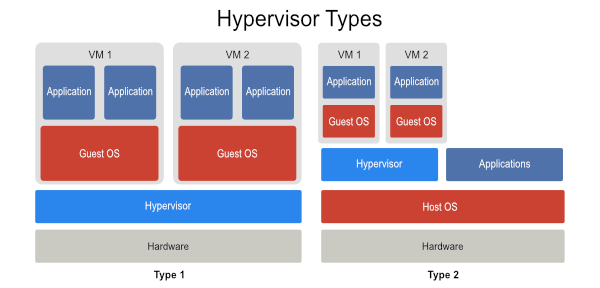
Type 1: Bare-Metal Hypervisor
- How it works: It is installed directly onto the physical server hardware, just like an operating system would be. There is no "host" operating system underneath it. The hypervisor is the operating system, in a sense, and its only job is to run VMs.
- Use Case: This is the standard for production environments in data centers. It offers the best performance, security, and stability because there is no extra layer of software between the hypervisor and the hardware.
- Examples: VMware ESXi, Microsoft Hyper-V, Proxmox, XCP-ng. In a data center role, you will almost certainly work with Type 1 hypervisors.
Type 2: Hosted Hypervisor
- How it works: It runs as a standard application on top of your existing operating system (like Windows, macOS, or Linux). You install it just like you would install a web browser or a text editor.
- Use Case: Perfect for personal use, development, and learning. It lets you run a different OS (like Linux) on your personal Windows or Mac machine to test software or learn new skills without needing a separate physical computer. This is what we will use today.
- Examples: Oracle VirtualBox, VMware Workstation/Fusion, Parallels Desktop.
The video you started watching explains this distinction well.
Let's continue with the 'Virtualization Explained' video to see the animated explanation of Type 1 and Type 2 hypervisors.
Please watch from 02:31 to 05:46. The video clearly demonstrates how a Type 1 hypervisor is installed on 'bare metal' and how a Type 2 hypervisor runs on a host OS.
For a solid textual summary of these concepts, the following article is also a useful reference.
Cybersecurity for Beginners: Setting up a Virtual Lab
This article from Flatiron School, 'Setting up a Virtual Lab', provides a concise written explanation of the two hypervisor types and their respective advantages and use cases.
Read the section titled 'Types of Virtualization'. It contains two sub-sections: 'Type 1: Bare Metal Hypervisors' and 'Type 2: Host-Based Hypervisors'. This will reinforce what you just saw in the video.
3. Practical Lab: Setting Up Your First VM with VirtualBox
Now we put the theory into practice. We'll set up a Type 2 hypervisor (Oracle VirtualBox) on your computer and create a new virtual machine that will be ready for a Linux server installation in our next lesson.
This video is an extremely detailed, step-by-step guide. We will follow it closely.
Install & Use VirtualBox PROPERLY: The 2025 Step-by-Step Setup Guide (Fast & Safe)
The 'Install & Use VirtualBox PROPERLY' video from IT Explainer is a comprehensive walkthrough. We will use it to prepare our system and create our VM.
Follow the video's instructions sequentially. I'll break it down into key stages. Don't worry about matching the OS exactly (the video uses Linux Mint); the VirtualBox steps are universal.
Step 1: Pre-flight Check: Enable Hardware Virtualization
Before installing anything, we need to ensure your computer's CPU is configured to support virtualization. This is usually called Intel VT-x or AMD-V.
- Follow the video from 00:10 to 01:08 to check if virtualization is enabled in your Windows Task Manager.
- If it's disabled, you'll need to restart your computer and enter the BIOS/UEFI settings to enable it. The video gives general guidance on where to find this setting. This is a critical first step.
Step 2: Download and Install Software
We need two things: the hypervisor (VirtualBox) and an operating system installer image (an ISO file). For our purposes, we'll prepare to install Ubuntu Server, a very popular Linux distribution in data centers.
- Watch from 01:08 to 02:08 to see how to download the VirtualBox installer from the official website (
virtualbox.org). Go ahead and download the "Windows hosts" package. - Next, you need the OS. Go to the official Ubuntu Server download page and download the latest LTS (Long-Term Support) version. This is a large file, so the download may take some time. An LTS version is standard for servers because it guarantees security updates for many years.
- Watch from 02:54 to 04:41 to see the installation process for VirtualBox itself. Follow the prompts and accept the default settings.
Step 3: Create the Virtual Machine
With VirtualBox installed and the Ubuntu Server ISO downloaded, we can now define our virtual computer.
-
Watch from 05:11 to 09:25. The presenter walks through the 'Create Virtual Machine' wizard. Follow along, but use these settings for our server:
- Name: Give it a descriptive name, like
Ubuntu-Server-LTS. - ISO Image: Select the Ubuntu Server ISO file you downloaded.
- Type and Version: VirtualBox should automatically detect
LinuxandUbuntu (64-bit). - Skip Unattended Installation: Check this box. We want to go through the manual installation process in the next lesson to understand every step.
- Hardware (Base Memory and Processors):
- RAM: Allocate at least 4096 MB (4 GB). If your host machine has 16GB or more, feel free to give it 8192 MB (8 GB).
- CPUs: Allocate at least 2 CPU cores.
- Hard Disk:
- Create a new virtual hard disk.
- Set the disk size to at least 40 GB. 50 GB or more is even better if you have the space.
- Leave the type as
VDIand do not check "Pre-allocate Full Size".
- Name: Give it a descriptive name, like
-
Click Finish when you're done. You will now see your new VM in the VirtualBox main window.
Step 4: Final Settings Tweak
There are a few more settings to check before we launch the machine for the first time.
- Watch from 09:25 to 10:52. The presenter shows how to open the VM's settings.
- Go to System -> Motherboard and ensure the Boot Order has
Opticallisted beforeHard Disk. This ensures the VM starts from our ISO file. You can uncheckFloppy. - Go to Display -> Screen and increase the Video Memory to the maximum possible (e.g., 128 MB). Also, Enable 3D Acceleration. While not critical for a server with no graphical interface, it's good practice.
- Go to System -> Motherboard and ensure the Boot Order has
Click OK to save the settings.
Step 5: Launch the VM
You are now ready to start the machine.
- Select your
Ubuntu-Server-LTSVM and click the green "Start" arrow. - A new window will open, and you should see the machine booting up. It will load the Ubuntu Server installer from the ISO file. You should land on a screen that asks you to choose a language and says "Try or Install Ubuntu Server".
Stop here! Our goal for today was to get to this point. We have successfully created and configured a virtual machine, ready for an OS installation.
Conclusion
In this lesson, you bridged the gap between physical and virtual hardware. You can now articulate the crucial role of virtualization in modern computing and explain the difference between the hypervisors used in data centers (Type 1) and those used for local development (Type 2). Most importantly, you put that theory into practice by setting up a VM from scratch.
Key Takeaways:
- Virtualization allows a single physical host to run multiple isolated guest operating systems, improving hardware utilization and efficiency.
- A hypervisor is the software that creates and manages virtual machines.
- Type 1 (Bare-Metal) hypervisors run directly on hardware and are used for production servers (e.g., VMware ESXi).
- Type 2 (Hosted) hypervisors run as an application on a host OS and are used for local development and testing (e.g., Oracle VirtualBox).
- Setting up a VM involves downloading a hypervisor and an OS ISO, then configuring virtual hardware like RAM, CPU, and storage before launching.
You are now perfectly positioned for our next lesson. We will pick up exactly where we left off: booting this new VM and walking through the complete installation of a Linux server distribution.