Hello! Welcome back to your training.
In our last session, we focused on diagnostics—learning to interpret system behavior to identify an overheating CPU or a failing Power Supply Unit. Now that you know how to find the problem, it's time to fix it.
This lesson directly addresses the learning outcome: Replace a faulty component (e.g., RAM, CPU cooler with new thermal paste) following safety procedures. We will move from theory to hands-on practice, covering the essential safety protocols and the step-by-step mechanical processes for replacing two of the most common components. Mastering this is a fundamental skill for any hardware technician, completing the "diagnose and repair" cycle.
1. The Foundation: Working Safely Inside a PC
Before you ever touch a component, you must ensure the safety of both yourself and the sensitive electronics you're working on. Failing to follow these procedures can lead to personal injury or permanent hardware damage.
Pre-Work Safety Checklist
Your first priority is to eliminate electrical hazards. This means completely isolating the machine from any power source.
Electrical Safety for Dell Product Repair
This Dell support article provides an industry-standard checklist for preparing a device for internal work. Following these steps systematically is non-negotiable in a professional environment.
Read the section titled 'Before Working Inside Your Device'. Focus on internalizing the pre-work checklist, especially the step to 'Discharge residual power' by holding the power button after unplugging. This drains any leftover charge in the capacitors.
Understanding and Preventing Electrostatic Discharge (ESD)
The most common way people accidentally destroy computer components is through electrostatic discharge (ESD). A tiny spark of static electricity, often too small for you to see or feel, can be fatal to a CPU, RAM module, or motherboard. Your ECE background gives you an understanding of how sensitive integrated circuits are to voltage spikes, and ESD is a prime example of this in the real world.

To understand the professional procedure for ESD protection, let's turn back to the Dell safety guide.
Electrical Safety for Dell Product Repair
This section details the 'why' and 'how' of ESD protection, explaining what it is and providing a step-by-step procedure to mitigate the risk.
Read the section 'Protection Against Electrostatic Discharge (ESD)'. Pay close attention to the five steps in the 'ESD Protection Procedure'. Even if you don't have a wrist strap, the practice of regularly touching an unpainted metal part of the chassis is a critical habit to build.
With these safety principles in mind, we're ready to start working on the hardware.
2. Practical Task 1: Replacing RAM Modules
Replacing RAM is one of the simplest hardware upgrades or repairs, making it a perfect place to start. Let's assume we've used a tool like MemTest86 (from our previous module) to identify a faulty RAM stick.
This video provides a clear, practical demonstration of the replacement process.
Old PC Upgrade #1: Options & RAM
This video from ExplainingComputers will walk us through the physical process of removing and installing RAM sticks.
Watch the segment from 00:16:04 to 00:17:37. Observe how the presenter handles the module by its edges, releases the retention clips, removes the old module, aligns the new one using the notch, and presses it firmly until the clips lock into place.
The "Why" Behind the Steps:
- Handling by the Edges: Avoids touching the gold contact pins. Oils and dirt from your fingers can interfere with the electrical connection, and it minimizes the risk of ESD damage to the chips themselves.
- The Notch: The notch on the bottom of the RAM stick is not centered. It's a keying mechanism that physically prevents you from installing the module backward or inserting a DDR4 stick into a DDR3 slot (and vice-versa).
- The "Click": The sound of the retention clips locking into place provides auditory and tactile confirmation that the module is fully seated. An improperly seated module is one of the most common reasons a computer fails to boot after a RAM upgrade.
After replacement, you would close up the case, reconnect power, and boot the system. The first stop is the BIOS/UEFI to confirm the total amount of installed memory is correct, then boot into the OS and check there as well.
3. Practical Task 2: Replacing a CPU Cooler
This task is more involved because it requires careful handling of the CPU and the correct application of a critical material: thermal paste. Let's say we've diagnosed an overheating CPU, and our investigation points to a failed cooler fan or dried-out thermal paste.
Why Thermal Paste is Essential
Before we touch the cooler, you need to understand the role of thermal paste. The surface of your CPU's Integrated Heat Spreader (IHS) and the base of your CPU cooler look perfectly smooth, but at a microscopic level, they are full of imperfections.
How to Apply Thermal Paste and How It Works
This article from Intel explains the physics behind thermal paste. Understanding this is key to appreciating why the application process is so important.
Read the sections 'Terms You Need to Know' and 'Why Do You Need Thermal Paste?'. The key takeaway is that thermal paste is a thermally conductive material designed to fill the microscopic air gaps between the CPU and the heatsink. Air is a terrible conductor of heat; the paste creates a much more efficient thermal bridge.
Step-by-Step CPU Cooler Replacement
We will now walk through the entire process, from removing the old cooler to testing the new one. The following video is an excellent guide.
How to Replace a CPU Cooler – Step by Step Guide
This video provides a complete, step-by-step guide to replacing a CPU cooler. We will break it down into four key phases: preparation, removal/cleaning, installation, and verification.
Watch the entire video from 00:02:00 to 00:07:07, but we'll focus on specific segments below. Keep an eye on the safety and precision at each step.
Phase 1: Preparation (Video 02:00 - 02:49)
- Gather your tools: You'll need a Phillips screwdriver, new thermal paste (if not pre-applied), and a cleaning solution (90%+ isopropyl alcohol) with lint-free wipes or coffee filters.
Phase 2: Removal and Cleaning (Video 02:49 - 03:33)
- Disconnect the Fan: Unplug the CPU fan cable from its header on the motherboard.
- Unscrew the Cooler: Loosen the screws holding the cooler in place. Crucially, do this in a diagonal or cross-pattern. This releases the mounting pressure evenly, preventing excess physical stress on one corner of the CPU and motherboard socket.
- Remove the Cooler: Gently twist the cooler to break the seal of the old thermal paste, then lift it straight up.
- Clean Both Surfaces: This is a critical step. Use isopropyl alcohol and a lint-free cloth to thoroughly remove all old thermal paste from both the CPU's IHS and the base of the old/new cooler. You want both surfaces to be perfectly clean and bare.
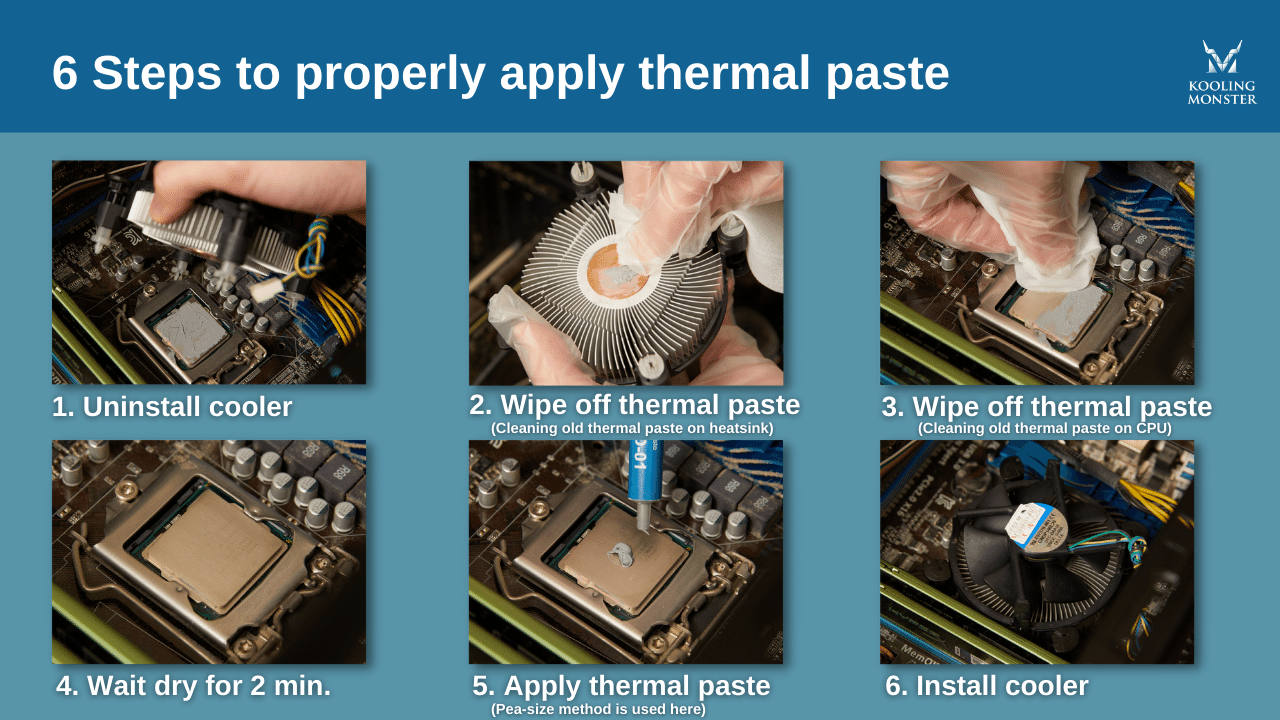
Phase 3: Application and Installation (Video 03:33 - 05:17)
- Apply New Thermal Paste: Apply a small amount—about the size of a single grain of rice or a small pea—to the center of the CPU's IHS.
- Avoid Spreading: Do not manually spread the paste. Let the pressure of the heatsink do it for you. This prevents air bubbles from being trapped, which would defeat the purpose of the paste.
- Mount the New Cooler: Carefully place the new cooler onto the CPU. Secure the screws, again using a cross-pattern to ensure even pressure is applied. Tighten them until they are firm, but do not overtighten.
- Connect the Fan: Plug the new cooler's fan cable into the CPU_FAN header on the motherboard.
Phase 4: Verification (Video 05:17 - 07:07)
- Boot and Check BIOS: Power on the system and immediately enter the BIOS/UEFI. Find the hardware monitor page and check the idle CPU temperature. It should be low (typically 30-45°C).
- Stress Test in OS: Boot into the operating system and use a tool like HWiNFO (which you've used before) and a stress test like Prime95 or Cinebench. Monitor the load temperatures to ensure they stay well within safe limits (e.g., under 85°C for most CPUs under heavy load). This confirms your installation was successful.
Conclusion
Congratulations! You've now covered the complete troubleshooting workflow: from diagnosing a fault to safely replacing the component and verifying the repair. These practical skills are the bedrock of a hardware support role.
Key Takeaways:
- Safety is paramount: Always power down, unplug, and ground yourself before working inside a PC to prevent injury and ESD damage.
- RAM replacement is a straightforward process of unclipping the old module and seating the new one until the clips lock.
- CPU cooler replacement is a more detailed procedure requiring meticulous cleaning of old thermal paste, precise application of new paste (pea-sized dot), and even mounting pressure applied in a cross-pattern.
- Verification is mandatory. Always check your work by monitoring temperatures or system information after a repair to ensure it was successful.
In our next lesson, we will tackle another critical maintenance task that often accompanies hardware changes: updating the motherboard firmware (BIOS/UEFI) to the latest version to resolve compatibility or stability issues.