Hello! Welcome back to the course.
In the last lesson, we focused on using a dedicated bootable tool, MemTest86, to get definitive proof of a RAM fault. This approach is essential when you have a strong theory and need to confirm it with hard data.
Today, we shift our focus to the initial, and often more ambiguous, phase of troubleshooting: diagnosing problems based on how the system behaves. This lesson addresses the learning outcome: Diagnose a failed Power Supply Unit (PSU) or an overheating CPU based on system behavior. These are two of the most common causes of system instability, and their symptoms can sometimes overlap. Your goal is to learn to recognize the tell-tale signs of each, understand the underlying reasons for those signs, and apply a logical process to confirm your diagnosis. This skill is fundamental for any hardware technician.
1. Diagnosing an Overheating CPU
When a computer suddenly becomes slow, laggy, or crashes during a heavy task like gaming or video rendering, one of the primary suspects is an overheating CPU. Let's explore why this happens and how to spot it.
The "Why": Thermal Throttling
Modern CPUs have a built-in self-preservation mechanism called thermal throttling. When a CPU's temperature exceeds its safe operating limit (often called TjMax, typically around 95-105°C), the CPU automatically reduces its clock speed and power consumption to generate less heat. This prevents permanent physical damage.
While thermal throttling is a protective feature, its side effect is a significant, often sudden, drop in performance.
CPU Thermal Throttling - Complete Guide
To understand the core concept, let's start with a clear definition of thermal throttling and its impact. This article provides a great overview.
Read the sections 'What is CPU Thermal Throttling?' and 'Performance Impact of Thermal Throttling'. Focus on understanding that throttling is a symptom of an underlying heat problem, not the problem itself.
The "What": Symptoms and Causes of Overheating
The most common symptoms you'll observe are direct results of thermal throttling or the system's attempts to cool itself:
- Sudden performance loss: The system becomes sluggish, applications lag, and game frame rates drop dramatically.
- Increased fan noise: System fans spin up to maximum RPM to try and dissipate the excess heat.
- System instability: Unexpected freezes, crashes, or Blue Screens of Death (BSODs) as the system struggles to operate correctly at high temperatures.
- Sudden shutdowns: If the temperature continues to rise despite throttling, the system will power itself off completely to prevent damage.
The causes of overheating are almost always related to a failure in the cooling system. To begin our practical diagnosis, let's watch a video that covers the most common culprits.
CPU Overheating? [WATCH THIS!]
This video from Greg Salazar is a fantastic practical guide to the main reasons a CPU overheats. We'll break it down to look at each potential failure point.
First, watch the introduction and the section on fans (00:00 - 03:03). Pay attention to the simple, practical checks: are the fans spinning? Are they plugged in correctly? Can you adjust their speed in the BIOS?
As the video showed, the first and most obvious check is the fans. But what if the fans are spinning and the CPU is still hot? The next step is to investigate the physical contact between the CPU and its cooler.
CPU Overheating? [WATCH THIS!]
Now, let's look at the most common 'user error' cause of overheating: improper cooler mounting.
Watch from 02:53 to 04:52. The video explains how to check for a gap between the cooler and CPU and discusses the importance of applying the right amount of thermal paste. A poor connection here means heat cannot be transferred away from the CPU effectively.
Finally, if the system uses an All-In-One (AIO) liquid cooler, there's another potential point of failure: the pump.
CPU Overheating? [WATCH THIS!]
AIO coolers introduce a mechanical pump that circulates liquid. If this pump dies, the coolant stops flowing, and the CPU will overheat very quickly. This part of the video explains the symptoms and provides a simple physical test.
Watch from 04:52 to 09:39. Focus on the symptoms of a dead pump (random shutdowns, lag spikes) and the practical diagnostic technique described around the 8:20 mark: carefully touching the AIO tubes to feel for the vibration of fluid movement. No vibration means the pump is likely dead or unpowered.
The "How": A Diagnostic Checklist for Overheating
Based on what we've learned, here is a systematic approach to diagnosing an overheating CPU:
- Monitor Temperatures: Use software like HWiNFO, Core Temp, or HWMonitor to get real-time CPU temperature data. Run a demanding application or a stress test (like Prime95) and watch the temperatures. If they quickly climb above 90°C and you see clock speeds drop, you have confirmed thermal throttling.
- Inspect Cooling Fans: Visually confirm that the CPU cooler fan and case fans are spinning. Check their connections to the motherboard.
- Check Cooler Mounting: Inspect the CPU cooler to ensure it is seated firmly and evenly on the CPU. There should be no visible gap.
- Check AIO Pump (if applicable): With the system on, carefully feel the AIO tubes for a slight vibration, which indicates the pump is circulating liquid.
- Consider Other Factors: Dust buildup in heatsinks and fans, poor case airflow, or high ambient room temperature can also contribute to overheating. These factors are detailed in the "CPU Thermal Throttling - Complete Guide" article under the "Causes of Thermal Throttling" section.
2. Diagnosing a Failed Power Supply Unit (PSU)
A PSU problem can be tricky because it can manifest in two distinct ways: a complete, catastrophic failure (the computer won't turn on at all) or a gradual, intermittent failure (the computer is unstable).
Scenario 1: The System is Completely Dead
This is the most straightforward scenario. You press the power button, and nothing happens—no lights, no fans, no sounds.
Initial Checks:
Before opening the case, always check the simple things:
- Is the power cord firmly plugged into both the wall outlet and the PSU?
- Is the wall outlet or power strip working? (Test it with a lamp).
- Is the rocker switch on the back of the PSU in the 'ON' (usually 'I') position?
If these are all fine, the next step is to test the PSU itself.
How to fix your PC if there's No Power
The 'paperclip test' is a classic technician's method to determine if a PSU is completely dead. This video demonstrates how to perform it safely.
Watch from 00:10 to 02:09. This covers the initial checks and then walks you through the paperclip test. Safety is paramount here. Make sure the PSU is unplugged from the wall before you touch any connectors. The goal is to short the green wire (PS_ON) to any black wire (Ground) on the 24-pin connector. If the PSU fan spins up when you plug it back in and flip the switch, the PSU is likely functional. If nothing happens, the PSU is dead.
Scenario 2: The System is Unstable
This is a more challenging diagnosis. A failing PSU might provide enough power for basic tasks but falter when the CPU and GPU demand more power. The symptoms can easily be mistaken for other issues.
Signs of Bad or Failing Power Supply Unit
This article provides an excellent list of symptoms that point towards a failing but not-yet-dead PSU. Understanding these is key to diagnosing instability.
Read sections 1, 2, and 3: 'Random Shutdowns or Restarts', 'Your GPU Isn’t Performing as Expected', and 'System Instability or BSODs'. Pay close attention to the context: these problems often occur specifically during high-load activities like gaming or rendering.
Other subtle signs can include strange noises from the PSU.
Signs of Bad or Failing Power Supply Unit
Audible clues can also help. Let's look at what different noises from a PSU might indicate.
Read section 6, 'You're Noticing Coil Whine or Electrical Noise'. While coil whine isn't always a sign of failure, a sudden onset, or any clicking/buzzing noises paired with instability, strongly suggests a PSU problem.
The "How": A Diagnostic Checklist for PSU Failure
- Check for 'No Power' failure: If the system is dead, perform the paperclip test after verifying external cables.
- Analyze the symptoms: If the system is unstable, ask:
- Does the crash/shutdown happen specifically under load? (e.g., starting a game). This strongly points to the PSU.
- Are you getting random BSODs, especially
WHEA_UNCORRECTABLE_ERRORorKERNEL-POWERerrors in Windows Event Viewer?
- Monitor Voltage Rails: Use a tool like HWiNFO to monitor the +12V, +5V, and +3.3V rails. While software monitoring isn't perfectly accurate, significant dips or fluctuations in these voltages under load are a major red flag for a failing PSU.
- Perform a Stress Test: Tools like OCCT include a specific "Power" test that loads the CPU and GPU simultaneously to maximize power draw. If the system crashes during this test, the PSU is the most likely culprit.
- Use a Multimeter (Advanced): For definitive proof, you can use a digital multimeter to test the voltage outputs directly from the PSU's connectors. This gives you a much more accurate reading than software monitoring.
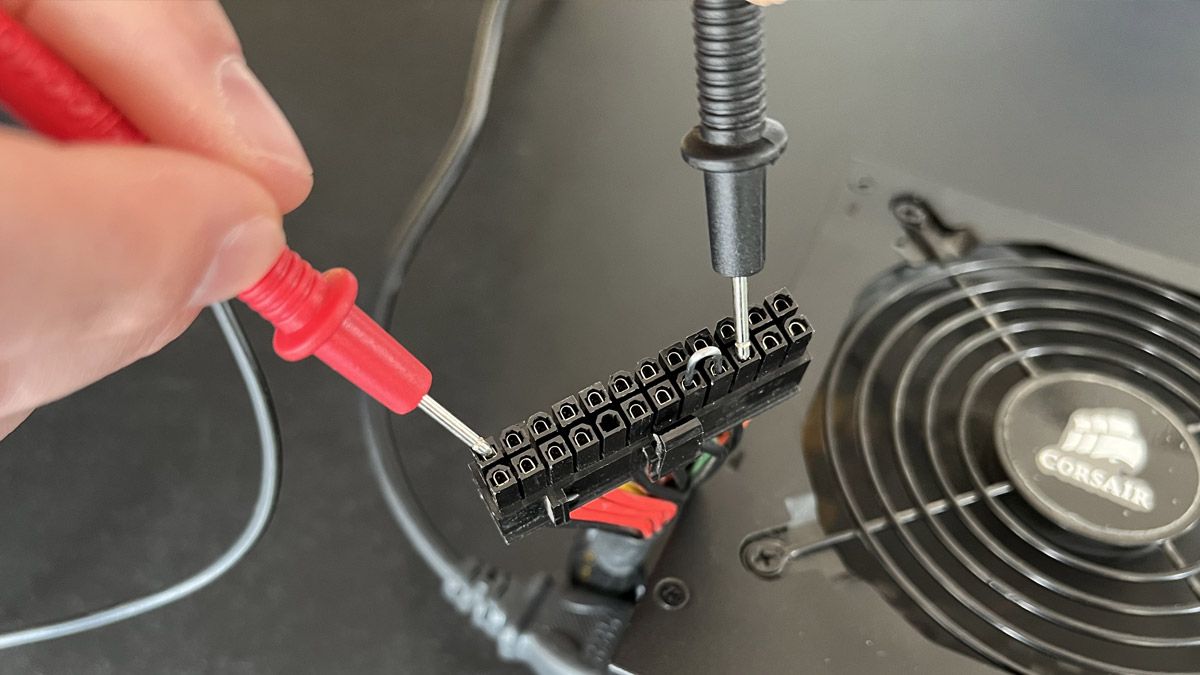
This method provides concrete evidence of the PSU's health, measuring the actual electrical output against its specification.
Conclusion
You can now distinguish between the symptoms of an overheating CPU and a failing PSU. You've learned to move from observing behavior to forming a hypothesis and then using practical tests to confirm it.
Key Takeaways:
- CPU Overheating is diagnosed by observing thermal throttling (performance drops under load) and high temperatures (above 90°C) with monitoring software. The root cause is almost always a failure in the cooling system (fan, mounting, paste, or pump).
- PSU Failure presents in two ways: no power at all (diagnosed with the paperclip test) or instability under load (diagnosed by observing random shutdowns/crashes during heavy tasks).
- The key to differentiating these issues is context and data. An overheating CPU will show high temperatures. A failing PSU will falter under high power draw, often with unstable voltage readings.
In our next lesson, we will take the logical next step. Now that you know how to diagnose a faulty cooler or identify a dead component, we will learn how to replace a faulty component (e.g., RAM, CPU cooler with new thermal paste) following safety procedures.