Hello! Welcome back to your Linux system administration course.
In the last lesson, we focused on software and configuration troubleshooting by diagnosing and fixing file permission issues. Today, we're shifting our attention from the software layer down to the physical hardware. A server's reliability is only as good as its components, and storage drives are among the most common points of failure.
This lesson will teach you how to proactively monitor the health of your hard drives and SSDs. We'll be working with the S.M.A.R.T. system and the smartctl command-line tool. By the end of this lesson, you will be able to use smartctl to inspect storage device health and interpret its S.M.A.R.T. data. This is a critical skill for any system administrator or data center technician, as it allows you to predict drive failures, prevent data loss, and ensure the reliability of your systems.
1. Understanding S.M.A.R.T. and smartctl
Before we jump into the practical side, it's important to understand what we're working with. Modern storage devices (both HDDs and SSDs) include a built-in monitoring system called S.M.A.R.T. (Self-Monitoring, Analysis, and Reporting Technology). This system constantly tracks various metrics about the drive's health and performance.
Our window into this system on Linux is a utility called smartctl. To get a formal introduction to these concepts, please read the first few sections of the following article.
smartctl: Syntax, Options, Examples
The article "smartctl: Syntax, Options, Examples" from phoenixNAP provides a clear and concise overview. It explains what S.M.A.R.T. is, defines key attributes, and introduces the smartctl command.
Please read the sections "Introduction to SMART", "SMART Attributes Explained", and "What Is smartctl?". Focus on understanding the purpose of S.M.A.R.T. and the role of smartctl as our interface to it.
The smartctl tool is part of the smartmontools package. Let's start by getting it installed on your system. This is a quick practical step you'll perform on almost any new server you manage.
Open your terminal and run:
sudo apt update
sudo apt install smartmontools
To verify the installation, you can run smartctl --version.
2. Performing Your First Health Check
With smartctl installed, you can immediately check the health of your drives. The most direct way to do this is with the -H or --health option, which gives a simple "PASSED" or "FAILED" assessment.
First, you need to identify your storage device's name. You can use lsblk to list your block devices. It will likely be something like /dev/sda, /dev/nvme0n1, etc. For this lesson, we'll assume your drive is /dev/sda. Remember to replace this with your actual device name.
# Run this command, replacing /dev/sda with your drive name
sudo smartctl -H /dev/sda
A PASSED result is good, but it doesn't tell the whole story. A drive can pass this basic check while still showing early warning signs of trouble. For a complete picture, we use the -a or --all option.
The following video demonstrates a real-world scenario of a failing drive and shows the initial smartctl -a command.
My Hard Drive Is Failing! - The smartctl Command & ddrescue Recovery Attempt
The video "My Hard Drive Is Failing!" by Robert Elder Software shows the practical application of smartctl in a real troubleshooting situation. This first clip introduces the -a flag.
Watch from 01:12 to 01:52. The presenter runs sudo smartctl -a and gives a quick overview of the output, which we will now break down in detail.
The output of smartctl -a is dense, but it's typically broken into three main sections:
- Device Information: Model number, serial number, firmware version, etc.
- Overall Health Assessment: The same "PASSED" or "FAILED" status from the
-Hflag. - S.M.A.R.T. Attributes Table: The heart of the report, containing detailed metrics.
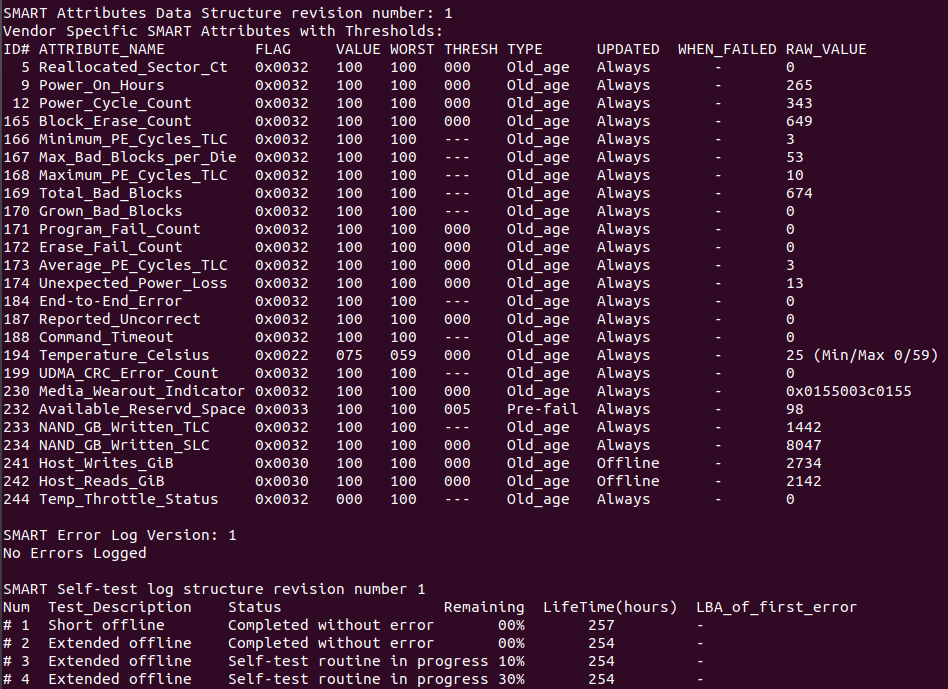
3. Interpreting Key S.M.A.R.T. Attributes
This is the most crucial skill. Knowing which attributes to watch for is what separates a novice from an experienced admin. The values can be cryptic, and their exact meaning can vary by manufacturer. However, a few attributes are universally critical.
Let's look at a few of the most important ones. The table below lists attributes that are frequently monitored and are excellent to know for a job interview.
| ID# | Attribute Name | What it Means |
|---|---|---|
| 5 | Reallocated_Sector_Ct |
Number of bad sectors that the drive has remapped to a spare area. A non-zero value is a concern; a value that is actively increasing is a strong indicator of a failing drive. |
| 9 | Power_On_Hours |
The total number of hours the drive has been powered on. Essential for gauging the age and usage of a drive. This is how you can spot a "new" drive that has actually been running for thousands of hours. |
| 194 | Temperature_Celsius |
The current internal temperature of the drive. Consistently high temperatures (e.g., > 50-55°C) can reduce the lifespan of a drive. |
| 197 | Current_Pending_Sector_Ct |
Number of "unstable" sectors waiting to be remapped. When the drive has trouble reading a sector, it marks it as "pending." If a future write to that sector succeeds, it's cleared. If it fails, the sector is reallocated (and ID 5 increases). A non-zero value here is a major warning sign. |
| 199 | UDMA_CRC_Error_Count |
Errors in data transfer between the host and the drive. This often points to a faulty data cable (e.g., a bad SATA cable) or a poor connection, rather than a problem with the drive itself. A valuable clue for troubleshooting. |
The following video segment explains the challenge of interpreting these attributes and focuses on the Current_Pending_Sector_Count, which is one of the most significant predictors of failure.
My Hard Drive Is Failing! - The smartctl Command & ddrescue Recovery Attempt
Let's return to the "My Hard Drive Is Failing!" video. The presenter does a great job of explaining the complexity of these attributes and highlights why some are more concerning than others.
Watch from 01:52 to 05:28. Pay close attention to the discussion around 'pre-fail' vs. 'old_age' types and the specific explanation of Current_Pending_Sector_Count.

4. Actively Testing Your Drives
Waiting for S.M.A.R.T. attributes to change is a passive approach. You can also actively command the drive to test itself. These tests are non-destructive, meaning they won't harm your data and can be run on a live system.
There are two main types of tests:
- Short: Takes a few minutes. Performs a quick check of the drive's electrical and mechanical systems.
- Long (or Extended): Can take several hours. Scans the entire disk surface for defects. It's a much more thorough check.
You can initiate these tests with the -t or --test option.
# Start a short self-test
sudo smartctl -t short /dev/sda


# Start a long self-test
sudo smartctl -t long /dev/sda
After starting a test, the command will tell you how long it's estimated to take. The results aren't shown immediately. You can check the progress and see the final results by viewing the full report (-a) or by specifically looking at the self-test log with -l selftest.
This final video clip will show you exactly how to run these tests and check the results.
My Hard Drive Is Failing! - The smartctl Command & ddrescue Recovery Attempt
This last segment from the "My Hard Drive Is Failing!" video demonstrates how to initiate self-tests and interpret their results, which is the final piece of our smartctl toolkit.
Watch from 05:28 to 07:17. Observe how the presenter runs a short test, checks the status, and then reviews the self-test log, where a previous long test has failed.
A common practice for sysadmins is to schedule a long self-test to run automatically once a week or once a month (using cron, which you've learned about) during off-peak hours.
Conclusion
You now have the knowledge and practical skills to assess the health of the most failure-prone components in a server: the storage drives. By using smartctl, you can move from a reactive to a proactive maintenance strategy, identifying potential problems before they result in catastrophic data loss and downtime.
Key Takeaways:
- S.M.A.R.T. is a built-in drive monitoring system, and
smartctlis your command-line tool to access it. - A quick health summary is available with
smartctl -H, but a full report withsmartctl -ais necessary for a real diagnosis. - Focus on key attributes:
Reallocated_Sector_Ct(ID 5),Current_Pending_Sector_Ct(ID 197), andPower_On_Hours(ID 9) are critical indicators of drive health and age. UDMA_CRC_Error_Count(ID 199) often points to cabling issues, not a failing drive.- You can and should run non-destructive self-tests (
-t short,-t long) to actively check for problems.
In our next lesson, we will continue with essential maintenance tasks by learning how to apply security updates and kernel patches, and manage system reboots for kernel upgrades. Keeping the core of the operating system updated is just as important as ensuring the hardware is healthy.