Hello! Welcome to the next lesson in our journey through Linux system administration.
In our last session, you mastered the art of managing background processes. You learned how to use &, nohup, jobs, fg, and bg to run long-running tasks without tying up your terminal or worrying about disconnections.
Now, let's consider the next logical problem. On a busy server, you'll have many processes running simultaneously—some critical, some less so. What happens when they all compete for the same limited resource: CPU time? How do you ensure that your critical database service isn't starved of resources by a non-urgent data analysis script?
This lesson focuses on exactly that. We will cover how to adjust the scheduling priority of processes using nice and renice. By the end, you'll be able to influence how the Linux kernel allocates CPU time, a crucial skill for performance tuning and maintaining server stability.
1. The "Why": Understanding Process Priority
On a Linux system, the kernel scheduler is the component responsible for deciding which process gets to use the CPU at any given moment. It juggles hundreds or thousands of processes to create the illusion that they are all running at once.
As a system administrator, you can influence the scheduler's decisions by adjusting a process's priority. We do this using a "nice" value.
- Nice Value: A number ranging from -20 to +19.
- The Analogy: Think of it as how "nice" a process is to others. A process with a high nice value (like +19) is very "nice"—it willingly gives up its CPU time to other processes. A process with a low, negative nice value (like -20) is "not nice"—it demands the CPU and has a higher priority.
- The Rule: A lower nice value means a higher priority. A higher nice value means a lower priority. By default, processes started by a user have a nice value of 0.
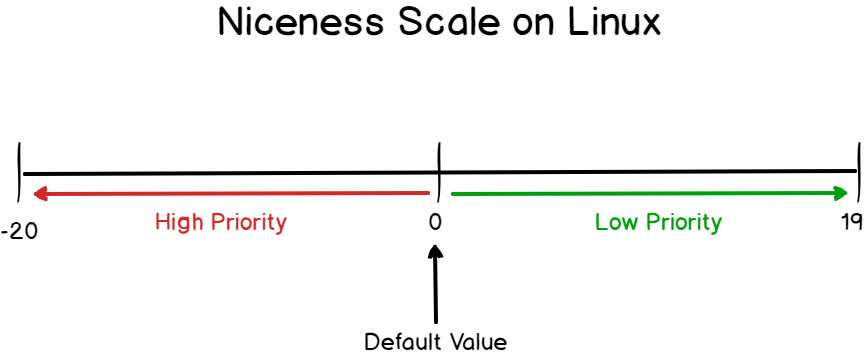
A crucial security and stability rule is that only the root user can assign negative nice values (i.e., increase a process's priority above the default). This prevents a regular user from giving their own process such high priority that it starves essential system services, potentially crashing the server.
To get a solid grasp of the theory and see these commands in action, let's watch a concise video that explains the core concepts and demonstrates the effects of nice and renice.
Linux Nice and Priority values
This video from the YouTube channel Engineer Man provides an excellent overview of process priority, demonstrating the commands with a clear, practical example.
Please watch from the beginning to 08:20. As you watch, focus on: The explanation of why priority is needed (00:00 - 01:45). The relationship between the 'nice' (NI) and 'priority' (PR) values shown in top (03:14 - 04:58). The demonstration of starting a new process with nice (04:58 - 06:50). The demonstration of changing a running process with renice (06:50 - 08:20). The important warning about setting very high priorities (negative nice values).
2. Practice Lab: Taking Control of the CPU
Now it's time to apply what you've seen. We'll use a simple script to simulate a CPU-intensive task and observe how nice and renice affect its performance.
Setup
First, open your terminal and create a simple shell script that does nothing but consume CPU.
- Create the script file:
echo 'while true; do :; done' > cpu_eater.sh - Make it executable:
chmod +x cpu_eater.sh - Open a second terminal window (or use a terminal multiplexer like
tmux) and runhtop. This will be your dashboard to observe CPU usage and nice (NI) values in real-time. Keep it visible throughout this exercise.
Part A: Starting Processes with nice
The nice command is used to launch a new process with a non-default priority.
-
Baseline: Start two CPU-eaters in the background, both with default priority.
./cpu_eater.sh &
./cpu_eater.sh &
Look at
htop. You'll see twocpu_eater.shprocesses, each with aNIvalue of 0, sharing the CPU core's time roughly 50/50. -
Clean up: Stop these processes. You can use
pkill cpu_eater. -
Lowering Priority: Now, let's start one process with a lower priority. A higher nice value means lower priority.
./cpu_eater.sh &
nice -n 15 ./cpu_eater.sh &
Observe
htopnow. The process withNI0 gets the vast majority of the CPU time, while the "nicer" process withNI15 gets whatever is left over. -
Clean up: Stop these processes again (
pkill cpu_eater).
Part B: Changing Running Processes with renice
More often, you'll need to adjust the priority of a process that is already running. This is the job of the renice command.
-
Start fresh: Launch two CPU-eaters with default priority again.
./cpu_eater.sh & ./cpu_eater.sh & -
Get PIDs: Find their Process IDs (PIDs). The
jobs -lcommand is perfect for this.jobs -lThe output will show the job number, PID, status, and command. Note the PIDs.
-
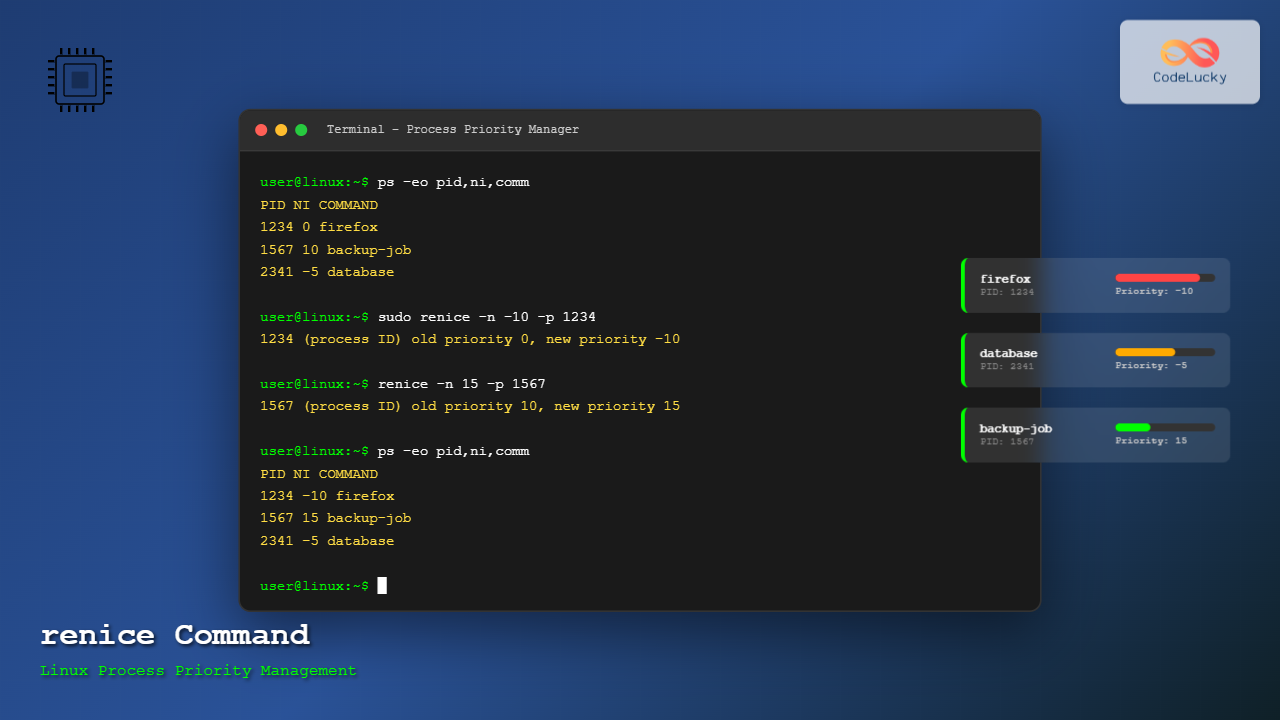
De-prioritize a process: Pick one of the PIDs and use
reniceto make it "very nice" (lowest priority).# Replace <PID> with one of the PIDs from the previous step renice 19 <PID>Watch
htop. The CPU usage for that process will plummet. It's now only getting CPU time when nothing else needs it. -
Increasing Priority (with
sudo): Now, let's try to give the other process a higher priority (a negative nice value).# Replace <OTHER_PID> with the other process's PID renice -10 <OTHER_PID>This will fail with a "Permission denied" error. Remember, only root can do this.
-
Using
sudo: Now, do it correctly withsudo.sudo renice -10 <OTHER_PID>Check
htopone last time. The process withNI-10 now completely dominates the CPU, starving the other process. This demonstrates both the power ofreniceand the importance of using it carefully.
- Final Cleanup: Terminate all
cpu_eater.shprocesses withpkill cpu_eater.
3. Real-World Scenarios (For the Job Interview)
Knowing the commands is one thing; knowing when and why to use them is what employers look for. Let's connect this to your goal of working in a data center.
-
Scenario 1: The Noisy Neighbor
- Problem: The server hosting the company's main website has become sluggish. Using
top, you identify a script started by a developer that is consuming 90% of a CPU core. - Your Action: You don't want to kill the script and lose the developer's work. Instead, you get its PID and lower its priority significantly:
renice 19 <PID>. - Result: The script is now "nice" and only uses spare CPU cycles. The web server's performance immediately returns to normal, and the developer's job eventually completes without impacting critical services.
- Problem: The server hosting the company's main website has become sluggish. Using
-
Scenario 2: The Critical Backup
- Problem: A critical database backup job, which must finish within a 2-hour maintenance window, is running too slowly because other non-essential cleanup tasks are also running.
- Your Action: You need to ensure the backup gets the resources it needs. You identify the backup process's PID and give it a higher priority:
sudo renice -5 <BACKUP_PID>. - Result: The backup process gets more CPU time, speeds up, and finishes well within its allotted window, ensuring data integrity.
-
Scenario 3: Proactive Planning
- Problem: You need to schedule a resource-intensive log analysis job to run every night. You know it's not time-sensitive, and it must never interfere with production traffic.
- Your Action: When adding the job to
cron, you launch it with thenicecommand from the start:nice -n 19 /usr/local/bin/analyze_logs.sh. - Result: The job is "born nice." Every night it runs with the lowest priority, doing its work without ever posing a risk to the performance of more critical applications.
For a quick text reference on these commands, including how to renice all processes for a specific user or group, the following article is useful.
How to Change Process Priority using Linux Nice and Renice Examples
This article from The Geek Stuff provides a clear, text-based summary of nice and renice with more examples. It's a great page to bookmark for future reference.
Quickly read sections 5, 6, and 7, which cover using renice on a running process, all processes in a group, and all processes for a user.
Conclusion
Excellent work. You've now added another layer of sophistication to your process management skills. You've moved from simply running and stopping processes to actively managing their resource consumption, a core competency for any system administrator.
Key Takeaways:
- Process Priority: Controlled by a "nice" value from -20 (highest priority) to +19 (lowest priority).
nice: Launches a new process with a specified nice value.renice: Changes the nice value of a running process.- Permissions: Any user can lower the priority of their own processes (increase the nice value), but only
rootcan increase the priority (set a negative nice value).
In our next lesson, we will tackle a fundamental aspect of troubleshooting: "Locate and interpret system logs in /var/log and journalctl to diagnose application or service errors." Now that you can run, manage, and tune processes, the next step is learning how to investigate what they are doing and what went wrong when they fail.