Hello! Welcome to your next lesson in the Data Center Operations and Deployment module.
In our last lesson, we covered the critical planning and documentation phase of a server deployment. You learned how to follow a change management procedure, culminating in an approved Request for Change (RFC). That approved RFC is your green light to begin the hands-on work.
Today, we transition from planning to execution. This lesson will walk you through the entire lifecycle of a physical server deployment, directly addressing the learning outcome: Execute a server deployment: rack the server, connect power and network, configure its management interface, and install the OS. This is the "rack and stack" process that is a fundamental, everyday task for a data center technician. Mastering this workflow is not just about completing a task; it's about understanding the sequence, the safety precautions, and the "why" behind each step—knowledge that is essential for both your daily work and for acing technical interviews.
Step 1: Physical Installation (Racking and Cabling)
With your approved change request in hand, the first step is to get the server physically and safely installed into its designated spot in the data center rack. This involves installing the rails, mounting the server, and then connecting power and network cables according to the plan you created.
Let's watch a video of data center engineers performing a real customer installation. This will give you a feel for the environment and the practical steps involved.
A DAY in the LIFE of the DATA CENTRE | FULL CUSTOMER "RACK & STACK" with ASH & JAMES!
This video, 'A DAY in the LIFE of the DATA CENTRE', from Custodian Data Centres, shows a full 'rack and stack' job from start to finish. It's a great real-world look at the process.
Watch the following sections, paying attention to how the engineers work and solve problems on the fly: Preparing the Rack & Rails (01:25 - 04:14): Notice how they prepare the rack by removing blanking panels and then install the server rails. They even run into a common issue where the rack posts need to be adjusted for the rails to fit. Mounting Hardware (04:14 - 06:08): Observe the physical act of lifting and sliding the servers into the rails. They also install network switches using cage nuts, a small but essential piece of hardware. Cabling (06:08 - 11:58): This is a fantastic demonstration of professional cable management. They create custom-length network cables and use a 'cable comb' to create a neat loom, separating data cables from power cables.
The video gives you the "feel" of the job. Now, let's look at the official, technical procedure for this process. Server manufacturers provide detailed guides for their hardware.
Rack Installation Guide - Lenovo Documentation
This 'Rack Installation Guide' from Lenovo provides the precise, step-by-step instructions and, most importantly, the safety guidelines for installing a server.
Please read the following sections. Compare these formal instructions to what you saw in the video. 'Read these guidelines first' (Page 2): This is crucial. Pay attention to the guidelines on rack depth, airflow, installing filler panels, and lifting safety. An interviewer might ask about these safety practices. 'Installing the slide rail kit' (Page 3-4): Review the diagrams showing how to attach the rails to the rack posts. This is the process you saw in the video and is visualized in the GIF below. 'Install the server onto the inner rails' (Page 5): Note the caution about using two people to lift the server and the specific method for lowering it onto the rails. 'Slide the server into the rack' (Page 6): This covers the final step of pushing the server in until it clicks and securing it.
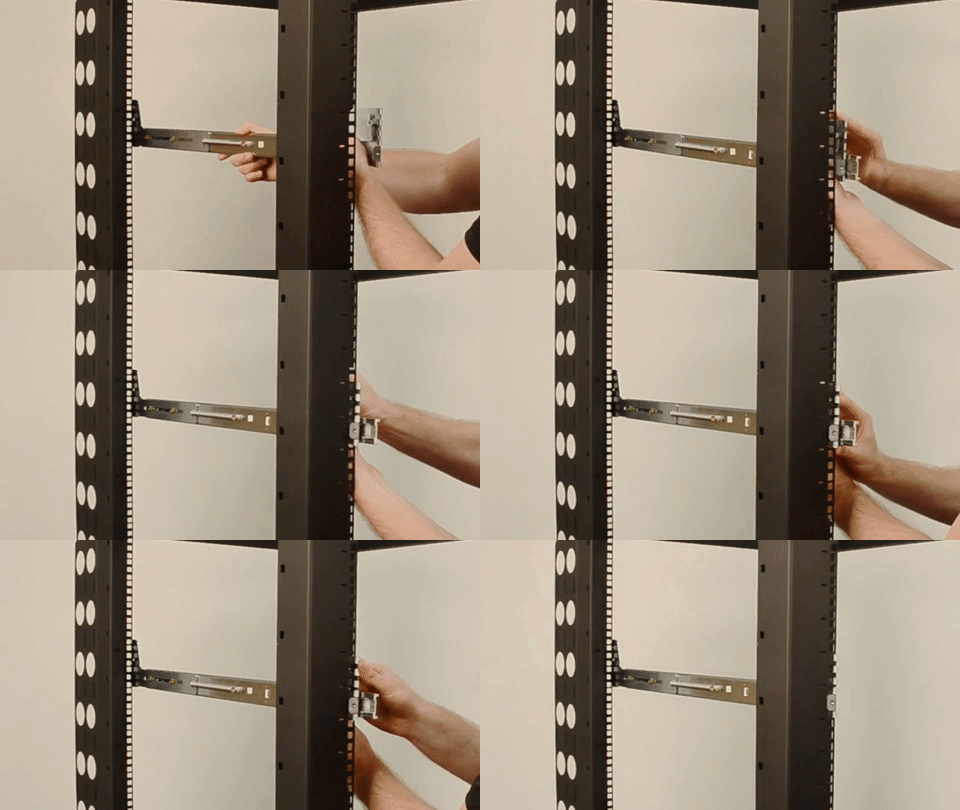
Once the server is racked, you connect the power and network cables as specified in your deployment plan. This includes connecting the Power Supply Units (PSUs) to the Power Distribution Units (PDUs) in the rack, and connecting the network interfaces to the top-of-rack switches.

Step 2: Configure the Remote Management Interface
Once the server has power and a basic network link, you do not plug in a monitor and keyboard. In a data center, all server management is done remotely. This is possible thanks to a dedicated "computer-within-a-computer" called a Baseboard Management Controller (BMC).
- Dell calls it iDRAC (integrated Dell Remote Access Controller).
- HPE calls it iLO (Integrated Lights-Out).
- Other vendors call it IPMI (Intelligent Platform Management Interface).
This controller has its own dedicated network port (as seen in the image above), its own processor, and its own firmware. It allows you to control the server's power, view its console, and install an OS, even if the server is turned off or has no operating system installed.
Your first task is to configure this management interface with an IP address so you can access it from your workstation.
HPE DL380 Gen10 Unboxing | Prepare Server to Install in DATACENTER
The video 'HPE DL380 Gen10 Unboxing | Prepare Server to Install in DATACENTER' provides a perfect demonstration of configuring the HPE iLO interface from scratch.
Watch the section on iLO Configuration (15:24 - 23:02). The presenter uses a very clever technique. Because the iLO is set to DHCP by default but there's no DHCP server on the network yet, he connects his laptop directly to the iLO port and runs a temporary DHCP server on his laptop to assign an initial IP address. Focus on these key moments: Connecting the laptop to the iLO port. Starting a DHCP server on the laptop to give the iLO an IP. Connecting to the iLO's web interface using that IP. Logging in and setting a static IP address, which is best practice for management interfaces.
Once the static IP is set, the server is now fully accessible for remote administration. This is a critical milestone in any deployment.
Step 3: Remote RAID Configuration and OS Installation
With access to the iDRAC/iLO web interface, you can now perform the final steps of the deployment: configuring the storage and installing the operating system. All of this is done through your web browser, using the remote management features.
RAID Configuration
Before you can install an OS, you must configure the server's physical hard drives into a logical volume that the OS can see. This is done using the RAID controller. In our previous module, we learned the theory of RAID; now we see the practice.
HPE DL380 Gen10 Unboxing | Prepare Server to Install in DATACENTER
Let's continue with the same 'HPE DL380' video, as it flows directly into RAID configuration via the iLO remote console.
Watch the segment on RAID Configuration (20:40 - 26:32). You'll see the presenter use the 'HTML5 remote console' feature to access the server's pre-boot environment. He then navigates the RAID controller's utility to: Create a new array. Select the physical disks to include in the array. Choose the RAID level (he chooses RAID 6). Create a logical/virtual disk from that array.
OS Installation via Virtual Media
Now that the storage is ready, you can install the operating system. The most common method is to use the virtual media feature of the iDRAC/iLO. This allows you to mount an OS installer ISO file (stored on your laptop or a network share) as if it were a physical CD/DVD drive attached to the server.
HPE DL380 Gen10 Unboxing | Prepare Server to Install in DATACENTER
The final practical step is installing the OS. The 'HPE DL380' video shows this process for a VMware ESXi hypervisor, but the steps are identical for installing a Linux distribution like Ubuntu Server.
Watch the last two key sections of the video: OS Installation (28:37 - 41:01): See how he mounts the ESXi ISO file through the iLO web console. He then reboots the server and instructs it to boot from the 'Virtual CD-ROM'. The OS installation then proceeds as normal, installing onto the internal USB drive he prepared earlier. Post-Install Configuration (37:04 - 44:08): After the OS is installed and rebooted, the final step is to configure the OS's own management network settings directly from the console, so the hypervisor itself is accessible on the network.
For a high-level summary of the entire process, from hardware setup to OS installation, this article provides a good checklist.
How to Configure a Server: A Comprehensive Guide
The article 'How to Configure a Server: A Comprehensive Guide' provides a great text-based overview of the steps we've just seen in the videos.
Quickly read through these three sections. They provide a concise summary of the entire deployment workflow. 'Step 1: Setting up the hardware' 'Step 2: Installing the operating system' 'Step 3: Initial configuration'
Conclusion
Congratulations! You have just walked through the complete, end-to-end process of a server deployment. From an empty space in a rack, we now have a fully installed and remotely accessible server with an operating system ready for service.
Key Takeaways:
- Deployment is a workflow: The process flows logically from physical installation (racking, cabling) to remote configuration (iLO/iDRAC IP setup) to logical setup (RAID, OS install).
- Safety and Planning First: Physical installation must follow manufacturer guidelines and safety best practices for lifting and rack stability. Cabling should be neat and follow a pre-defined plan.
- Remote Management is Everything: The BMC (iDRAC/iLO/IPMI) is the key to all modern server management. Configuring its IP address is the first critical step after providing power.
- Virtual Media is Standard Practice: Operating systems are installed remotely by mounting ISO images, eliminating the need for physical media or presence in the data center.
You now have a practical understanding of one of the most fundamental skills required in a data center. You can confidently describe this entire process, explaining not just what you would do, but why each step is performed in that order.
In our next lesson, we'll zoom out from the single server we just deployed. We'll learn how to analyze an infrastructure diagram to identify single points of failure at the power, network, and storage layers, a crucial skill for ensuring the resilience of the entire data center.