Hello! Welcome to your fourth lesson in the "Navigating the Databricks Lakehouse Platform" module.
In our last session, you learned how to navigate the Databricks workspace and manage individual assets like notebooks. While features like built-in revision history are useful for recovering your own work, they fall short in a collaborative, production-focused environment. Effective data engineering relies on robust software engineering practices, chief among them being version control.
Today's lesson directly addresses this need. Our learning outcome is to integrate and manage source code using Databricks Repos. You will learn how to connect your Databricks workspace to a remote Git repository (we'll use GitHub as our example), clone it, and use Git operations like branching, committing, pushing, and pulling directly within the Databricks UI. This skill is essential for collaborative development and deploying reliable data pipelines.
Why Go Beyond Basic Revision History?
As we briefly saw, every Databricks notebook automatically saves a history of its changes. This is great for quickly reverting a mistake. However, it has significant limitations:
- It's isolated: The history is tied to that specific notebook within that specific workspace. It doesn't track changes across an entire project (multiple notebooks, scripts, etc.).
- It lacks structure: It doesn't support structured workflows like feature branching, code reviews via pull requests, or atomic commits that group related changes across multiple files.
- It's not portable: If the workspace is deleted, the history is lost.
For professional development, we need a more powerful solution. This is where Databricks Repos comes in, providing full Git integration.
Let's clarify the distinction with a quick read.
This article from endjin clearly explains the difference between the default version history and the more robust Git integration offered by Databricks Repos.
Please read the first two sections: 'Version Control in Databricks Notebooks': Understand the built-in revision history feature. 'Git integration in Databricks Notebooks': Focus on why a dedicated Git integration via Databricks Repos is the recommended best practice for serious development.
The Databricks Repos Workflow
Integrating Git with Databricks follows a standard development workflow, but with the convenience of performing most actions within the Databricks UI.
The overall process can be visualized as follows:
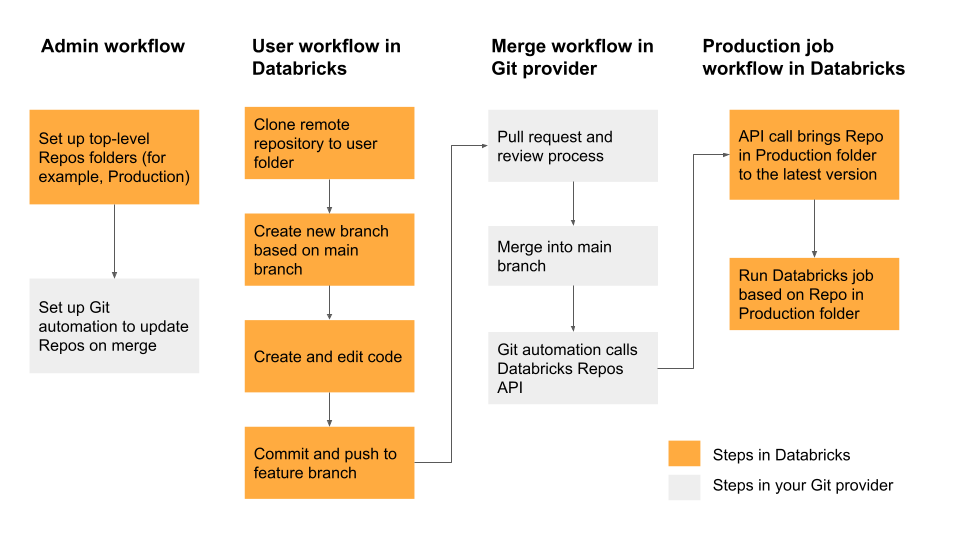
Our focus today is on the User workflow: cloning a repository, creating branches, developing code, and synchronizing it back to the remote Git provider.
Setting Up Your Git Integration
For this section, I recommend having your Databricks workspace and a GitHub account open so you can follow along. The most common way to connect Databricks to a private Git repository is by using a Personal Access Token (PAT).
This first video from Databricks Academy provides a perfect walkthrough of the entire setup process.
Tutorial - Getting Started with Databricks Repos | Databricks Academy
This official Databricks tutorial walks through setting up the Git integration from start to finish. We'll watch it in segments to cover each part of the process.
Please watch the following two parts: Configure Git Integration (00:00 - 02:00): Follow the steps to generate a Personal Access Token (PAT) in your GitHub account and add it to your Databricks User Settings. Important: When generating your token in GitHub, ensure you give it the repo scope. Create and Clone a Repository (02:00 - 03:14): See how to create a new repository in GitHub and then use its URL to clone it into your Databricks workspace using the 'Add Repo' feature.
Your Turn: Set Up the Connection
- Generate a PAT in your GitHub account under
Settings > Developer settings > Personal access tokens. Remember to copy it to a safe, temporary place. - Add the PAT to Databricks under
User Settings > Git Integration. Select 'GitHub' as the provider, enter your GitHub username, and paste the token. - Create a new, empty repository in your GitHub account. Give it a name like
databricks-de-course. Make sure to initialize it with a README file. - Clone the repository into Databricks by going to
Workspace > Repos, clickingAdd Repo, and pasting your repository's URL.
You should now see your new repository listed under the Repos section in your workspace.
Managing Code: The Edit-Commit-Push Cycle
With the repository cloned, you can now start developing. The best practice is to never commit directly to the main branch. Instead, you create a separate branch for each new feature or bug fix. This isolates your work and makes it easy to manage changes through pull requests.
1. Branching and Making Changes
Let's continue with the Databricks video to see how to create a branch, add a notebook, and commit your changes.
Tutorial - Getting Started with Databricks Repos | Databricks Academy
This segment demonstrates the core development loop: creating a branch, adding content, and committing the changes.
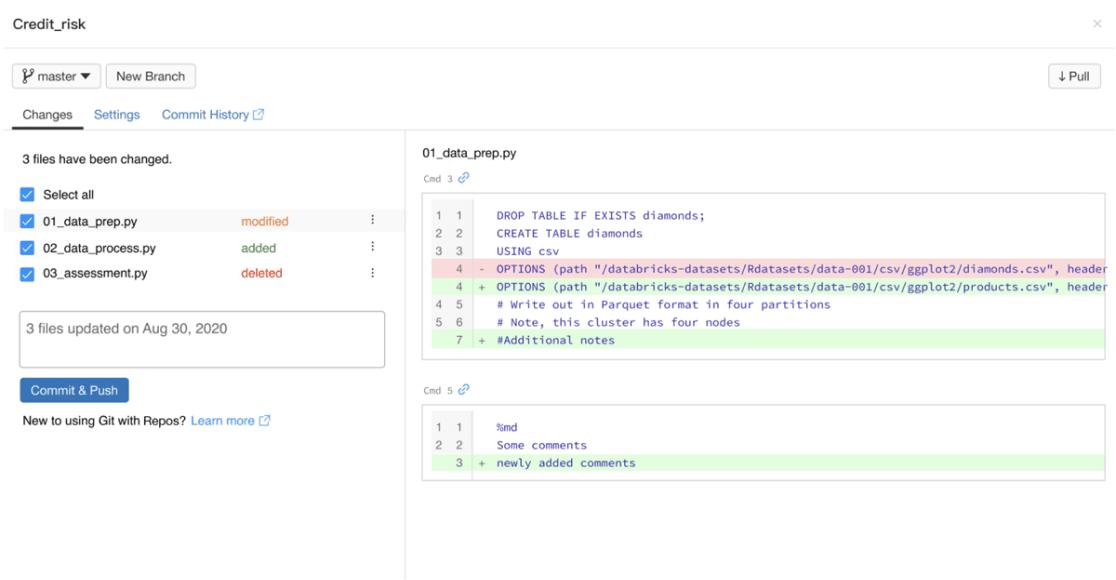
Watch the segment from 03:14 to 05:25. Pay close attention to: How to open the Repos dialog by clicking the branch name (e.g., main). Creating a new development branch (e.g., dev). Creating folders and notebooks inside the repo, just as you would in the regular workspace. Using the Repos dialog to review, summarize, and commit your changes.
The interface for committing changes gives you a clear view of what has been added, modified, or deleted.
Your Turn: Make Your First Commit
- In your cloned Databricks Repo, click the
mainbutton and select Create Branch. Name it something likemy-first-feature. - With your new branch selected, create a new notebook inside the repository.
- Add a simple code cell to the notebook, for example:
print("Hello from Databricks Repos!"). - Click the branch button again (
my-first-feature). You will now see your new notebook listed as an unstaged change. - Write a brief commit summary (e.g., "Add initial notebook") and click Commit & Push.
- Go to your repository on GitHub. You should now see your new branch with the notebook you just created.
2. Pulling Changes from Remote
Collaboration often means other team members will be pushing changes to the same repository. To get their latest work, you need to pull those changes into your Databricks workspace.
4. Databricks Repos Explained 🚀 | Git Integration, Hands-On Demo & Pro Tips
This video from 'The Data Master' channel has an excellent demonstration of the 'pull' workflow, where a change is made in GitHub and then synchronized back to Databricks.
Watch the clip from 14:21 to 17:26. The presenter makes a change directly in the GitHub UI and then uses the 'Pull' functionality in the Databricks Repo dialog to update the notebook in their workspace.
This synchronization is crucial. Always remember to pull regularly to avoid merge conflicts, especially when working on a shared branch.
Conclusion
In this lesson, you've bridged the gap between interactive development and professional software engineering practices. By integrating Git into your Databricks workspace, you can now manage your data engineering projects with the same rigor as any other software project.
Key Takeaways
- Databricks Repos provides full Git integration, which is superior to the built-in notebook revision history for collaborative and production-level work.
- The connection to a Git provider like GitHub is typically configured using a Personal Access Token (PAT) in your User Settings.
- The standard workflow is to clone a remote repository, create a feature branch to isolate your work, make your changes, and then commit and push them back to the remote.
- To get the latest updates from your collaborators, you use the pull operation.
Next Steps
You now know how to manage your development environment and your source code. The next logical step is to understand the resources that will execute that code.
In our next lesson, we will cover the learning outcome: Create, configure, and manage clusters for running workloads. We will dive into how to set up and manage the compute power that brings your notebooks and data pipelines to life.