Hello! Welcome to your third lesson.
In our last session, we outlined the architecture of the Databricks Lakehouse Platform, distinguishing between the Control Plane and the Data Plane and identifying key components like workspaces, compute resources, and Unity Catalog. We looked at the "what" and "why" from a theoretical perspective.
Today, we transition from theory to practice. Our learning outcome is to navigate the Databricks workspace to manage notebooks and other assets. You'll get hands-on with the Databricks user interface (UI), learning how to find your way around and how to create, organize, and manage the core assets you'll use as a data engineer. This lesson is fundamental for building the practical skills required for the certification and your day-to-day work.
A Guided Tour of the Workspace UI
The Databricks workspace is the web-based environment where you'll spend most of your time developing. Let's start with a tour of its main components.
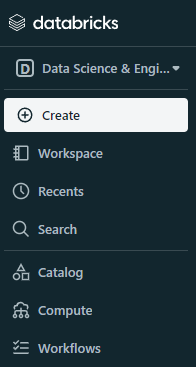
The left-hand sidebar is your primary navigation tool. It provides access to all the major functionalities of the platform.
To get a dynamic feel for the UI, let's watch a guided walkthrough. This video provides a great overview of the main menu items and their purposes.
10 - Introduction to Databricks Workspace
This video from the 'Learning Journal' channel will walk us through the main areas of the Databricks UI. We'll focus on the sections most relevant for our data engineering work.
Please watch the following segments: Introduction to the UI (00:01 - 02:20): Get familiar with the overall layout, the collapsible sidebar, and the purpose of the 'Recents' and 'Favorites' sections. The Workspace Folder (02:20 - 04:25): Pay close attention to this part. The 'Workspace' menu item acts as the primary file browser for your notebooks and other project files. Note the user-specific home directories. Other Key Areas (05:25 - 07:27): This segment gives a quick overview of the 'Catalog', 'Workflows', and 'Compute' menus, which directly correspond to the architectural components we discussed in the last lesson.
As you saw, the workspace is organized around these key areas:
- Create (+): Your starting point for making new assets like notebooks, tables, or clusters.
- Workspace: A file-system-like browser where you can organize your projects into folders. This is where your notebooks are stored.
- Recents: A quick way to find the assets you've recently worked on.
- Catalog: The UI for the Unity Catalog, allowing you to browse databases, schemas, tables, and manage permissions.
- Compute: Where you create and manage your compute resources (clusters and SQL warehouses).
- Workflows: The interface for building and monitoring jobs that orchestrate your data pipelines.
Your Primary Tool: The Databricks Notebook
The most fundamental asset for any developer in Databricks is the notebook. It's an interactive document that allows you to mix executable code (like Python or SQL), narrative text, and visualizations. Given your experience in data analytics, you'll find the notebook environment intuitive for exploration and development.
Creating and Developing in a Notebook
Let's see how to create and start working with a notebook.
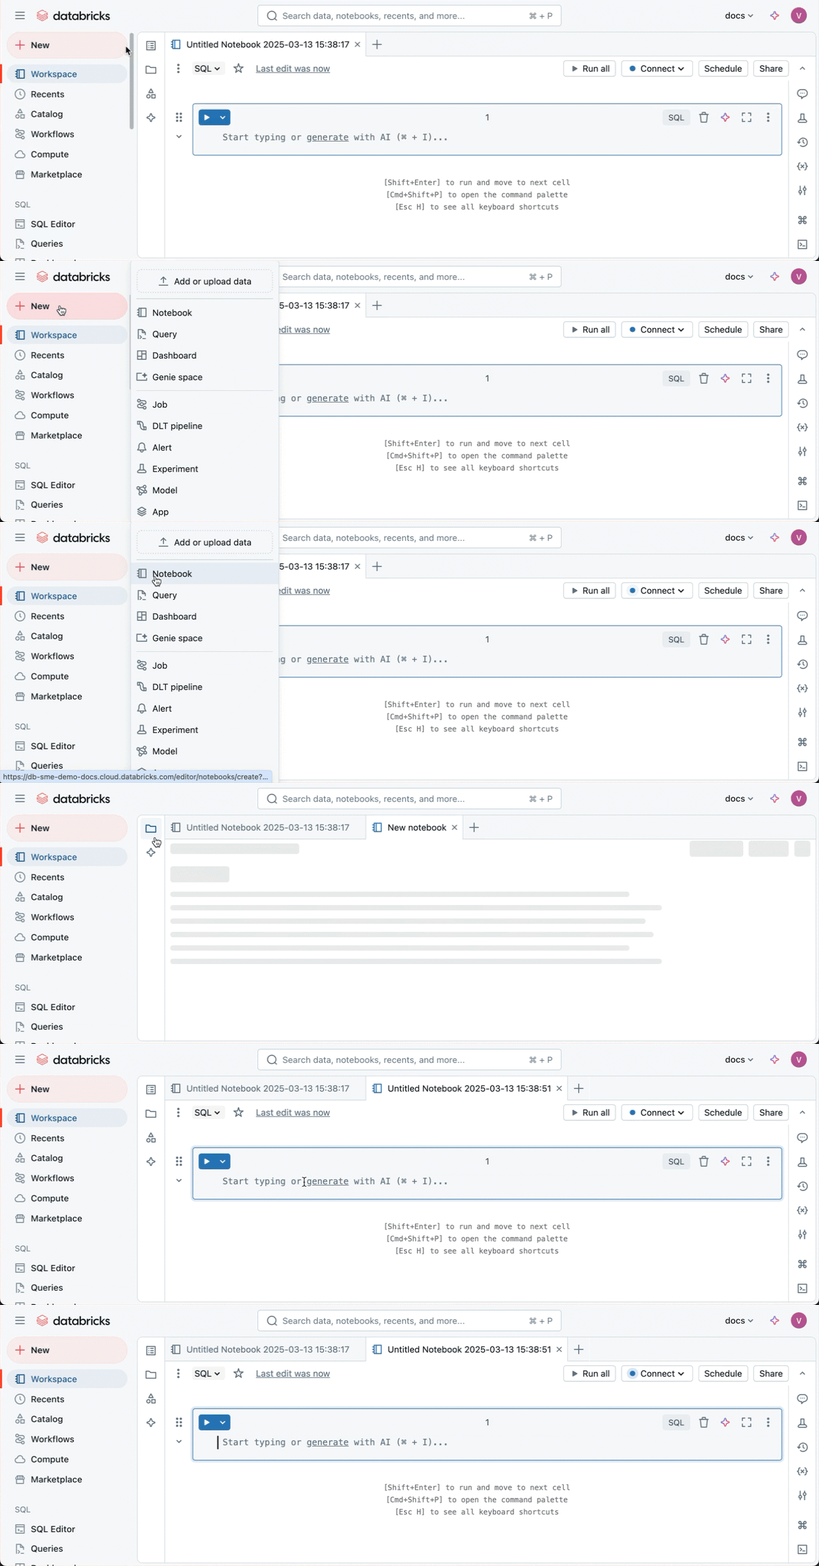
The following video from Databricks provides a comprehensive overview of notebook development. It covers creating a notebook, adding cells with different languages, and running your code.
Databricks | Notebook Development Overview
This official Databricks video demonstrates the end-to-end process of creating and developing a notebook. It's a perfect practical guide to getting started.
Watch the following two segments: Creating a Notebook (00:00 - 01:58): Observe how to name the notebook, set its default language (e.g., Python), and attach it to a compute cluster, which is necessary to run any code. Populating and Running Cells (01:58 - 06:07): This is the core of notebook development. Pay attention to: Using the %md magic command to write Markdown for documentation. Writing and running Python code to read data. Intermixing languages by using the %sql magic command to query data with SQL in a separate cell.
Core Notebook Operations
Databricks notebooks offer a rich set of features. The ability to switch languages using magic commands (%python, %sql, %md, %sh) is particularly powerful, enabling you to use the best language for each specific task within a single workflow.
This document from Databricks provides a useful summary of notebook features and operations. It serves as a great "cheat sheet."
[PDF] Get Started with Databricks Data Science and Engineering Workspace
This PDF guide from Databricks training materials provides a concise summary of notebook features and common operations. It's a good reference to have.
Quickly review the slides titled: 'Databricks Notebooks' (slide 18): This slide lists the key benefits like multi-language support and collaboration. 'Notebook magic commands' (slide 19): Note the most common magic commands. 'DE 1.2: Databricks Notebook Operations' (slide 25): This slide lists the essential skills for managing notebooks, which we are covering in this lesson.
Managing Workspace Assets
Beyond creating and editing, a key skill is managing your assets within the workspace. This includes organizing them into folders, renaming them, and cleaning up old files. These actions are generally performed using the context menu that appears when you right-click an object or click the kebab menu (⋮) next to its name.
The official documentation provides clear, step-by-step instructions for these common tasks.
Manage workspace objects | Databricks on AWS
Let's review the official Databricks documentation to learn how to manage workspace objects like notebooks and folders.
Please read the following short sections: Introduction (first paragraph): Understand the types of objects you can manage and how to access the action menu. 'Move an object': Learn the two ways to move an asset, such as a notebook, into a folder. 'Delete an object': Understand how to move an object to the Trash. Note that items in the Trash are permanently deleted after 30 days. 'Restore an object': See how you can recover an asset that was accidentally deleted.
Importing and Exporting Notebooks
Finally, you'll often need to share your work with colleagues or move notebooks between workspaces. You can do this by exporting and importing them. The video we watched earlier also covers this process.
Databricks | Notebook Development Overview
Let's revisit the 'Databricks | Notebook Development Overview' video to see how to share your work.
Watch the segment from 06:37 to 08:24. Focus on the different export options, especially the DBC archive, which is a Databricks-specific format for easily sharing and importing notebooks into another workspace.
These management principles—moving, deleting, exporting—apply not just to notebooks but to all assets you manage in the Workspace browser, such as folders and libraries.
Key Takeaways
- The Databricks UI is navigated primarily through the left-hand sidebar, which links to major functions like the
Workspacefile browser,Catalog,Compute, andWorkflows. - Notebooks are the core development environment, allowing you to mix code (Python, SQL, R, Scala), text (Markdown), and visualizations.
- Magic commands like
%mdand%sqlallow you to override the notebook's default language on a cell-by-cell basis. - Workspace assets are managed via the context menu (right-click or kebab menu ⋮), which allows you to move, rename, clone, delete, and export objects.
- Deleted items go to the Trash, where they can be restored for up to 30 days.
Next Steps
In this lesson, you learned how to manage individual notebooks and files within the Databricks workspace. While this is fine for exploration and simple projects, production-level data engineering requires more robust version control and collaboration.
In our next lesson, we will address the learning outcome: Integrate and manage source code using Databricks Repos. You will learn how to connect your Databricks workspace to a Git repository (like GitHub), enabling you to version control your entire project, collaborate with team members, and implement CI/CD practices.