Hello! Welcome to your fifth lesson in the "Navigating the Databricks Lakehouse Platform" module.
In our last lesson, we focused on bringing software engineering best practices to our project by integrating source code with Databricks Repos. You now know how to manage your code using Git for versioning and collaboration. The next logical question is: where does this code actually run?
Today's lesson answers that question. Our learning outcome is to create, configure, and manage clusters for running workloads. A cluster is essentially the engine that powers your data engineering tasks, executing the code in your notebooks and jobs. Mastering cluster configuration is fundamental for balancing performance and cost, a key responsibility for any data engineer.
What is a Databricks Cluster?
At its core, a Databricks cluster is a set of computational resources and configurations on which you run your data engineering workloads. It's built on Apache Spark, a powerful open-source engine for large-scale data processing.
A Spark cluster follows a simple and powerful architectural pattern:
- Driver Node: This is the "brain" of the operation. It runs your main program (e.g., your notebook), maintains information about the Spark application, and analyzes, distributes, and schedules tasks on the worker nodes.
- Worker Nodes: These are the "muscles." They execute the tasks assigned by the driver. A cluster can have many worker nodes, allowing for massive parallel processing of your data.
Given your background in physics, you can think of this architecture as being analogous to distributed computing systems used in scientific research. The driver node acts as a master node that orchestrates a complex simulation, breaking it down into smaller, independent calculations that are distributed across a fleet of worker or compute nodes. The driver then aggregates the results to produce the final output. Spark operates on a very similar principle for data transformation.
To hear this concept explained with a simple analogy, watch the following short clip.
15 Minutes- Spark Clusters in Databricks Explained -Tips & Tricks | Azure Databricks Tutorials
The presenter in this video from Mr. K Talks Tech uses a great 'team lead and team members' analogy to explain the driver/worker relationship.
Watch from 12:43 to 13:16 to get a clear mental model of how the driver and worker nodes collaborate.
All-Purpose vs. Job Clusters
Databricks offers two primary types of clusters, and choosing the right one is crucial for both development efficiency and cost management. This distinction is also a frequent topic on the certification exam.
- All-Purpose Clusters: These are designed for interactive analysis and collaborative development. You create them manually, multiple users can attach their notebooks to them, and they persist until you manually terminate them. They are ideal for exploring data and building your pipelines.
- Job Clusters: These are created and terminated automatically by the Databricks job scheduler to run automated, non-interactive workloads. A new job cluster is spun up for a specific job run and is torn down as soon as the job completes. This makes them highly cost-effective and isolated, which is ideal for production pipelines.
Let's read a brief but clear explanation of these two types.
Databricks clusters 101: A comprehensive guide
This article from Flexera provides a concise definition of All-Purpose and Job clusters.
Read the section titled 'Types of Databricks Cluster' to solidify your understanding of when to use each type.
For the rest of this lesson, we will focus on creating and managing an All-Purpose Cluster, as this is what you'll use for interactive development in your notebooks.
Creating and Configuring a Cluster: A Walkthrough
The best way to learn about clusters is to create one. We'll walk through the configuration options available in the Databricks UI. As we go, I encourage you to open your Databricks workspace and follow along.
Navigate to the Compute page from the left-hand sidebar and click the Create Compute button.
The following video provides an excellent tour of the cluster creation UI. We'll watch it in segments corresponding to the key configuration sections.
20 Databricks Computes - All Purpose & Job | Access Modes | Cluster Policies | Cluster Permissions
This video from 'Ease With Data' provides a detailed walkthrough of every setting on the cluster creation page. It's a perfect resource for seeing these options in action.
Please watch from 01:05 to 09:20. This covers the entire configuration process from top to bottom. As you watch, pay close attention to the following key settings, which we will break down further below: Policy and Access Mode Databricks Runtime (DBR) version Photon Acceleration Worker and Driver types Autoscaling Automatic Termination
Now, let's break down the most important settings you just saw.
1. Policy, Node Type, and Access Mode
- Policy: A set of rules that constrains the available cluster configurations. Policies help organizations control costs and enforce standards. As a beginner, you'll likely use the
UnrestrictedorPersonal Computepolicy. - Multi-Node vs. Single-Node: A
Multi-Nodecluster has one driver and one or more workers, enabling parallel processing. ASingle-Nodecluster has only a driver (no workers), which is cheaper and suitable for very small data tasks or some ML model training. - Access Mode: This controls who can use the cluster. For now,
Single Useris sufficient, as it means only you can use the cluster you create.Sharedmodes are for collaborative use and have specific requirements, often involving Unity Catalog.
2. Databricks Runtime and Photon
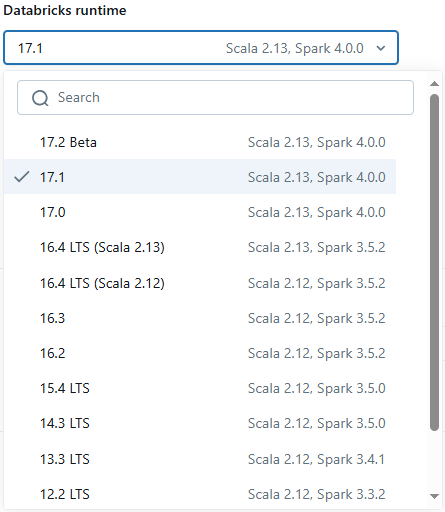
- Databricks Runtime (DBR): This is the core software that runs on your cluster. It includes Apache Spark, Delta Lake, and a set of pre-installed libraries (e.g., for Python and SQL). Choosing a runtime is a required step. It's best practice to use an LTS (Long Term Support) version for stability in production.
- Photon Acceleration: Photon is Databricks' high-performance, vectorized query engine written in C++. Enabling it can significantly speed up your SQL and DataFrame workloads. It comes at a slightly higher cost but can reduce total cost-of-ownership by finishing jobs faster.
3. Worker and Driver Nodes
This is where you configure the hardware for your cluster.
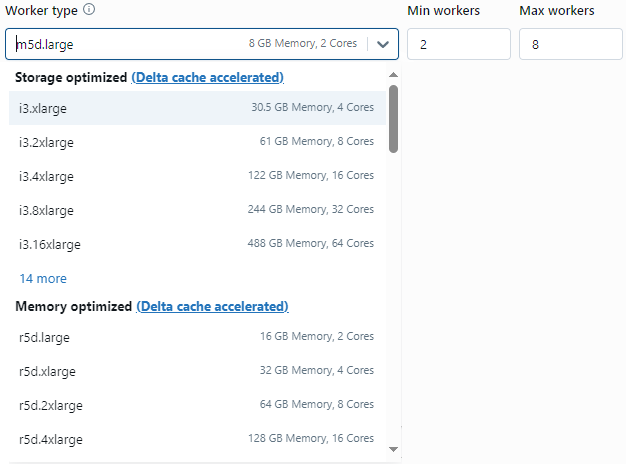
- Worker Type & Driver Type: You select the virtual machine (VM) instance type for your nodes. Different instance types offer different balances of CPU, memory, and local storage. You might choose a
Memory optimizedinstance for jobs with large joins or aggregations. - Autoscaling: This is a critical feature for cost optimization. Instead of a fixed number of workers, you set a minimum and maximum. Databricks will automatically add workers (up to the max) when the workload is heavy and remove them (down to the min) when the cluster is idle.
4. Automatic Termination
This is arguably the most important cost-saving feature for All-Purpose clusters. You specify an inactivity period (e.g., 30 minutes). If the cluster is not used for that duration, Databricks will automatically shut it down, stopping all charges.
Your Turn: Create Your First Cluster
Now it's time to apply what you've learned. Follow these steps in your Databricks workspace:
- Navigate to Compute and click Create Compute.
- Give your cluster a memorable name, like
de-associate-dev-cluster. - For Policy, select Personal Compute. This will simplify the options and create a cost-effective single-node cluster.
- Notice that
Single nodeandSingle useraccess are pre-selected. - Select a Databricks Runtime version. Choose the latest LTS version available (e.g.,
13.3 LTS). - Change Terminate after to 30 minutes of inactivity. This is a crucial best practice.
- Click Create compute.
You will see the cluster status change to "pending" and then to a green checkmark once it's ready. This process usually takes a few minutes.
Managing Your Cluster
Creating a cluster is just the first step. You also need to know how to manage its lifecycle. With your new cluster selected on the Compute page, you'll see tabs for Notebooks, Libraries, Event Log, Spark UI, Driver logs, and Metrics.
The video you watched earlier briefly touched on these tabs. They are essential for monitoring and debugging.
- Event Log: Shows key cluster lifecycle events, like starting, terminating, or autoscaling resizing.
- Spark UI: The primary interface for debugging the performance of your Spark jobs. It shows you the execution plan, task duration, data shuffling, and more.
- Driver Logs: Contains the direct output (stdout/stderr) from the driver node, which is useful for debugging code errors.
For a detailed reference on all management actions—from editing and cloning to managing permissions—the following guide is an excellent resource.
Step-by-Step Guide to Manage Databricks Clusters
The Flexera guide we looked at earlier also has a fantastic, step-by-step section on managing clusters.
Read through the section titled 'Step-by-Step Guide to Manage Databricks Clusters'. You don't need to memorize every step, but get familiar with the common actions: Editing a cluster's configuration. Cloning a cluster to create a new one with the same settings. Terminating and Restarting a cluster. Deleting a terminated cluster.
Finally, a key management task is controlling who can do what with a cluster. The video below explains cluster permissions.
20 Databricks Computes - All Purpose & Job | Access Modes | Cluster Policies | Cluster Permissions
Let's revisit the 'Ease with Data' video for a quick look at how permissions are managed.
Watch from 11:47 to 12:47. This clip explains the three permission levels you can grant on a cluster: 'Can Attach To', 'Can Restart', and 'Can Manage'.
Conclusion
Congratulations! You've successfully created, configured, and learned how to manage a Databricks cluster. This is a foundational skill that puts you in control of the engine that will run all your data transformations.
Key Takeaways
- Clusters are the compute resources that execute your code, consisting of a driver node and worker nodes.
- All-Purpose clusters are for interactive development, while Job clusters are for automated, production workloads and are more cost-effective.
- Key configuration settings include the Databricks Runtime (DBR), node types, autoscaling, and auto-termination.
- Auto-termination is the most critical setting for controlling the cost of All-Purpose clusters.
- Managing a cluster involves actions like terminating, restarting, cloning, and editing permissions. The Spark UI and Driver Logs are your go-to tools for monitoring and debugging.
Next Steps
You've now covered almost all the key components of the Databricks platform's user-facing environment: the workspace, notebooks, code management with Repos, and compute clusters.
In the final lesson of this module, we will solidify your understanding by formally addressing the learning outcome: Identify the roles of clusters and SQL warehouses as compute resources in Databricks. This will wrap up our tour of the platform's architecture and prepare you to start querying and transforming data.