Hello! Welcome to our new module, Orchestrating Production Workflows.
In the previous module, you mastered Delta Live Tables, learning how to build, configure, and monitor a single, declarative data pipeline. In a real-world data platform, however, data processing rarely happens in a single step. You often need to chain together multiple different tasks—like ingesting data with a notebook, transforming it with a DLT pipeline, and then refreshing a BI dashboard—into a cohesive and reliable workflow.
This is where Databricks Jobs, also known as Workflows, come in. This lesson kicks off our journey into orchestration. By the end of our 60 minutes, you will be able to create a multi-task job in the Databricks Workflows UI. This is the foundational skill for building any production-grade pipeline on Databricks.
What are Databricks Workflows?
Think of a complex process like building a car. You don't do everything at once. You have separate stages: building the chassis, installing the engine, painting the body, and so on. Some stages must happen in a specific order, while others can happen in parallel.
Databricks Workflows act as the factory manager for your data pipelines. A Job is the overall project (building the car), and each step is a Task (installing the engine). Workflows allow you to define these tasks and their relationships to orchestrate your data, AI, and analytics projects.
Chaining multiple tasks in a single job offers several key benefits:
- Modularity: You can break down a complex problem into smaller, manageable, and reusable tasks.
- Parallel Execution: Independent tasks can run at the same time, significantly speeding up your overall workflow.
- Error Isolation: If one task fails, you can configure the workflow to stop or to continue with other independent tasks, making your pipeline more resilient.
- Simplified Maintenance: You can update a single task without having to redeploy the entire workflow.
The following blog post from Databricks provides an excellent introduction to this concept and will guide our initial steps.
Basics of Databricks Workflows - Part 1: Creating your pipeline
Let's start with this official Databricks blog post. It lays out the core concepts and provides a clear, step-by-step guide to creating your first job and task.
Please read the sections 'Introduction', 'Create your first Databricks Workflow', and 'Step #2 - Create your first task'. Focus on understanding the distinction between a 'job' and a 'task', and familiarize yourself with the initial UI steps.
Creating Your First Multi-Task Job
Now that you understand the basic concepts, let's walk through the process of creating a job and adding multiple tasks to it. The process is entirely visual and managed through the Databricks UI.
Step 1: Create the Job Container
First, you create the job itself, which acts as a container for your tasks.
- In the left sidebar of your Databricks workspace, click Workflows.
- Click the Create job button.
- In the top-left corner, replace "Add a name for your job..." with a descriptive name, for example,
my_first_workflow.
You now have an empty job. The next step is to populate it with tasks.
Step 2: Add and Configure Your Tasks
A task is a single unit of work, such as running a notebook or a SQL query. Let's add our first task.
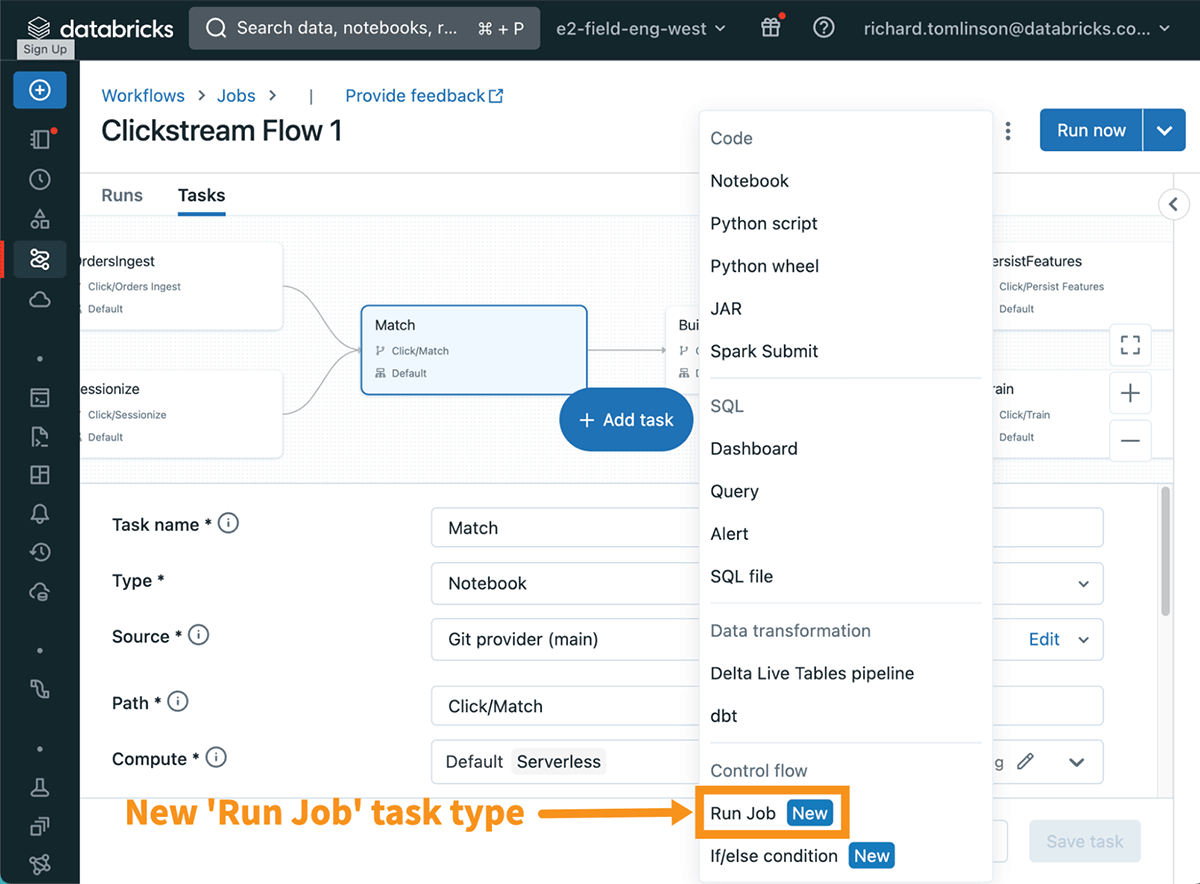
- In the center of the screen, you'll see an "unnamed task". Click on it to open the task configuration panel.
- Task name: Give your task a clear name, like
Task_A_Ingest_Data. - Type: This dropdown lets you choose what kind of work the task will do. Common types include:
- Notebook: Runs a Databricks notebook.
- SQL: Executes a saved query, a file, or refreshes a dashboard or alert.
- Delta Live Tables pipeline: Runs an existing DLT pipeline.
- Python Script / Wheel: Runs a Python file or package.
)
- Source & Path: Specify where your code is located (e.g., in the Workspace) and provide the path to the specific notebook or file.
- Compute: Choose the cluster that will run this task. You can use an existing all-purpose cluster or configure a job-specific cluster, which is created just for the job run and terminates afterward, often making it more cost-effective for production.
Step 3: Add More Tasks
A job with a single task isn't very interesting. The real power of Workflows comes from orchestrating multiple tasks.
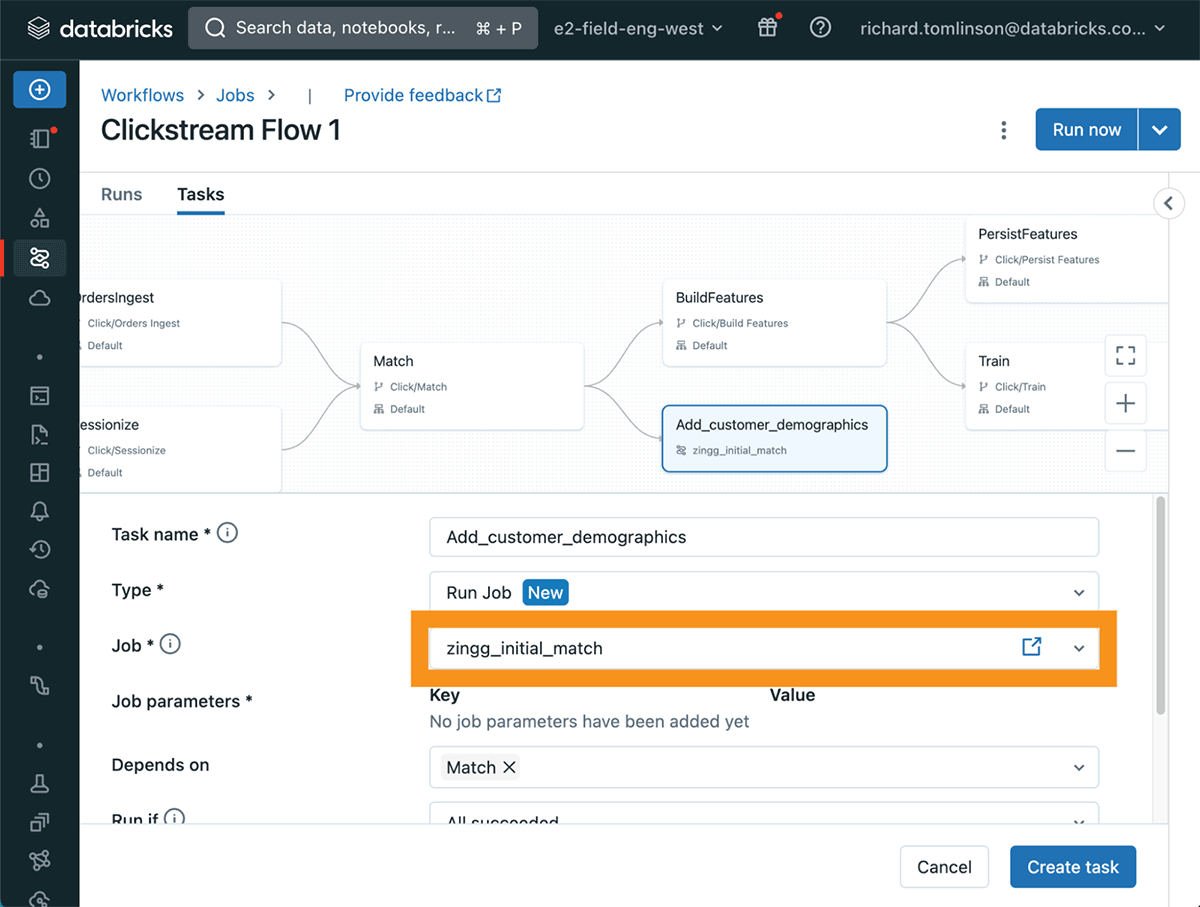
To add a second task, click the small + icon below your first task in the DAG view. This will add a new task box, which you can configure just as you did before. For example, you could name it Task_B_Transform_Data.
As you add tasks, Databricks automatically visualizes the workflow as a Directed Acyclic Graph (DAG).
This video provides a fantastic, hands-on demonstration of creating a job with several interconnected tasks.
22 Workflows, Jobs & Tasks | Pass Values within Tasks | If Else Cond | For Each Loop & Re-Run Jobs
This video from Ease With Data walks through the entire process of creating a multi-task job in the UI. Watching someone else do it is a great way to solidify your understanding of the flow.
Please watch the following segments: Intro to the UI (00:55 - 02:00): A quick tour of the job creation interface. Configuring a Task (02:00 - 03:00): A look at the key configuration options for a single task. Creating the Multi-Task Workflow (14:07 - 17:15): This is the most important part. Observe how the presenter adds multiple tasks (set day, check day, process data) and connects them to form a sequence. Notice the 'Depends on' field being used to link the tasks.
As you saw in the video and the image above, the "Depends On" field is how you create relationships. By setting Task_B_Transform_Data to depend on Task_A_Ingest_Data, you are telling Databricks: "Do not start Task B until Task A has completed successfully."
Tasks with no dependencies can run in parallel, while tasks that depend on others will wait their turn.
Your Turn: Hands-On Practice
The best way to learn is by doing. Let's apply what you've seen.
Goal: Create a simple two-task job in your Databricks workspace.
-
Create two simple notebooks:
- Notebook 1: Name it
task_1_notebook. Add a single cell with the codeprint("Executing Task 1"). - Notebook 2: Name it
task_2_notebook. Add a single cell with the codeprint("Executing Task 2").
- Notebook 1: Name it
-
Create a new Job:
- Navigate to Workflows and click Create Job. Name it
My Practice Workflow.
- Navigate to Workflows and click Create Job. Name it
-
Add the tasks:
- Configure the first task to run
task_1_notebook. - Click the
+button to add a second task and configure it to runtask_2_notebook. - For now, do not set any dependencies. You should see two parallel tasks in the UI.
- Configure the first task to run
-
Run the Job:
- In the top-right corner, click Run now.
- Go to the Runs tab to watch your job execute. You should see both tasks run (likely at the same time).
This simple exercise directly practices the core skill of creating a multi-task job.
Conclusion
In this lesson, you've taken your first and most important step into the world of data orchestration with Databricks. You now understand how to bundle individual units of work into a cohesive, multi-task job using the Workflows UI.
Key Takeaways
- Databricks Jobs (Workflows) are used to orchestrate and automate multi-step data and AI processes.
- A Job is a container, and a Task is a specific unit of work within it (e.g., running a notebook).
- You create and manage jobs through the Workflows UI, which provides a visual representation of your pipeline as a DAG.
- Creating a multi-task job involves adding two or more tasks and, optionally, defining their relationships.
Next Steps
You've successfully created a job with multiple tasks. But right now, they either run in parallel or not at all. In our next lesson, we will dive deep into that critical "Depends on" field. You will learn how to configure task dependencies to define the precise execution order in a workflow, enabling you to build complex, sequential, and conditional data pipelines.