Hello! Welcome back to our module on orchestrating production workflows.
In the last lesson, we focused on monitoring your jobs. You learned how to track job runs, view outputs, and—most importantly—diagnose failures by inspecting logs and error messages. We saw what a failed task looks like in the UI, similar to the image below.
Finding an error is the first step. The next is deciding what to do about it. Should the system try again automatically? Should it stop a task that's taking too long? This lesson is all about building more resilient and reliable pipelines by automating these decisions.
Our learning goal is to configure task failure handling including retry policies and expected duration. By the end of this lesson, you'll be able to make your jobs smarter and more self-sufficient, a key skill for any data engineer.
1. Automatic Recovery with Retry Policies
Not all failures are created equal. Some are permanent, like a syntax error in your code. Others are transient—temporary issues like a brief network outage, a database connection drop, or an API that's momentarily unavailable. For these transient errors, simply trying the task again a few moments later is often enough to succeed.
Databricks allows you to automate this process by setting a retry policy for any task in your job.
To understand the specifics of how to set this up, let's turn to the official Databricks documentation.
Configure and edit tasks in Lakeflow Jobs
This guide from Databricks explains the advanced settings available for tasks, focusing on how to configure retries.
Please read the sections 'Advanced task settings' and 'Set a retry policy'. Focus on: Where to find the 'Retries' configuration in the task settings. The parameters you can set: the maximum number of retries and the interval between them.
As the documentation states, you can specify how many times a task should be retried and the delay between each attempt. This simple configuration can dramatically improve the reliability of your workflows against intermittent issues.
Let's see a visual demonstration of where these settings are located in the UI.
How to Create Databricks Workflows (new features explained)
This video provides a practical walkthrough of the job configuration screen. The presenter points out exactly where to set the retry policy.
Watch from 00:15:49 to 00:16:30. Pay attention as the presenter navigates to the task settings and highlights the option to set the number of retries.
Configuring a retry policy is a best practice for production data pipelines, especially for tasks that communicate with external systems.
2. Managing Task Execution Time
Besides outright failure, another common issue is a task that runs for too long. This can happen for many reasons: an unexpected volume of data, an inefficient query, or a deadlock in a database. Unchecked, a long-running task can waste expensive compute resources and delay downstream processes.
Databricks provides two thresholds to manage task duration:
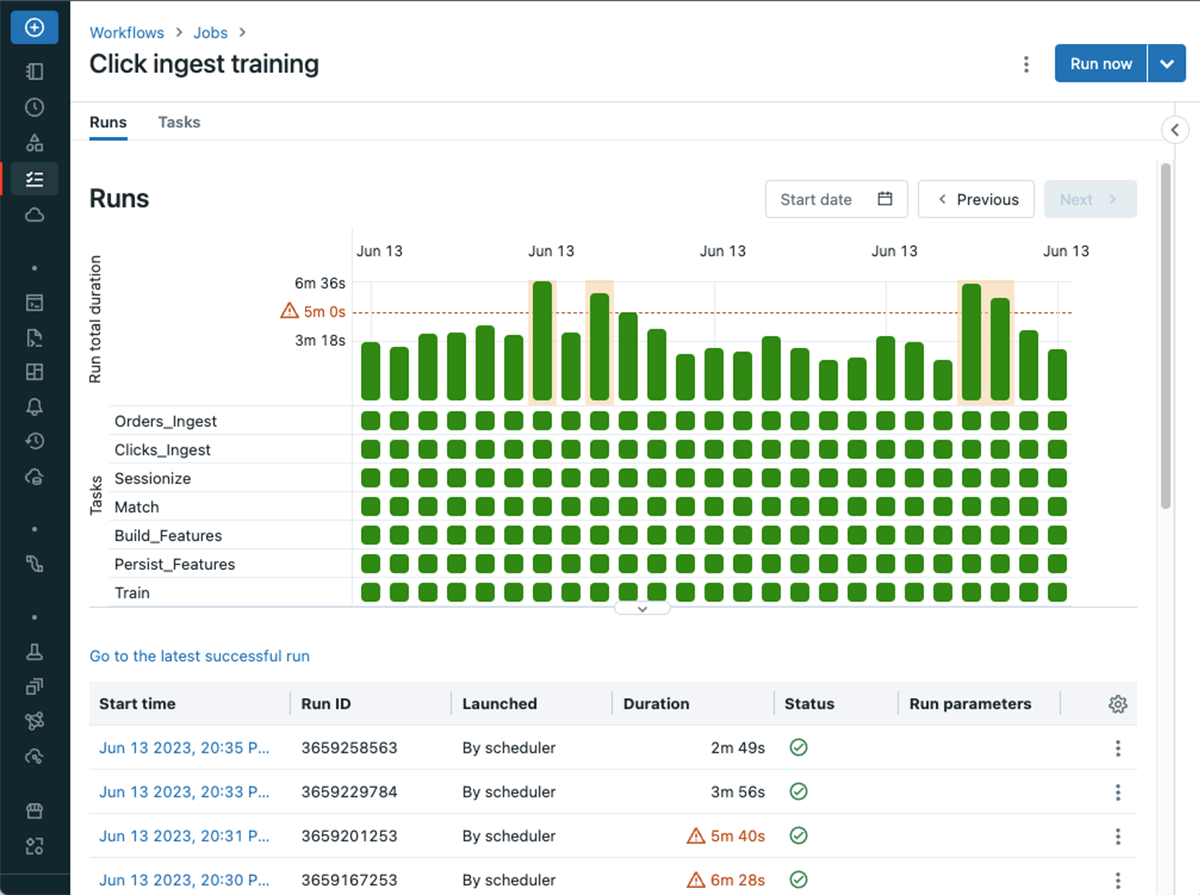
- Warning Threshold: Sets an expected completion time. If the task exceeds this duration, it is flagged with a warning, but continues to run. This is excellent for performance monitoring and alerting you when a job is running slower than usual, which might indicate a problem or a need for optimization.
- Timeout Threshold: Sets a maximum allowed completion time. If the task exceeds this duration, it is forcibly stopped and marked as "Timed Out". This is a critical safeguard to prevent runaway jobs and control costs.
This image shows how a warning threshold appears in the job runs UI, providing a clear visual cue for performance monitoring.
Now, let's consult the documentation to see how to configure these thresholds.
Configure and edit tasks in Lakeflow Jobs
Returning to the Databricks documentation, we'll now focus on the section covering duration thresholds.
Read the section titled 'Configure thresholds for task run duration or streaming backlog metrics'. Focus on the distinction between the Warning field (expected completion time) and the Timeout field (maximum completion time).
A key takeaway is that if you configure both a Timeout and a Retry Policy, the timeout applies to each individual retry attempt, not the total time across all attempts.
3. Hands-On: Building a Resilient Job
It's time to apply these concepts. We will configure failure handling for the My Practice Workflow job you've been working on.
Part A: Prevent Runaway Jobs with a Timeout
First, let's see the timeout feature in action.
- Navigate to Your Job: In your Databricks workspace, go to Workflows and select your
My Practice Workflowjob. - Select the Task: Click on the task in the graph to open its configuration panel on the right.
- Set a Timeout: Under the Advanced settings, find Metric thresholds. Click + Add.
- Set Metric to
Run duration. - Leave Warning blank for now.
- Set Timeout to
1minute. - Click Confirm.
- Set Metric to
- Introduce a Delay: Go to the notebook associated with this task. Add a new cell at the end with a command that waits for longer than the timeout.
- If using Python:
import time print("Starting a long sleep...") time.sleep(70) # 70 seconds is > 1 minute print("Sleep finished.") - If using SQL:
-- This command will run for 70 seconds
SELECT java_method('java.lang.Thread', 'sleep', 70000L);
- If using Python:
- Run and Observe: Go back to the workflow and click Run now. Go to the Runs tab and monitor the new run. After about a minute, it should fail with the status Timed Out. Click on the run to see the details. This confirms your safeguard works.
- Clean Up: Remove the
time.sleeporjava_methodcell from your notebook.
Part B: Automatically Retry on Failure
Now, let's configure the job to retry after a recoverable error.
- Introduce a Transient Error: In your notebook, add a cell with the code that failed in the previous lesson's exercise. This simulates a temporary issue we want to retry.
- If using SQL:
SELECT * FROM non_existent_table; - If using Python:
print(undefined_variable)
- If using SQL:
- Configure Retries: Go back to your workflow task settings.
- Keep the Timeout of
1minute for now. - Under Advanced settings, find Retries. Click + Add.
- Set Retries to
2. - Set Interval to
10seconds. This tells Databricks to retry the task up to 2 times, waiting 10 seconds between each failed attempt. - Click Confirm and then Save changes on the job.
- Keep the Timeout of
- Run and Observe: Run the job again. This time, when you view the job run details, you will see the task attempt to run, fail, wait 10 seconds, and then try again. You'll see icons indicating the multiple attempts. The job will ultimately fail (since the error is permanent), but you'll have witnessed the retry policy in action.
- Final Cleanup: Remove the error-producing cell from your notebook. Also, you can remove the Retry and Timeout configurations from your job task for now.
4. Manual Intervention: Repair and Rerun
Automatic retries are for transient errors. What about permanent ones, like the NameError you just simulated? The system will try a few times and then fail for good. At that point, a data engineer needs to intervene:
- Diagnose the root cause (as you learned in the previous lesson).
- Fix the code in the notebook.
- Rerun the failed part of the job.
For complex workflows with many tasks, you don't want to rerun the entire job from the beginning. Databricks provides a Repair and Rerun feature that intelligently reruns only the failed tasks and their downstream dependencies.
How to Create Databricks Workflows (new features explained)
Let's watch a demonstration of how to fix a code error and use the 'Repair and Rerun' feature to efficiently complete the job.
Watch the segment from 00:30:09 to 00:31:44. Notice how the presenter first identifies the error, fixes it directly in the notebook, and then uses 'Repair Rerun' to resume the job from the point of failure.
This feature is a huge time-saver in development and production, allowing you to recover from failures without re-processing data that was already successfully transformed.
Conclusion
You've now moved beyond simply monitoring jobs to actively making them more resilient. By intelligently configuring failure handling, you can build data pipelines that are more robust, cost-effective, and require less manual intervention.
Key Takeaways
- Retry Policies are your first line of defense against transient, temporary errors. They are simple to configure and can greatly increase pipeline reliability.
- Duration Thresholds help you manage task execution time. Use the Warning threshold for performance monitoring and the Timeout threshold as a critical safeguard against runaway jobs.
- When automatic retries fail due to a permanent error, the Repair and Rerun feature allows for efficient manual recovery after you've fixed the root cause.
Next Steps
In our next lesson, we will continue exploring how to make jobs more flexible and dynamic. You will learn how to pass parameters to a notebook within a job using widgets. This allows you to create generic, reusable tasks that can be configured at runtime, a powerful technique for building sophisticated workflows.