Welcome to the final lesson in our module on orchestrating production workflows!
In the last session, we focused on making individual tasks flexible by passing parameters into a notebook from the job configuration using widgets. This is perfect for reusing the same logic with different inputs. However, real-world data pipelines often involve multiple steps where the output of one task must become the input for the next.
Today, we will learn how to connect these steps. Our goal is to pass data between tasks in a multi-task job using task values. This capability is the glue that allows you to build complex, dependent workflows, such as a data quality check that produces a score, which a subsequent task then uses to decide whether to load the data into a production table.
This lesson completes our deep dive into Databricks Workflows, giving you the skills to build, parameterize, and orchestrate robust, multi-stage data pipelines.
1. The Mechanism: Task Values
When one task needs to pass a dynamic result to another, we can't use the job parameters we learned about previously, as those are static values defined before the job run starts. Instead, we use a feature called Task Values.
Task values are a way for a task to output a small amount of data (up to 48 KiB, in JSON format) that downstream tasks in the same job run can access. The process involves two main steps:
- Setting a value in an "upstream" task.
- Referencing that value in a "downstream" task.
This is managed through the dbutils.jobs.taskValues utility.
Setting a Task Value
To output a value from a task, you use dbutils.jobs.taskValues.set() within a Python notebook.
# In the upstream notebook (e.g., 'task_A')
dbutils.jobs.taskValues.set(key="data_quality_score", value=0.97)


# You can also set multiple key-value pairs
dbutils.jobs.taskValues.set(key="processed_records", value=15042)
- The
keyis a string that you will use to identify the value. - The
valuecan be any Python variable that can be represented as JSON (e.g., strings, numbers, lists, dictionaries).
Referencing a Task Value
There are two ways to retrieve a value set by an upstream task.
1. Dynamic Value References (Recommended)
This is the most flexible and recommended method. You can reference a task value directly in the Databricks Workflows UI when configuring a downstream task. The syntax is:
{{tasks.UPSTREAM_TASK_NAME.values.KEY_NAME}}
You can use this syntax in parameter fields, if/else condition tasks, and other places in the UI. This approach decouples the downstream task's code from the upstream task's name.

2. Programmatic Retrieval (Less Recommended)
You can also retrieve a value programmatically within another Python notebook using dbutils.jobs.taskValues.get().
# In the downstream notebook (e.g., 'task_B')
quality_score = dbutils.jobs.taskValues.get(
    taskKey="task_A",
    key="data_quality_score"
)
This method is less flexible because you have to hardcode the upstream task's name (taskKey) in your notebook's code. If you rename the task in the workflow, you must also update the code.
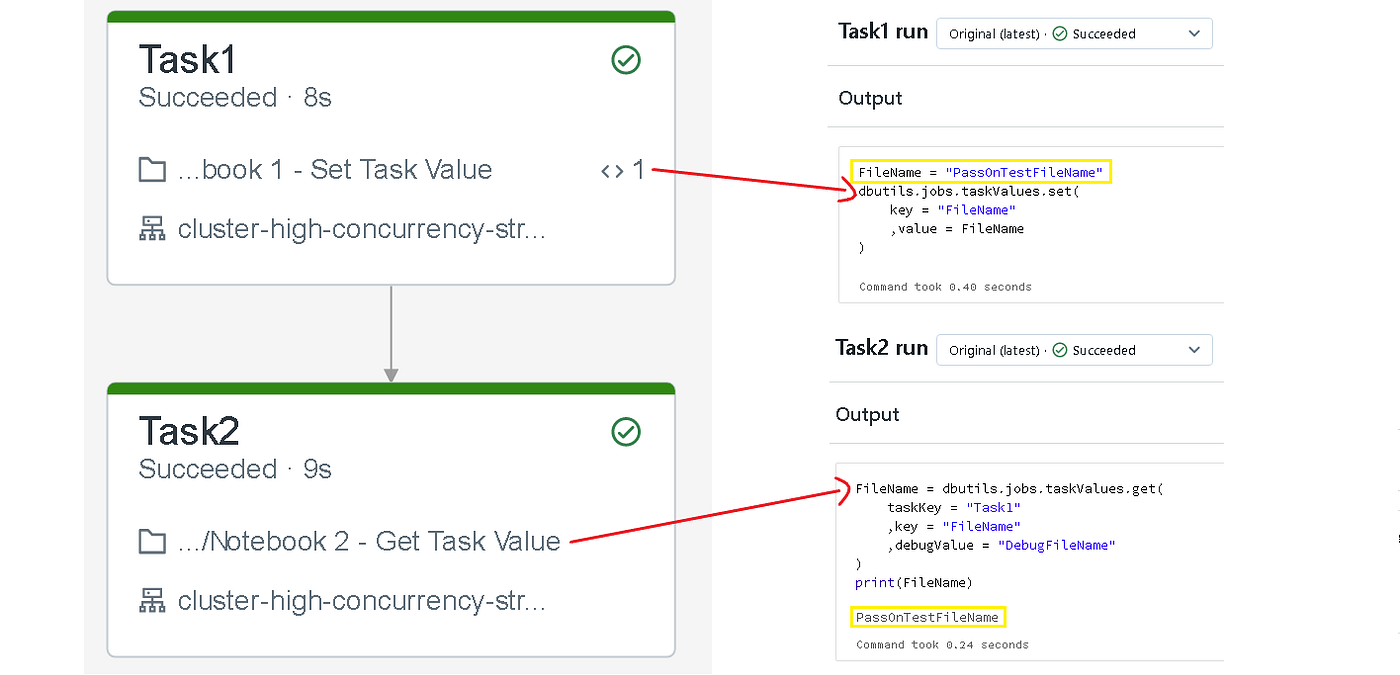
Let's dive into the official documentation to solidify these concepts.
Use task values to pass information between tasks
The Databricks documentation provides a definitive guide to using task values. This resource covers the syntax, constraints, and best practices.
Please read the entire document. Pay close attention to the following sections: 'Set task values': Note the examples and the 48 KiB size limit. 'Reference task values': This is the most important section. Understand the syntax for dynamic value references {{tasks..values.}} and why it is the recommended approach over dbutils.jobs.taskValues.get(). 'View task values': This brief section tells you where to find the output of a task in the UI, which is very useful for debugging.
2. A Practical Walkthrough
Now let's see this in action. The following video provides a practical demonstration of creating a multi-task job where one task determines the day of the week and passes it to an if/else condition task to control the workflow's logic.
22 Workflows, Jobs & Tasks | Pass Values within Tasks | If Else Cond | For Each Loop & Re-Run Jobs
This video from 'Ease With Data' walks through a complete example of setting a task value and then using it to make a decision in a workflow.
Please watch the following segments: 00:11:39 - 00:12:31: The presenter demonstrates using dbutils.jobs.taskValues.set() to pass the calculated day of the week as a task value named input_day. 00:13:07 - 00:14:07: Here, dbutils.jobs.taskValues.get() is used to retrieve the value. Notice the dependency on the task key (01 set day). 00:15:48 - 00:16:35: This is the key part. The presenter configures an if/else task that uses a dynamic value reference (task 01 values.input_day) to check if the day is 'Sunday'. This demonstrates the recommended way to use task values in the UI.
3. Hands-On: Building a Multi-Task Pipeline
It's time to build your own multi-task workflow. We will create a two-step pipeline. The first task will generate some metadata (like a report ID and a quality status), and the second task will "process" that report, receiving the metadata dynamically.
Part A: Create the Upstream "Generator" Notebook
-
In your workspace, create a new Python notebook named
Generate Metadata. -
In a cell, add the following code. It simulates a process that generates a unique report ID and a quality check result. It then outputs these as two separate task values.
import json import uuid # 1. Simulate a data quality check quality_status = "PASSED" # 2. Generate a unique ID for the report report_id = str(uuid.uuid4()) # 3. Print the values for logging purposes print(f"Generated Report ID: {report_id}") print(f"Data Quality Status: {quality_status}") # 4. Set the values to be passed to the next task dbutils.jobs.taskValues.set(key="report_id", value=report_id) dbutils.jobs.taskValues.set(key="quality_status", value=quality_status) -
Run the cell to ensure it works without errors.
Part B: Create the Downstream "Processor" Notebook
-
Create another new Python notebook named
Process Report. -
This notebook will be parameterized using the widgets we learned about in the last lesson. Add the following code to the first cell:
# 1. Define widgets to accept the incoming metadata. # The default values are for interactive testing. dbutils.widgets.text("report_id", "default-id") dbutils.widgets.text("quality_status", "UNKNOWN") # 2. Retrieve the values passed into the widgets received_report_id = dbutils.widgets.get("report_id") received_status = dbutils.widgets.get("quality_status") # 3. Use the values in the task's logic print(f"--- Starting processing for Report ID: {received_report_id} ---") if received_status == "PASSED": print("Quality status is PASSED. Proceeding with report processing.") # In a real scenario, your main logic would be here. else: print(f"Quality status is {received_status}. Aborting processing.") # Raise an exception to fail the task raise Exception("Data quality check failed.") print("--- Report processing completed successfully. ---") -
Run the cell. It should run successfully using the default values you provided.
Part C: Configure the Multi-Task Job
Now, let's wire these two notebooks together in your workflow.
- Navigate to Workflows and select
My Practice Workflow. - Delete any existing tasks to start fresh.
- Create Task 1:
- Click Add task.
- Task name:
generate_metadata - Type: Notebook
- Path: Select your
Generate Metadatanotebook. - Cluster: Select your cluster.
- Click Create task.
- Create Task 2:
- Click the + icon below the first task to add a downstream task.
- Task name:
process_report - Type: Notebook
- Path: Select your
Process Reportnotebook. - The
Depends onfield should already be populated withgenerate_metadata. - Cluster: Select your cluster.
- In the Parameters section, click + Add.
- Key:
report_id - Value:
{{tasks.generate_metadata.values.report_id}}
- Key:
- Click + Add again.
- Key:
quality_status - Value:
{{tasks.generate_metadata.values.quality_status}}
- Key:
- Click Create task.
- Your workflow should now show a two-step dependency graph. Click Save changes.
Part D: Run and Verify
- Click Run now to execute your new multi-task workflow.
- Click on the new run to monitor its progress.
- Once the
generate_metadatatask completes, click on it. In the Output panel, you should see thereport_idandquality_statuslisted as task values. - Once the
process_reporttask completes, click on it. Its output should show the messages with the dynamically passedreport_idand confirm that processing proceeded because the status was "PASSED".
Congratulations! You have successfully built a pipeline where data flows dynamically from one task to the next.
Conclusion
This lesson completes our module on orchestrating production jobs. You have progressed from running single, static notebooks to building complex, parameterized, and interconnected workflows that can handle dependencies and pass data between steps. This is a cornerstone of modern data engineering on Databricks.
Key Takeaways
- Task values are the mechanism for passing small amounts of data between tasks within a single job run.
- Use
dbutils.jobs.taskValues.set(key, value)in a Python notebook to output a value. - The recommended way to consume a task value is with a dynamic value reference (
{{tasks.TASK_NAME.values.KEY}}) in the task configuration UI. - This allows the output of one task to control the parameters or logic (e.g., in an
if/elsetask) of a subsequent task. - You can view the task values produced by a task in its Output panel in the job run details, which is helpful for debugging.
Next Steps
Having mastered workflow orchestration, we will now shift our focus to a critical aspect of enterprise data platforms: data governance. In the next module, we will be introduced to Unity Catalog, Databricks' unified governance solution. Our first lesson will cover its foundational concept: the three-level namespace (catalog, schema, table), which provides a structured way to organize and secure all your data assets.