Introduction
In our previous lesson, we established a balanced upper body by pairing the negative push-up with the bodyweight row. Now, we shift our focus to the engine that powers nearly every athletic movement: the lower body. This lesson is dedicated to mastering the bodyweight squat, the undisputed cornerstone of leg strength and functional fitness.
Your goal is to perform this fundamental exercise with excellent technique. We will break down the movement into its critical components: achieving proper depth, ensuring your knees track correctly, and maintaining an upright torso. Understanding and executing these elements will build a strong, resilient foundation that translates not only to more advanced calisthenics but also to everyday activities.
The Squat: A Fundamental Human Movement
Before we analyze the mechanics, it's important to understand that the squat is not just a gym exercise; it's a primal human movement pattern. For much of human history, the deep squat was a natural resting position. In modern society, prolonged sitting in chairs has caused many of us to lose this ability, leading to tight hips and weak legs. Reclaiming this movement is key to long-term mobility and health.
A common myth you might have heard is that squatting deep is bad for your knees. The opposite is true: when performed correctly, deep squats strengthen the muscles and connective tissues around the knee, making the joint more resilient.
Let's start with a video that dispels these myths and introduces the importance of the deep squat.
I Couldn’t SQUAT For Years...Until I Did This
The video "I Couldn’t SQUAT For Years...Until I Did This" by Oscar Moves provides an excellent introduction.
Watch the first part from the beginning. The speaker explains why the deep squat is a fundamental movement and addresses the common myths that might be holding you back.
Your Squat Blueprint: Anatomy and Individual Variation
The squat is a compound exercise that primarily targets the quadriceps, glutes, and hamstrings. It also heavily engages your core for stability.

Crucially, a "perfect" squat will look different for everyone. Your unique skeletal structure, particularly the ratio of your femur (thigh bone) length to your torso length, will dictate your mechanics. This is a principle of biomechanics that should resonate with your engineering background. Someone with long femurs and a short torso will naturally need to lean forward more to keep their center of mass over their midfoot. Conversely, someone with shorter femurs can typically maintain a more upright posture. Neither is "wrong"; they are simply different solutions to the same mechanical problem.
The following video provides a concise explanation of this concept.
Can’t Deep Squat? Here's The Fix
In "Can’t Deep Squat? Here's The Fix," Dr. Alyssa Lu clearly explains how bone structure influences squat form.
Watch the segment from this section to understand how femur length affects your ideal stance and the degree of forward lean required for balance.
The "How": Step-by-Step Execution
Now, let's build the squat from the ground up. We will follow a systematic process to ensure every part of the movement is correct.
Your Guide to Perfect Squat Form - VASA Fitness
This guide from VASA Fitness provides a clear, step-by-step breakdown of the squat.
Read the section titled "How to Do A Squat". Focus on each step, from setting your stance to your breathing pattern. Pay special attention to the cue to "screw" your feet into the ground to create stability. Also, read the brief subsection on Air Squats.
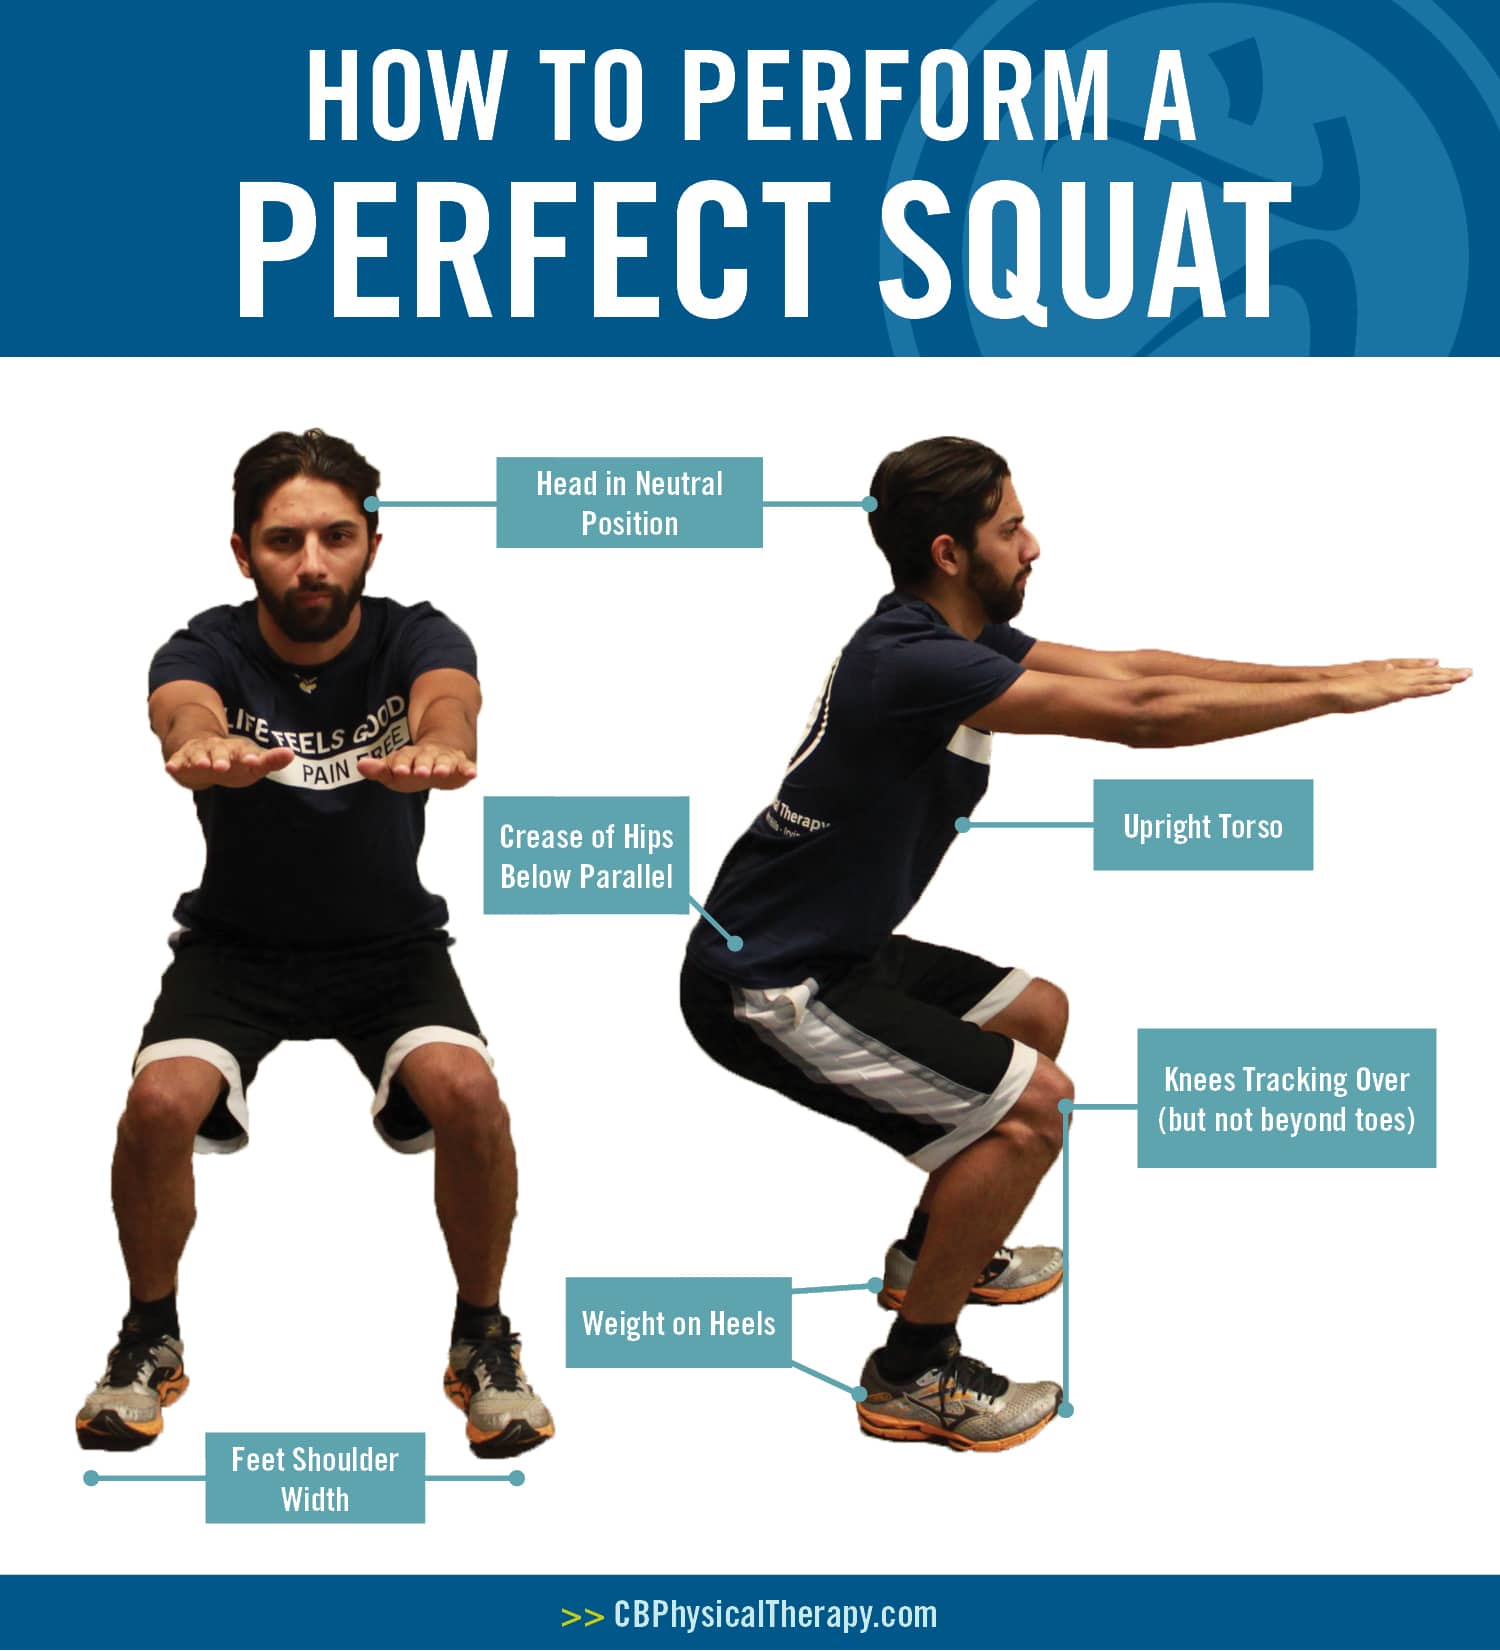
Here are the key takeaways from that guide, which define proper form:
- Stance: Feet shoulder-width apart or slightly wider, with toes pointed out 15-30 degrees.
- Initiation: Begin by pushing your hips back as if sitting in a chair. This is the "hip hinge."
- Descent: Keep your chest up and back straight. Lower yourself until your hip crease is below the top of your knees ("breaking parallel").
- Knee Tracking: Your knees should follow the line of your toes. Do not let them collapse inward.
- Ascent: Drive through your midfoot and heels, squeezing your glutes to return to the standing position. Your hips and shoulders should rise at the same rate.
- Core: Maintain a braced core and a neutral spine throughout the entire movement.
Troubleshooting: Identifying and Fixing Common Mistakes
As with any new skill, you'll likely encounter some technical issues. Being able to identify and correct them is crucial for safe and effective training. The most common errors are heels lifting, knees caving inward, and rounding the lower back ("butt wink").
Bodyweight squats: Benefits, common mistakes, and progressions
The article from Exakthealth offers an excellent analysis of common squatting mistakes and, importantly, explains why they happen.
Read the sections covering the top mistakes: Knees falling in/out and heels lifting, and chest dropping and back rounding. As you read, try to connect the cause to the effect. For example, understand that heels lifting is often a symptom of limited ankle mobility (dorsiflexion).
Let's focus on two of the most critical faults:
- Knees Caving In (Knee Valgus): This is often caused by weak glute muscles or tight adductors (inner thigh muscles). A great cue is to actively think about "spreading the floor" with your feet or pushing your knees outward so they track over your feet.
- Heels Lifting: This indicates your weight has shifted too far forward onto your toes, usually due to limited ankle flexibility. You can temporarily fix this by placing a small book or rolled-up towel under your heels. This allows you to practice the deep squat pattern while you work on improving your ankle mobility separately.
Finding Your Starting Point and Progressing
Now it's time to put theory into practice. First, you need to perform a simple self-assessment to identify your primary limitation.
I Couldn’t SQUAT For Years...Until I Did This
Let's return to the Oscar Moves video for a quick diagnostic test.
Watch the section from the self-test. Perform the test as shown and observe what happens. Do your heels lift? Does your back round immediately? This will tell you where to start.
Based on your test, here is your progression plan:
- Level 1 (If your heels lift AND your back rounds): Your main limitations are in ankle and hip mobility. Start with an assisted squat. Place a book under your heels to reduce the ankle mobility demand, and lightly hold onto a door frame or sturdy table for balance. This allows your body to learn the pattern without fighting against its own restrictions. Focus on sitting deep into the squat and getting comfortable in the bottom position.
- Level 2 (If ONLY your heels lift): Your primary limitation is ankle mobility. Continue to use a heel lift, but perform the squat without holding onto anything for support. Focus on control and balance.
- Level 3 (If you can squat with good form): You are ready to perform unassisted bodyweight squats. Focus on perfecting every rep and increasing the number of repetitions you can perform with flawless technique.
The concept of "owning" your range of motion is critical here. Passively stretching can grant you temporary flexibility, but building strength in that new range is what creates permanent, usable mobility. This is where your interest in hybrid training comes in. In the future, holding a light weight (like your loaded backpack) in front of your chest during a squat (a Goblet Squat) can act as a counterbalance, making it easier to stay upright and teaching your body to control the deep squat position.
The Protocol: Your First Lower Body Workout
Incorporate bodyweight squats into your routine on the days you do your push-ups and rows.
- Exercise: Bodyweight Squat (using the appropriate level from the progression plan above).
- Sets: 3
- Repetitions: 8-15. Your goal is to perform each rep with perfect form. If your form breaks down, stop the set.
- Tempo: Control the movement. Aim for a 2-second descent, a 1-second pause at the bottom, and a 1-second ascent.
- Rest: 60-90 seconds between sets.
Progression Standard: Once you can comfortably perform 3 sets of 15 repetitions with perfect form at your current level, you are ready to move to the next level in the progression (e.g., from heel-supported to flat ground).
Conclusion
Today, you've learned to perform the bodyweight squat, the foundational exercise for building a powerful lower body. By understanding the mechanics and tailoring the movement to your own body, you've equipped yourself with a tool for building functional strength that will last a lifetime.
Key Takeaways:
- The Squat is Foundational: It's a natural human movement essential for leg strength, mobility, and overall athleticism.
- Form is Individual: Your ideal squat stance and posture depend on your unique anatomy. Don't force a "one-size-fits-all" model.
- The Three Pillars of Form: Always focus on achieving proper depth (hip crease below knees), maintaining knee tracking (in line with your toes), and keeping an upright torso with a neutral spine.
- Diagnose and Progress: Use self-assessment to find your starting point—whether assisted or unassisted—and progress methodically as your form improves.
In our next lesson, we will focus on the critical link between the upper and lower body: the core. You'll learn a series of exercises designed to build the core stability needed to make all your movements, including squats and push-ups, stronger and safer.