Introduction
In our last lesson, we focused on building pressing strength by mastering the negative push-up, a fundamental horizontal pushing movement. To ensure a balanced and functional upper body, we must now introduce its counterpart. This lesson is dedicated to the bodyweight row, a horizontal pulling exercise that is essential for developing a strong back, improving posture, and preventing the muscular imbalances that can arise from focusing only on pushing exercises.
Your goal is to build a solid calisthenics foundation using the equipment you have available. Today, you will learn how to perform the bodyweight row safely and effectively using a sturdy table. We will cover the mechanics of the movement, the precise form required for success, and how you can adjust the difficulty by applying basic principles of leverage—a concept that should be quite familiar from your engineering studies.
Why Rows are Non-Negotiable
Many home workout routines overemphasize pushing movements like push-ups while neglecting the back. This is like designing a structure to withstand force from only one direction; over time, it will lead to instability. In the body, this manifests as rounded shoulders and poor posture. The bodyweight row directly counteracts this by strengthening the muscles of your upper back—the rhomboids, traps, and lats—which are responsible for pulling your shoulder blades back and down, creating a strong, upright posture.
To start, let's watch a brief video that explains the importance of balancing your upper body training.
How To Do Rows and Pullups at Home With Minimal Equipment
This video, "How To Do Rows and Pullups at Home With Minimal Equipment," begins by highlighting the common problem of neglecting back training.
Watch the section from the beginning to understand why balancing pushing exercises with pulling exercises is crucial for preventing posture problems and developing a healthy, functional upper body.
The concept of the inverted row can be thought of as a "push-up in reverse." It trains the same plane of motion but targets the opposing muscle groups, creating a state of equilibrium in your upper body structure.
The "How": Mastering the Table Row
Given that you'll be using a household table, safety is the absolute first priority. The exercise creates a significant horizontal pulling force, so you must ensure your setup is secure.
Crucial Safety Check:
- Sturdiness: Use a heavy, robust table. Do not use a flimsy card table or lightweight desk. It must be able to support your full bodyweight without any sign of stress.
- Stability: Ensure the table will not slide or tip. If it's on a smooth floor, you might need to brace its legs against a wall. Test its stability by applying force before committing your full weight.
Once you have a safe setup, you can focus on the technique. The goal is to maintain a rigid body line, just as you practiced for the push-up.
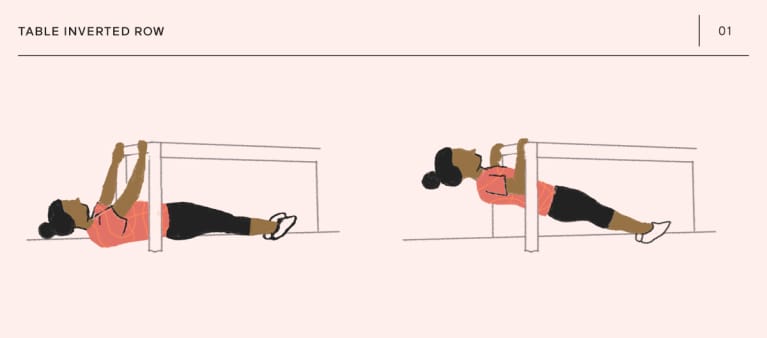
Let's watch a full demonstration of the exercise using a table, which will serve as your primary visual guide.
How To Do Rows and Pullups at Home With Minimal Equipment
The same video provides a clear, practical demonstration of how to perform the row using a table.
Watch from this section for a step-by-step guide. Pay close attention to the setup, the pulling motion, and the variations shown, such as the bent-knee version for making it easier and the underhand grip.
To reinforce the specific cues for perfect form, let's consult a detailed written guide. Good form is what makes the difference between an effective back exercise and simply tiring out your arms.
How to train bodyweight rows - Calisthenics equipment
This article from Calisthenics Equipment provides an excellent checklist for proper execution and troubleshooting common errors.
First, read the section under "Execution: the cues that fix 90% of mistakes." Focus on internalizing these cues: the five key points. Then, review the section on "Common mistakes (and quick fixes)" to learn how to identify and correct issues like common errors.
Adjusting Difficulty with Leverage
The bodyweight row is a highly scalable exercise. You don't need to add weight to make it harder; you simply need to change the leverage. As you move your body closer to a horizontal position, you increase the percentage of your bodyweight that your arms and back must lift.
- Easier (Regression): To make the exercise easier, you increase your body's angle to be more vertical. The simplest way to do this is by bending your knees and planting your feet flat on the floor. This brings your center of mass closer to the pivot point (your feet) and requires your upper body to lift less of the total load.

- Harder (Progression): To make it harder, you do the opposite.
- Start with bent knees.
- Progress to straight legs with heels on the floor.
- Finally, elevate your feet on a chair or stool to put your body in a decline position, which is the most challenging variation.
The following video explains this principle of scaling difficulty very clearly.
Inverted Rows (Beginner to Advanced Progressions)
This video, "Inverted Rows (Beginner to Advanced Progressions)," masterfully explains how body angle changes the difficulty of the exercise.
Watch the segment from 01:13 to 02:12. The demonstration uses a TRX system, but the mechanical principle is identical for your table row. Focus on how stepping your feet forward (making the body more horizontal) increases the difficulty.
The Protocol: Your First Pulling Workout
Integrate this routine into your week, ideally on the same days you perform your negative push-ups. You can alternate between a set of push-ups and a set of rows to save time, a technique known as "supersetting."
- Starting Point: Begin with the bent-knee variation.
- Sets: 3
- Repetitions: 6-10. Focus on clean, controlled reps. If you cannot complete 6 reps with good form, that is fine. Your goal is quality over quantity.
- Tempo: Control the movement. A good tempo is 1 second up, a 1-second squeeze at the top, and 2 seconds down.
- Rest: 90 seconds between each set.
Progression Standard: Once you can comfortably perform 3 sets of 10-12 repetitions with the bent-knee variation, you are ready to progress to the straight-leg version.
Conclusion
Today you've added the second cornerstone of upper-body strength to your program: the horizontal pull. By mastering the bodyweight row, you are not just building a stronger back; you are creating a balanced, resilient system that is less prone to postural issues and injury.
Key Takeaways:
- Balance is Key: Bodyweight rows are the essential counterpart to pushing exercises like the push-up, ensuring balanced development and healthy posture.
- Safety First: Always verify that your improvised equipment (the table) is heavy, stable, and will not slide or tip.
- Form over Everything: Maintain a rigid "plank" from your shoulders to your knees/heels. Pull with your back by driving your elbows behind you, not just with your arms.
- Leverage is Your Friend: You can precisely adjust the difficulty of the row by changing your body angle—no extra weight needed. Start with bent knees and progress methodically.
In our next lesson, we will shift our focus from the upper body to the lower body, introducing the foundational movement for leg strength: the bodyweight squat.