In our last lesson, you mastered the forward lunge, an exercise that builds unilateral strength and balance. A key component of a powerful lunge is the ability to drive your body upwards using your glutes. Today, we'll isolate and strengthen that exact muscle group. This lesson is dedicated to the glute bridge, an essential exercise for activating the posterior chain—the group of muscles on the back of your body.
Your goal of comprehensive fitness requires a balanced physique, and strong glutes are the powerhouse of your lower body. They are critical for everything from sprinting and jumping to maintaining good posture and preventing low back pain. By the end of this session, you will be able to perform both the standard and single-leg glute bridge, ensuring your glutes are firing correctly and contributing effectively to all your lower body movements.
The "Why": Your Body's Engine
Before performing the movement, it's important to understand the system you're training. The posterior chain, which includes your glutes, hamstrings, and lower back erectors, is the primary engine for powerful hip extension. Given your engineering background, you can think of the glutes as the prime movers in this system. However, a sedentary lifestyle can lead to a phenomenon sometimes called "gluteal amnesia," where these powerful muscles become underactive. When this happens, smaller, less suitable muscles like the hamstrings and lower back erectors are forced to compensate, leading to inefficiency, poor performance, and potential pain.
This first resource provides an excellent breakdown of the key muscles involved in a glute bridge and their specific roles. Understanding this will help you build a stronger mind-muscle connection.
Guide To Glute Bridges | ATHLEAN-X
This article from ATHLEAN-X details the anatomy of the movement, which will satisfy your interest in the "why" behind the exercise.
Please read the section titled GLUTE BRIDGES: MUSCLES WORKED. Focus on understanding the distinct roles of the Gluteus Maximus (the main driver), the Gluteus Medius (a key stabilizer), and how the hamstrings and spinal erectors should act as supporters, not primary movers.
Performing the Basic Glute Bridge
Now, let's put this knowledge into practice. The goal is not just to lift your hips, but to do so by consciously activating your glutes.
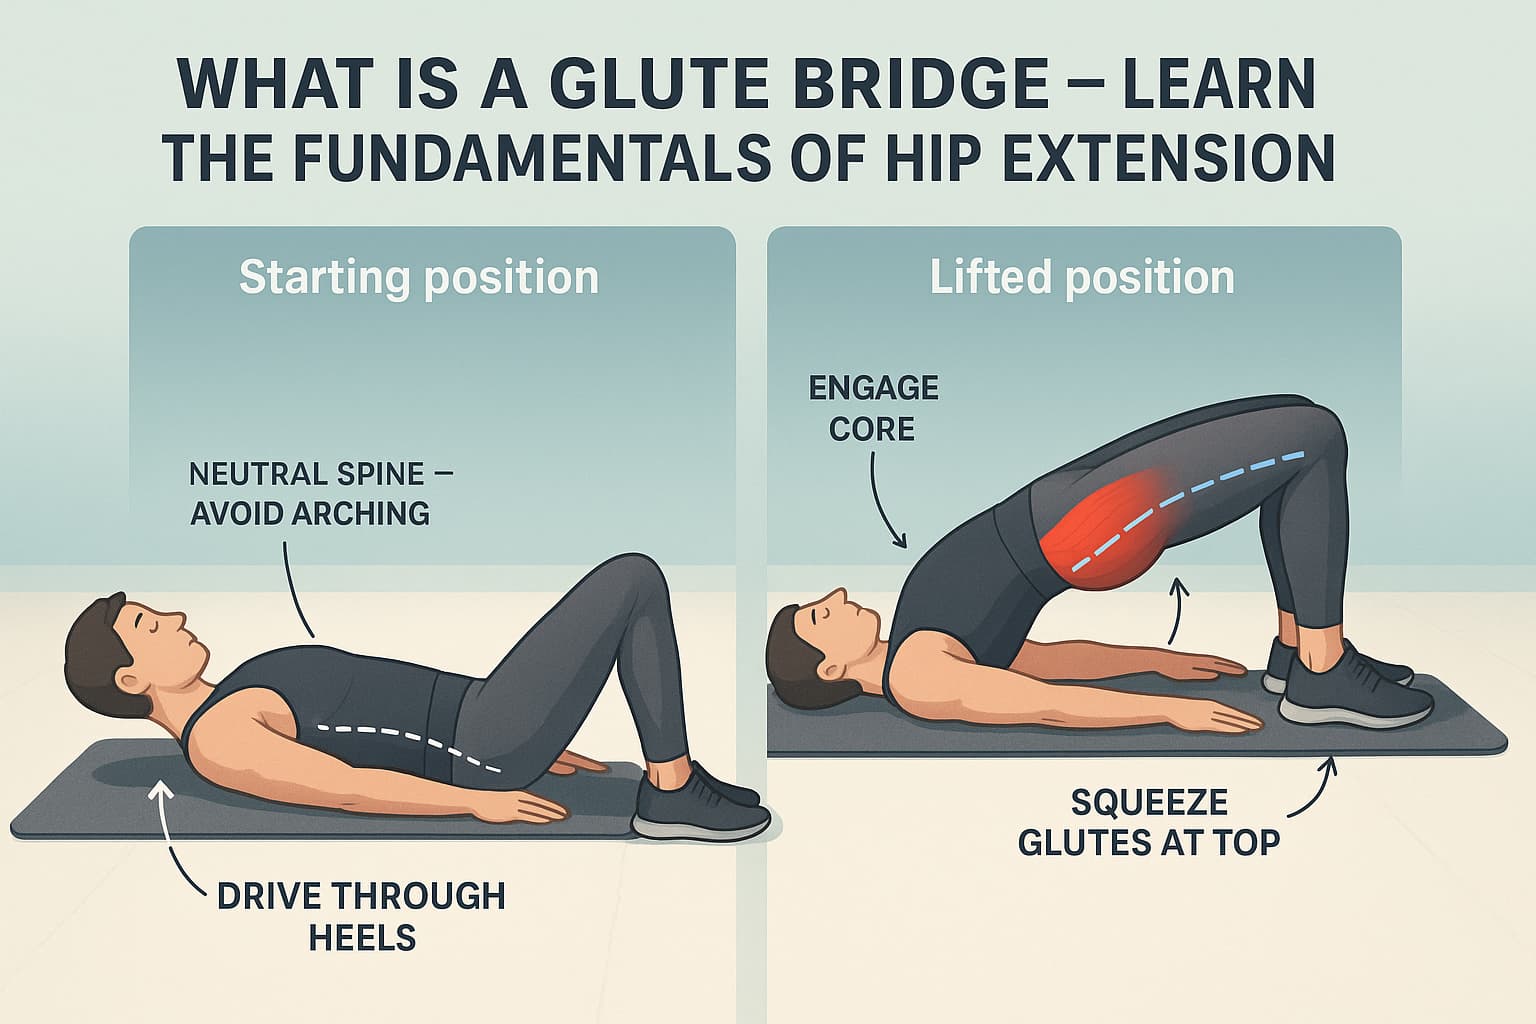
How to Perform the Basic Glute Bridge:
- Starting Position: Lie on your back with your knees bent, feet flat on the floor about hip-width apart. Your heels should be close enough that you can just graze them with your fingertips. Your arms can rest by your sides.
- Engage Your Core: Before lifting, brace your core. A key technique here is the posterior pelvic tilt. Imagine you have a belt buckle; try to tilt it up towards your chin. This action should press your lower back gently into the floor, disengaging your back muscles and preparing your glutes to work.
- Lift: Drive through your heels to lift your hips off the floor. Push up until your body forms a straight line from your shoulders to your knees. Avoid arching your back at the top; the movement should stop once your hips are fully extended.
- Squeeze: At the top of the movement, consciously squeeze your glutes as hard as you can for 1-2 seconds.
- Lower: Lower your hips back down with control. Don't just drop to the floor; maintain tension throughout the descent.
Troubleshooting: When the Wrong Muscles Take Over
It's very common to feel this exercise more in your hamstrings or lower back than in your glutes. This is a sign of the compensation we discussed earlier. The following video offers excellent, science-based cues to correct this.
How To Properly Perform The Glute Bridge |#AskSquatU Show Ep. 39|
This video from Squat University, led by a Doctor of Physical Therapy, provides a diagnostic test and explains the biomechanics behind fixing common faults.
First, watch the section describing a single-leg bridge test. Try this yourself. Do you feel your glutes working, or do your hamstrings, quads, or back take over? Next, watch the detailed instructions on performing the classic bridge. The explanation of how moving your heels closer to your body uses the principle of active insufficiency to reduce hamstring involvement is a perfect example of applied biomechanics. Try this cue if your hamstrings are cramping.
The video you just watched is one way to ensure glute activation. Another simple method involves using an object to change the muscle recruitment pattern.
Glute Bridge Exercise - The correct way of doing it
This video from PostureFlow demonstrates two other common techniques to improve glute activation.
Watch the section on using an object, like a book or rolled-up towel, between your knees to squeeze. Then, watch the next variation where you use your hands or a band to push your knees outward. Experiment with both to see which one helps you feel your glutes the most.
Progression: The Single-Leg Glute Bridge
Once you can perform the standard glute bridge for several reps while feeling it primarily in your glutes, you are ready to progress. The single-leg glute bridge dramatically increases the demand on the working glute and challenges your core and hip stability.

How to Perform the Single-Leg Glute Bridge:
- Setup: Begin in the same starting position as the standard glute bridge.
- Lift One Leg: Lift one foot off the floor and bring that knee towards your chest.
- Bridge Up: Drive through the heel of the foot that is still on the ground, lifting your hips.
- Stay Level: The key challenge here is to keep your hips level. Do not let the hip of the raised leg drop or rotate.
- Squeeze and Lower: Squeeze the working glute at the top, then lower with control. Perform all reps on one side before switching to the other.
A great way to build the stability needed for this exercise is the marching glute bridge. From the top of a standard two-leg bridge, practice slowly lifting one foot off the ground for a second, placing it back down, and then lifting the other, all while keeping your hips perfectly still.
Workout Implementation
Your goal is to master the activation before focusing on load.
- Phase 1 (Activation): Start with the standard double-leg glute bridge.
- Perform 3 sets of 15-20 repetitions.
- Focus on a slow, controlled tempo and a hard squeeze at the top.
- If you struggle to feel your glutes, use the techniques from the videos (heels closer, squeezing an object, pushing knees out). Your only goal is to perform "good reps" where you feel your glutes working.
- Phase 2 (Progression): Once you can comfortably complete the Phase 1 workout with perfect form, move to the single-leg glute bridge.
- Start with 3 sets of 8-12 repetitions per leg.
- If you find your hips dropping, work on marching glute bridges first (3 sets of 16-20 total marches) to build stability.
Conclusion
Today you've learned how to properly activate and strengthen your posterior chain using the glute bridge. By moving beyond simply lifting your hips and focusing on the quality of the contraction, you are re-training your body to use its most powerful muscles effectively.
Key Takeaways:
- Strong, active glutes are essential for athletic power, posture, and preventing injury.
- Use the posterior pelvic tilt and heel drive to initiate the movement from your glutes, not your lower back.
- If your hamstrings cramp, move your feet closer to your body. If you still struggle with activation, try squeezing an object between your knees or pushing them apart against a band.
- Master the double-leg bridge with perfect form and glute activation before progressing to the more challenging single-leg variation.
In our next lesson, we will shift our focus back to nutrition. You'll learn practical strategies to plan simple, high-protein meals that fit a student budget, providing your body with the fuel it needs to recover and build muscle from these workouts.