Hello! Welcome back to our course on C++ for the ESP32.
In the last lesson, we explored the internal architecture of the ESP32, focusing on its powerful dual-core processor and its various types of memory. We learned what we're programming. Now, it's time to set up the tools to actually do the programming.
This lesson is dedicated to achieving a crucial milestone: setting up the ESP-IDF toolchain for ESP32 development. This is the official software development framework from Espressif, the creators of the ESP32.
Think of the toolchain as your digital workshop or assembly line. It's a collection of essential software—compilers, libraries, and build tools—that takes your C++ source code as the raw material and transforms it into a binary firmware file that the ESP32 chip can execute.
The Development Workflow
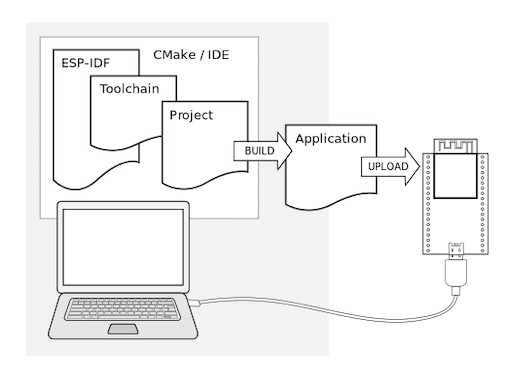
Before we start installing, let's visualize the process. You will write code on your computer, use the ESP-IDF toolchain to build it into an application, and then upload that application to the ESP32 board via a USB connection.
What's in the ESP-IDF Toolchain?
The term "toolchain" can sound abstract, but it's just a set of specialized programs that work in sequence. For ESP32 development, the key components are:
- ESP-IDF (Espressif IoT Development Framework): This is the heart of the ecosystem. It's a vast collection of libraries (for controlling GPIO, connecting to Wi-Fi, etc.), essential system software, and the FreeRTOS real-time operating system, which we will explore in a later module.
- Compiler: A program (specifically, a version of GCC tailored for the ESP32's Xtensa architecture) that translates your C++ code into machine instructions the ESP32's processor can understand.
- Build System (CMake): An automation tool that manages the entire compilation process. You'll create simple configuration files, and CMake handles the complex task of telling the compiler which files to build and how to link them together with the ESP-IDF libraries.
- Development Environment: This is where you'll write code and interact with the toolchain. While you can use any text editor and the command line, we'll be using Visual Studio Code (VS Code) as it provides an excellent, integrated experience.
Choosing Your Setup Method
There are several ways to install the ESP-IDF toolchain. Each has its pros and cons. Let's review the main options so you can choose the one that best suits you.
-
VS Code Extension (Recommended): Espressif provides an official extension for VS Code. It manages the entire installation of the toolchain and IDF for you and integrates build, flash, and monitoring commands directly into the editor's interface.
- Pros: Easiest and most integrated approach, works on Windows, macOS, and Linux.
- Cons: You are dependent on the extension's logic, which can sometimes hide the underlying details.
-
Native Installers/Scripts: You can install the toolchain directly on your host operating system using official installers (for Windows) or command-line scripts (for macOS/Linux).
- Pros: A "purist" approach that gives you full control over the installation paths and process.
- Cons: More manual steps are involved, and it can be easier to run into OS-specific permission or path issues.
-
Docker Container: This method involves running the entire development environment inside a Docker container. This creates a perfectly isolated and reproducible setup.
- Pros: Guarantees a consistent environment across any machine, avoids "polluting" your host OS with development tools.
- Cons: Adds a layer of complexity (you need to understand Docker basics like images and volumes).
For this course, we will follow the VS Code Extension method. It offers the best balance of simplicity and power, allowing us to get up and running quickly while still providing access to the underlying command-line tools.
Guided Setup: The VS Code Extension
Let's walk through the setup process using the official Espressif extension for VS Code. If you don't already have VS Code, you can download it from the official website.
Step 1: Install the Extension
First, we need to find and install the extension from the VS Code Marketplace. The following video clip shows you exactly how to do this.
Installation and Use of the Visual Studio Code ESP-IDF Extension
This video from the Intermation channel demonstrates installing and configuring the ESP-IDF extension. Watch this first part to see how to locate and install it.
Watch from 0:25 to 1:16. The goal is to find the 'ESP-IDF' extension by Espressif and click 'Install'.
Step 2: Run the Configuration Wizard
Once the extension is installed, it needs to download and configure the toolchain components. You will use the setup wizard to do this. This is a one-time process.
The next segment of the same video will guide you through the wizard.
Installation and Use of the Visual Studio Code ESP-IDF Extension
Now, let's configure the installation. This part of the video shows how to launch the setup wizard and choose the installation settings.
Watch from 1:16 to 3:24. Follow these key steps shown in the video: Open the command palette (Ctrl+Shift+P or Cmd+Shift+P). Type 'ESP-IDF: Configure ESP-IDF extension' and run the command. Select the EXPRESS installation type. Choose the ESP-IDF version you want to use (the latest stable version is usually a good choice). Important: Pay close attention to the installation paths for the 'ESP-IDF container directory' and 'tools directory'. Make sure these are in a location where you have full write permissions (e.g., inside your user home directory) to avoid installation errors.
The installation will take several minutes as it downloads the compiler, the ESP-IDF source code, and other necessary tools.
Step 3: Verify the Installation
The best way to confirm everything is working is to create and build one of the provided example projects. The extension makes this simple.
The video below demonstrates creating a project from an example, compiling it, selecting the port, and flashing it. While we will cover creating our own projects from scratch in the next lesson, this is an excellent way to test your new setup.
Installation and Use of the Visual Studio Code ESP-IDF Extension
To finalize and test your setup, let's build and flash a 'hello_world' example.
First, watch from 3:24 to 4:20 to see how to create a new project from an example using the 'ESP-IDF: Show Examples Projects' command. Then, skim through the section from 8:46 to 11:07 to understand the UI controls at the bottom of the VS Code window for building (compiling), flashing (uploading), and monitoring your device.
At the bottom of your VS Code window, you should now see a status bar with several new icons and items:
- Port: A selector for the COM port (on Windows) or
/dev/tty...device (on Linux/macOS) your ESP32 is connected to. - Build Button (Cylinder icon): Compiles your code.
- Flash Button (Lightning bolt icon): Uploads the compiled application to the ESP32.
- Monitor Button (Plug icon): Opens a serial terminal to view output from the ESP32.
If you can successfully build and flash the "hello_world" example to your board, your toolchain is correctly set up!
Test your understanding!
You've written some code and want to see if it compiles without any errors, but you are not ready to upload it to the ESP32 board yet. Which idf.py command (or corresponding VS Code UI button) would you use for this purpose?
Show answer
You would use the idf.py build command, or click the "Build" button (the cylinder icon) in the VS Code status bar. This action compiles the source code and links it with the necessary libraries to create the final application binary, but does not attempt to write it to the hardware.
Alternative Setup Methods (For Reference)
If you prefer a different approach or run into issues with the VS Code extension, the official Espressif documentation provides excellent step-by-step guides for native installation.
Standard Setup of Toolchain for Windows
For Windows users who prefer a standalone installer without relying on VS Code, the official documentation provides a wizard-based installer.
If you choose this path, read the sections 'ESP-IDF Tools Installer' and 'Launching ESP-IDF Environment'. This will guide you through using the installer and opening the special command prompt where the tools are available.
Standard Toolchain Setup for Linux and macOS
For Linux and macOS users who prefer a manual, command-line based setup, this guide details the process.
This is a more involved process. If you follow this path, you'll need to read through Steps 1 to 4, which cover installing prerequisites, cloning the ESP-IDF repository with Git, and running the install and export scripts.
Conclusion
Congratulations on setting up your development environment! This is a critical step, and having a working toolchain is the foundation for everything we'll do from this point forward.
Here are the key takeaways from this lesson:
- The ESP-IDF toolchain is a suite of software for compiling code, linking libraries, and creating firmware for the ESP32.
- The recommended setup method is using the official ESP-IDF extension for VS Code, which automates the installation and provides an integrated development experience.
- The core interaction with the toolchain happens via
idf.pycommands (build,flash,monitor), which can be executed from a terminal or through the convenient UI buttons in VS Code.
Now that your digital workshop is ready, we can start building. In the next lesson, we will move beyond examples and learn how to configure and build a new ESP32 project from scratch using CMake. You'll learn how to structure your project directories and write the CMakeLists.txt files that define how your application is built.