Hello! Welcome back to our course on C++ for the ESP32.
In our last session, you successfully set up your development environment and toolchain using the ESP-IDF extension in VS Code. You've seen how to build and flash a pre-existing example project, which confirms your tools are working correctly.
This lesson takes the crucial next step: we will learn how to configure and build a new ESP32 project from scratch using CMake and the ESP-IDF. Moving away from examples gives you complete control over your application's structure and features. We'll cover the standard ESP-IDF project layout, the role of CMake in the build process, and how to tailor your project's configuration for specific needs—including enabling C++ support.
1. ESP-IDF Project Structure
Before we create a project, let's understand its anatomy. An ESP-IDF project is not just a collection of source files; it's a well-defined directory structure that the build system relies on.
Build System - Example Project Structure
The official ESP-IDF documentation provides an excellent overview of a typical project structure. Understanding this is key to organizing your code effectively.
Please read the section 'Example Project'. Focus on the descriptions for the main directory, the components directory, the root CMakeLists.txt file, and the sdkconfig file. We will be interacting with all of these today.
As you read, the key takeaway is that an ESP-IDF project is a collection of components. The main directory is simply a special component that holds your primary application logic. This modular approach is powerful for organizing large projects, which we will leverage later in the course.
2. Creating a New Project
The ESP-IDF provides a command-line tool, idf.py, to handle project management. Let's use it to generate the skeleton of our new project.
ESP32 - How to create your First ESP IDF project (From Scratch)
This video from Yuri R demonstrates the command to create a new project and explains the initial files that are generated.
Watch from 1:11 to 2:00. Pay attention to the idf.py create-project command. You can run this in the ESP-IDF terminal within VS Code. For our course, we'll create a project named cpp_project.
To do this yourself:
- Open VS Code.
- Open the command palette (Ctrl+Shift+P) and select ESP-IDF: Open ESP-IDF Terminal.
- Navigate to a directory where you store your projects (e.g.,
cd ~/esp). - Run the command:
idf.py create-project cpp_project - Open this new
cpp_projectfolder in VS Code (File > Open Folder...).
You now have a standard, C-based ESP-IDF project.
3. The Build System: Understanding CMake
You'll notice your new project contains two CMakeLists.txt files. These are the blueprints for our build system, CMake. CMake is a tool that reads these files to understand how to compile and link all the necessary code—your source files and the ESP-IDF's libraries—into a final executable firmware.
Let's examine the purpose of these two critical files.
The Root CMakeLists.txt
This file configures the entire project.
Build System - Project CMakeLists File
The official documentation clearly explains the mandatory parts of the top-level CMakeLists.txt file. Let's review them.
Read the subsections 'Minimal Example CMakeLists' and 'Mandatory Parts'. This will clarify the purpose of each of the three essential lines in this file.
In essence, this file:
- Sets the minimum required CMake version.
- Includes the main ESP-IDF build system logic (
project.cmake). - Declares your project and gives it a name.
The main Component's CMakeLists.txt
This file defines the contents of the main component.
Build System - Component CMakeLists Files
Now let's look at the component-level configuration. The documentation explains how to register source files.
Read the subsection 'Minimal Component CMakeLists'. Focus on the idf_component_register function and its SRCS argument, which lists the source files to be compiled for this component.
4. Configuring the Project for C++
Our goal is to use C++, but the default project is C. Let's fix that. This involves three simple changes.
ESP-IDF C++ with CMake for ESP32
This tutorial from EmbeddedTutorials.com walks through the exact steps needed to switch an ESP-IDF project from C to C++. This is a critical step for our course.
Follow the steps in the sections 'The folder structure', 'Configure CMake for C++', and 'Write a program in ESP-IDF C++'. You'll be modifying both CMakeLists.txt files and renaming main.c.
To summarize the steps from the article:
-
Rename
main.c: In themaindirectory, renamemain.ctomain.cpp. -
Modify the root
CMakeLists.txt: Add the lineset(CMAKE_CXX_STANDARD 17)before theinclude(...)line. This tells CMake to use the C++17 standard. Your file should look like this:cmake_minimum_required(VERSION 3.16) set(CMAKE_CXX_STANDARD 17) include($ENV{IDF_PATH}/tools/cmake/project.cmake) project(cpp_project) -
Modify
main/CMakeLists.txt: Update theSRCSargument inidf_component_registerto point tomain.cpp.idf_component_register(SRCS "main.cpp" INCLUDE_DIRS ".") -
Update
main.cpp: Replace the contents ofmain.cppwith a simple C++ "Hello World". Note theextern "C"block.#include <iostream> #include "freertos/FreeRTOS.h" #include "freertos/task.h" extern "C" void app_main(void) { int i = 0; while (true) { std::cout << "Hello from C++! Count: " << i++ << std::endl; vTaskDelay(1000 / portTICK_PERIOD_MS); } }
Why extern "C"?
The ESP-IDF startup code is written in C and expects to find a C-style function named app_main. C++ compilers perform "name mangling" to support function overloading, which changes the function's name in the compiled object file. extern "C" tells the C++ compiler to give this specific function C-style linkage, ensuring its name is not mangled and the startup code can find it.
Test your understanding!
Imagine you create a new file my_helper_functions.cpp inside the main directory. What single change must you make to one of the CMakeLists.txt files to ensure this new file is compiled as part of your project?
Show answer
You would need to add my_helper_functions.cpp to the SRCS list in the main/CMakeLists.txt file. It would look something like this:
idf_component_register(SRCS "main.cpp" "my_helper_functions.cpp"
                    INCLUDE_DIRS ".")
This tells the build system that both files are part of the main component.
5. Customizing Configuration with menuconfig
The ESP-IDF is highly configurable. You can enable or disable entire features (like Bluetooth), change driver settings, or adjust system-level parameters. This is done through a menu-based tool called menuconfig.
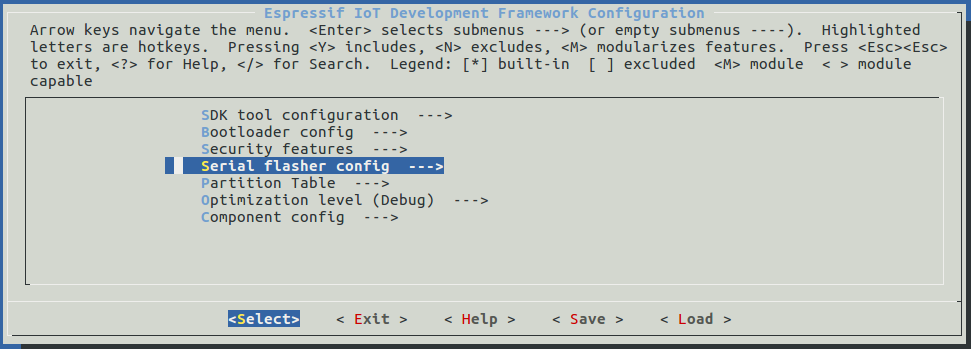
menuconfig works by modifying the sdkconfig file in your project's root directory. This file tracks every configuration choice you make.
ESP32 - How to create your First ESP IDF project (From Scratch)
Let's see menuconfig in action. This video clip will show you how to launch it and make some basic configuration changes.
Watch from 2:42 to 5:35. This demonstrates how to: Launch menuconfig using idf.py menuconfig. Navigate the menus to change settings like CPU frequency and flash size. Save the changes, which updates the sdkconfig file.
A common and useful configuration is setting the default log level. The ESP-IDF has a powerful logging framework, and you can control how much detail it outputs.
ESP32 - Kconfig with ESP-IDF Tutorial
This next video from Shawn Hymel provides a more in-depth look at Kconfig (the system behind menuconfig) and shows how to change the logging verbosity.
Watch from 6:18 to 10:48. Focus on how menuconfig is used to navigate to Component config -> Log output and change the Default log verbosity. This also clearly shows how saving your changes in menuconfig immediately reflects in the sdkconfig file.
6. Building the Project
Now that we have created a project, configured it for C++, and know how to customize its settings, the final step is to build it. This is the same build command you used in the last lesson.
In the ESP-IDF terminal, simply run:idf.py build
This command will:
- Read your
sdkconfigfile. - Parse your root
CMakeLists.txtand all componentCMakeLists.txtfiles. - Invoke the compiler for all necessary source files.
- Link the resulting object files into a final firmware binary.
The video you watched earlier also demonstrates the build process and explains the key files that are generated in the build directory.
ESP32 - How to create your First ESP IDF project (From Scratch)
As a final review, this clip shows the build process and the resulting output files.
Briefly re-watch from 5:35 to 7:31. This will reinforce what happens when you run idf.py build and what the important output files (.bin, .elf) in the build folder represent.
Conclusion
You've now successfully journeyed from a blank slate to a fully configured, custom C++ project for the ESP32. This is a foundational skill for all the advanced topics we'll cover.
Let's recap the key takeaways:
- An ESP-IDF project is structured into components, with
mainbeing the primary one for your application code. - CMake is the build system that uses
CMakeLists.txtfiles as blueprints to compile and link your project. - The root
CMakeLists.txtconfigures the project as a whole, while componentCMakeLists.txtfiles register source files for that specific component. - Enabling C++ requires adding
set(CMAKE_CXX_STANDARD)and renaming your source files to.cpp. - The
idf.py menuconfigtool is used to customize project features, and it saves these settings in thesdkconfigfile.
In the next lesson, we will focus on flashing and monitoring your newly built program. We'll take the cpp_project.bin you just created, upload it to your ESP32 board, and learn how to view its output and interact with it over the serial connection.