In our last lesson, we successfully set up our CUDA development environment and compiled our first simple program. You saw a complete example that adds two vectors on the GPU, which included functions like cudaMalloc, cudaMemcpy, and cudaFree. We used them to get the job done, but we didn't explore how or why they work.
This lesson dives into that crucial topic: managing memory in a heterogeneous system. We will dissect the fundamental API calls that control the allocation, deallocation, and transfer of data between the CPU (host) and GPU (device). Most importantly, we will establish a robust framework for error handling, a non-negotiable practice in low-level programming that will be essential for debugging the complex kernels we will build later in this course.
The Great Divide: Host vs. Device Memory
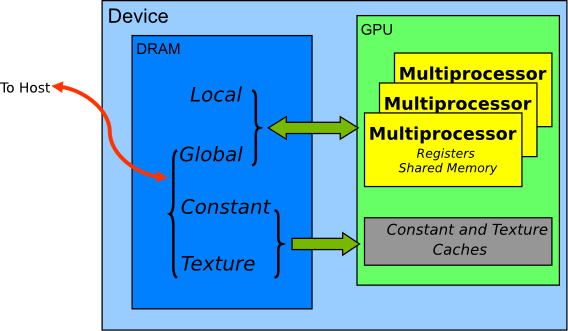
The single most important architectural concept to internalize at this stage is that the CPU and GPU are separate processors with their own distinct memory spaces. The CPU has access to system RAM (host memory), and the GPU has its own dedicated high-bandwidth memory, or HBM (device memory).

This separation means that a kernel running on the GPU cannot directly access data residing in the host's RAM, and vice versa. Any data your kernel needs to operate on must first be copied from the host to the device. Likewise, any results computed by the kernel must be copied back. This explicit data management is a core part of the standard CUDA programming model.
The different types of memory on the GPU form a hierarchy, which we will explore in detail later. For now, know that when we talk about allocating "device memory," we are referring to the largest, but also slowest, pool of memory available to the GPU, often called global memory.
The Three Pillars of Memory Management
To manage this data flow, CUDA provides three fundamental functions. Let's watch a short video that introduces these concepts and walks through a complete example.
Intro to CUDA (part 2): Programming Model
This video from the "Intro to CUDA" series by Josh Holloway clearly explains the host/device memory model and the core functions for managing it.
First, watch the overview of the program flow, which reinforces the concept of separate memory regions. Next, focus on the explanation of allocating and deallocating device memory with cudaMalloc and cudaFree. Note the parallel to standard C functions. Pay close attention to the breakdown of the cudaMemcpy function, particularly its four arguments, which control the data transfer. Finally, watch the full example to see how these functions are sequenced in a real program.
Let's formalize what we just saw.
-
cudaError_t cudaMalloc(void** devPtr, size_t size)- Purpose: Allocates
sizebytes of global memory on the device. - Analogy: The GPU equivalent of
malloc()in C. - Parameters:
devPtr: The address of a host pointer. After the call, this pointer will hold the memory address of the newly allocated block on the device. The double pointer (void**) is necessary so the function can modify the value of your pointer variable.size: The amount of memory to allocate in bytes. A common pattern isN * sizeof(type).
- Purpose: Allocates
-
cudaError_t cudaMemcpy(void* dst, const void* src, size_t count, cudaMemcpyKind kind)- Purpose: Copies
countbytes of data from a sourcesrcto a destinationdst. This is a blocking (synchronous) call by default; the host code will pause until the transfer is complete. - Parameters:
dst: Pointer to the destination memory.src: Pointer to the source memory.count: The number of bytes to copy.kind: A crucial enum that specifies the direction of the transfer. The two most common values arecudaMemcpyHostToDeviceandcudaMemcpyDeviceToHost.
- Purpose: Copies
-
cudaError_t cudaFree(void* devPtr)- Purpose: Frees a block of device memory previously allocated with
cudaMalloc. - Analogy: The GPU equivalent of
free()in C. - Parameters:
devPtr: A pointer to the device memory block to be freed.
- Purpose: Frees a block of device memory previously allocated with
Failing to call cudaFree will result in a memory leak on the GPU, where memory remains allocated and unusable until the application terminates.
Robustness Through Error Handling
You may have noticed that all three functions return a value of type cudaError_t. This is not a coincidence. Unlike high-level languages that might throw exceptions, the CUDA C++ Runtime API relies on you, the programmer, to manually check the return code of almost every function call. Ignoring these return codes is a path to long, frustrating debugging sessions.
The wrapper function from our previous lesson is an excellent pattern to adopt:
#include <iostream>

// A macro to wrap CUDA calls and check for errors


#define CHECK_CUDA(call) do { \
    cudaError_t err = call; \
    if (err != cudaSuccess) { \
        std::cerr << "CUDA Error in " << #call << " at " << __FILE__ << ":" << __LINE__ \
                  << ": " << cudaGetErrorString(err) << std::endl; \
        exit(EXIT_FAILURE); \
    } \
} while(0)

// Usage:
// CHECK_CUDA(cudaMalloc(&d_data, size));
// CHECK_CUDA(cudaMemcpy(d_data, h_data, size, cudaMemcpyHostToDevice));
This macro wraps a CUDA call, checks its return value, and if it's not cudaSuccess, prints a detailed error message—including the file and line number—before exiting. Using this for every single CUDA API call is a best practice that will save you immense trouble.
Synchronous vs. Asynchronous Errors
Checking the return value of a function like cudaMalloc is straightforward. If you request more memory than is available, the call will fail immediately, and err will not be cudaSuccess. This is a synchronous error.
However, CUDA's execution model is fundamentally asynchronous. When you launch a kernel, the host code continues executing without waiting for the kernel to finish. What happens if an error occurs inside the kernel, such as trying to access an invalid memory address? This is an asynchronous error. The return code of the kernel launch kernel<<<...>>>() itself cannot tell you about this, as it only reports synchronous errors related to the launch configuration.
This is where things get subtle.
Proper CUDA Error Checking - Lei Mao's Log Book
This blog post by Lei Mao provides an excellent, concise explanation of the different types of CUDA errors and the best practices for catching them. Understanding this is crucial for effective debugging.
Please read the following sections: The section on error types. Focus on the distinction between a synchronous error from cudaMalloc and a potential asynchronous error from a kernel. Also, understand the concept of a "sticky" error, which can corrupt the CUDA context. The best practice section. Note the recommendation to check return values and also to use cudaGetLastError after kernel launches. Finally, carefully read the quiz scenario. This is a classic "gotcha" that highlights the behavior of CUDA error states.
Let's unpack the key insight from that article's quiz. CUDA maintains a "last error" state for each host thread. Many functions, like cudaDeviceSynchronize, might return cudaSuccess for their own operation, but they do not clear a pre-existing error state. Only cudaGetLastError() does.
cudaError_t cudaGetLastError(void);- Returns the last error that occurred for this host thread.
- Crucially, it also resets the error state to
cudaSuccess.
Therefore, the correct way to check for a potential error from a kernel launch is:
// Launch the kernel (asynchronous)
myKernel<<<grid, block>>>(args...);

// Use a macro for checking cudaGetLastError


#define CHECK_LAST_CUDA_ERROR() do { \
    cudaError_t err = cudaGetLastError(); \
    if (err != cudaSuccess) { \
        std::cerr << "CUDA Last Error at " << __FILE__ << ":" << __LINE__ \
                  << ": " << cudaGetErrorString(err) << std::endl; \
        exit(EXIT_FAILURE); \
    } \
} while(0)

// Check for any synchronous launch errors
CHECK_LAST_CUDA_ERROR();

// It's often good practice to synchronize the device to be sure the kernel has finished
// before checking for asynchronous errors from its execution.
CHECK_CUDA(cudaDeviceSynchronize());
The combination of checking the return code from synchronous functions (like cudaMemcpy) and calling cudaGetLastError() after asynchronous operations (like kernel launches) provides a robust safety net.
Conclusion
In this lesson, we moved from simply using CUDA API calls to understanding their purpose and, most importantly, how to use them safely. The concepts of separate memory spaces and explicit data transfer are fundamental constraints that drive much of the engineering effort in GPU programming. Your background in building production models will give you an appreciation for why this level of rigor in error handling is essential; a silent failure in a memory copy can lead to incorrect results that are far harder to debug than an immediate crash.
Key Takeaways:
- The host (CPU) and device (GPU) have separate memory spaces, requiring explicit data management.
- The core functions for this are
cudaMalloc(allocate),cudaFree(deallocate), andcudaMemcpy(transfer). cudaMemcpyis a synchronous, blocking operation that is often a performance bottleneck.- Every CUDA runtime API call returns an error code that must be checked. Using a C++ macro can make this practice systematic and clean.
- Errors can be synchronous (immediate) or asynchronous (delayed, e.g., inside a kernel).
- Use
cudaGetLastError()after kernel launches and other asynchronous calls to detect errors that are not reported by the function's direct return value.
In the next lesson, we will finally demystify the <<<grid, block>>> syntax. We will learn how to organize threads into a hierarchy of grids and blocks and how to use their unique indices to map parallel computations onto our data, enabling us to write the core logic of our kernels.