Hello! Welcome to your third lesson in the "Project Showcase" module.
In our last lesson, we focused on adapting your project's aspect ratio to ensure it looks perfect on different platforms, like the standard 16:9 for YouTube and the vertical 9:16 for Shorts. Now that your video is perfectly framed, we've arrived at the final, crucial step before you can share it with the world: exporting.
Today's lesson is all about how to export a final video file with appropriate codecs and compression settings. This might sound technical, but it's one of the most important steps in the entire filmmaking process. Your export settings determine the final video quality, its file size, and whether it will even play on your chosen platform. Getting this wrong can mean a beautiful project ends up looking pixelated and unwatchable.
We will demystify the key terms like "codec," "container," and "bitrate," and by the end, you'll know exactly which settings to choose to make your YouTube videos look crisp and professional.
1. The Building Blocks: Containers, Codecs, and Compression
Before you can export, you need to understand what you're telling the software to do. Think of it like packing a box for shipping.
- Container: This is the "box" your video and audio are stored in. It’s the file format, like
.mp4,.mov, or.avi. The container itself doesn't affect quality, but it determines compatibility. - Codec (Coder-Decoder): This is the method used to pack (compress) the video and audio data into the container. When you watch the video, the same codec is used to unpack (decompress) the data. This is where the magic of making huge video files small enough for the internet happens.
- Compression: This is the process of reducing the file size. Video compression is what makes streaming possible.

To dive a bit deeper into these foundational concepts, let's start with a reading.
Video Encoding 101: A Comprehensive Guide
The article 'Video Encoding 101' from ImageKit.io provides an excellent overview of these core ideas. It explains why we need to encode videos and defines the key terms we'll be using throughout this lesson.
Please read the sections 'Video encoding: How does it empower your video production?', 'What are Video Codecs?', and review the table under 'Comparing Lossless vs. Lossy Codecs'. Focus on understanding the relationship between quality, file size, codecs, and containers, and the difference between lossy and lossless compression.
As you just read, the most important distinction for us is between lossy and lossless compression.
- Lossless: No data is lost. The decompressed video is identical to the original. This results in perfect quality but very large file sizes. It's great for archiving but impractical for streaming.
- Lossy: Some data is permanently discarded to achieve much smaller file sizes. This is the type of compression used for all online video. The key is to discard data that the human eye is less likely to notice, preserving perceived quality as much as possible.
The central challenge of exporting for the web is managing the trade-off: achieving the highest possible quality at the smallest possible file size.
2. Choosing Your Export Settings
When you go to export your video, you'll be faced with a menu of options. Let's break down the most important ones for creating content for YouTube.
Container: The Box
For web video, the choice is simple: MP4 (.mp4). It's the universal standard, compatible with virtually every device, browser, and platform, including YouTube. While you might see .MOV (common for files from Apple cameras and software), .MP4 is the safest and most recommended choice for a final delivery file.
Codec: The Packing Method
This is the most important decision for quality and compatibility.
Video Encoding 101: A Comprehensive Guide
Let's return to the 'Video Encoding 101' article to learn about the most popular codecs used today.
Read the subsection 'Popular codecs used in video encoding', focusing on the descriptions for H.264 (AVC) and H.265 (HEVC). These are the two most relevant codecs for you.
- H.264 (or AVC): This is the workhorse of the internet. It offers a great balance of quality, file size, and universal compatibility. When in doubt, use H.264. It's YouTube's primary recommendation.
- H.265 (or HEVC): This is a newer, more efficient codec. It can deliver the same quality as H.264 at a significantly smaller file size (up to 50% smaller). However, it requires more processing power to encode and is not as universally supported. It's becoming more common, especially for 4K and HDR content.
For now, H.264 is your best friend. It guarantees your video will be processed correctly by YouTube and play back on all your viewers' devices.
Bitrate: The Amount of Data
The bitrate is the amount of data used to represent one second of video, usually measured in megabits per second (Mbps). This is your most direct control over the quality vs. file size trade-off.
- Higher Bitrate = Higher Quality = Larger File Size
- Lower Bitrate = Lower Quality = Smaller File Size
There are two main ways to control bitrate:
- Constant Bitrate (CBR): The same bitrate is used for the entire video, whether it's a simple, static shot or a fast-paced action scene. It's predictable but inefficient.
- Variable Bitrate (VBR): The encoder adjusts the bitrate on the fly, allocating more data to complex scenes and less to simple ones. This is much more efficient and generally results in better quality for a given file size. YouTube recommends VBR.
So, what bitrate should you use? Luckily, YouTube provides a clear guide.
YouTube recommended upload encoding settings
The best source for YouTube settings is YouTube itself. This official support page lists their exact recommended upload settings.
Please review this document. Pay close attention to the recommended Container (MP4), Video Codec (H.264), and Audio Codec (AAC-LC). Most importantly, study the tables under 'Recommended video bitrates for SDR uploads'. This table is your cheat sheet for exporting.
Using the YouTube Bitrate Table:
Find the row for your video's resolution (e.g., 1080p) and the column for its frame rate (e.g., standard frame rate for 24fps). The number you find is your target bitrate.
For a typical 1080p, 24fps short film (SDR), YouTube recommends 8 Mbps.
3. Applying Your Knowledge in the Editor
Let's see how these concepts translate to the export window in your editing software. Since you have experience with CapCut, let's use its export screen as an example.
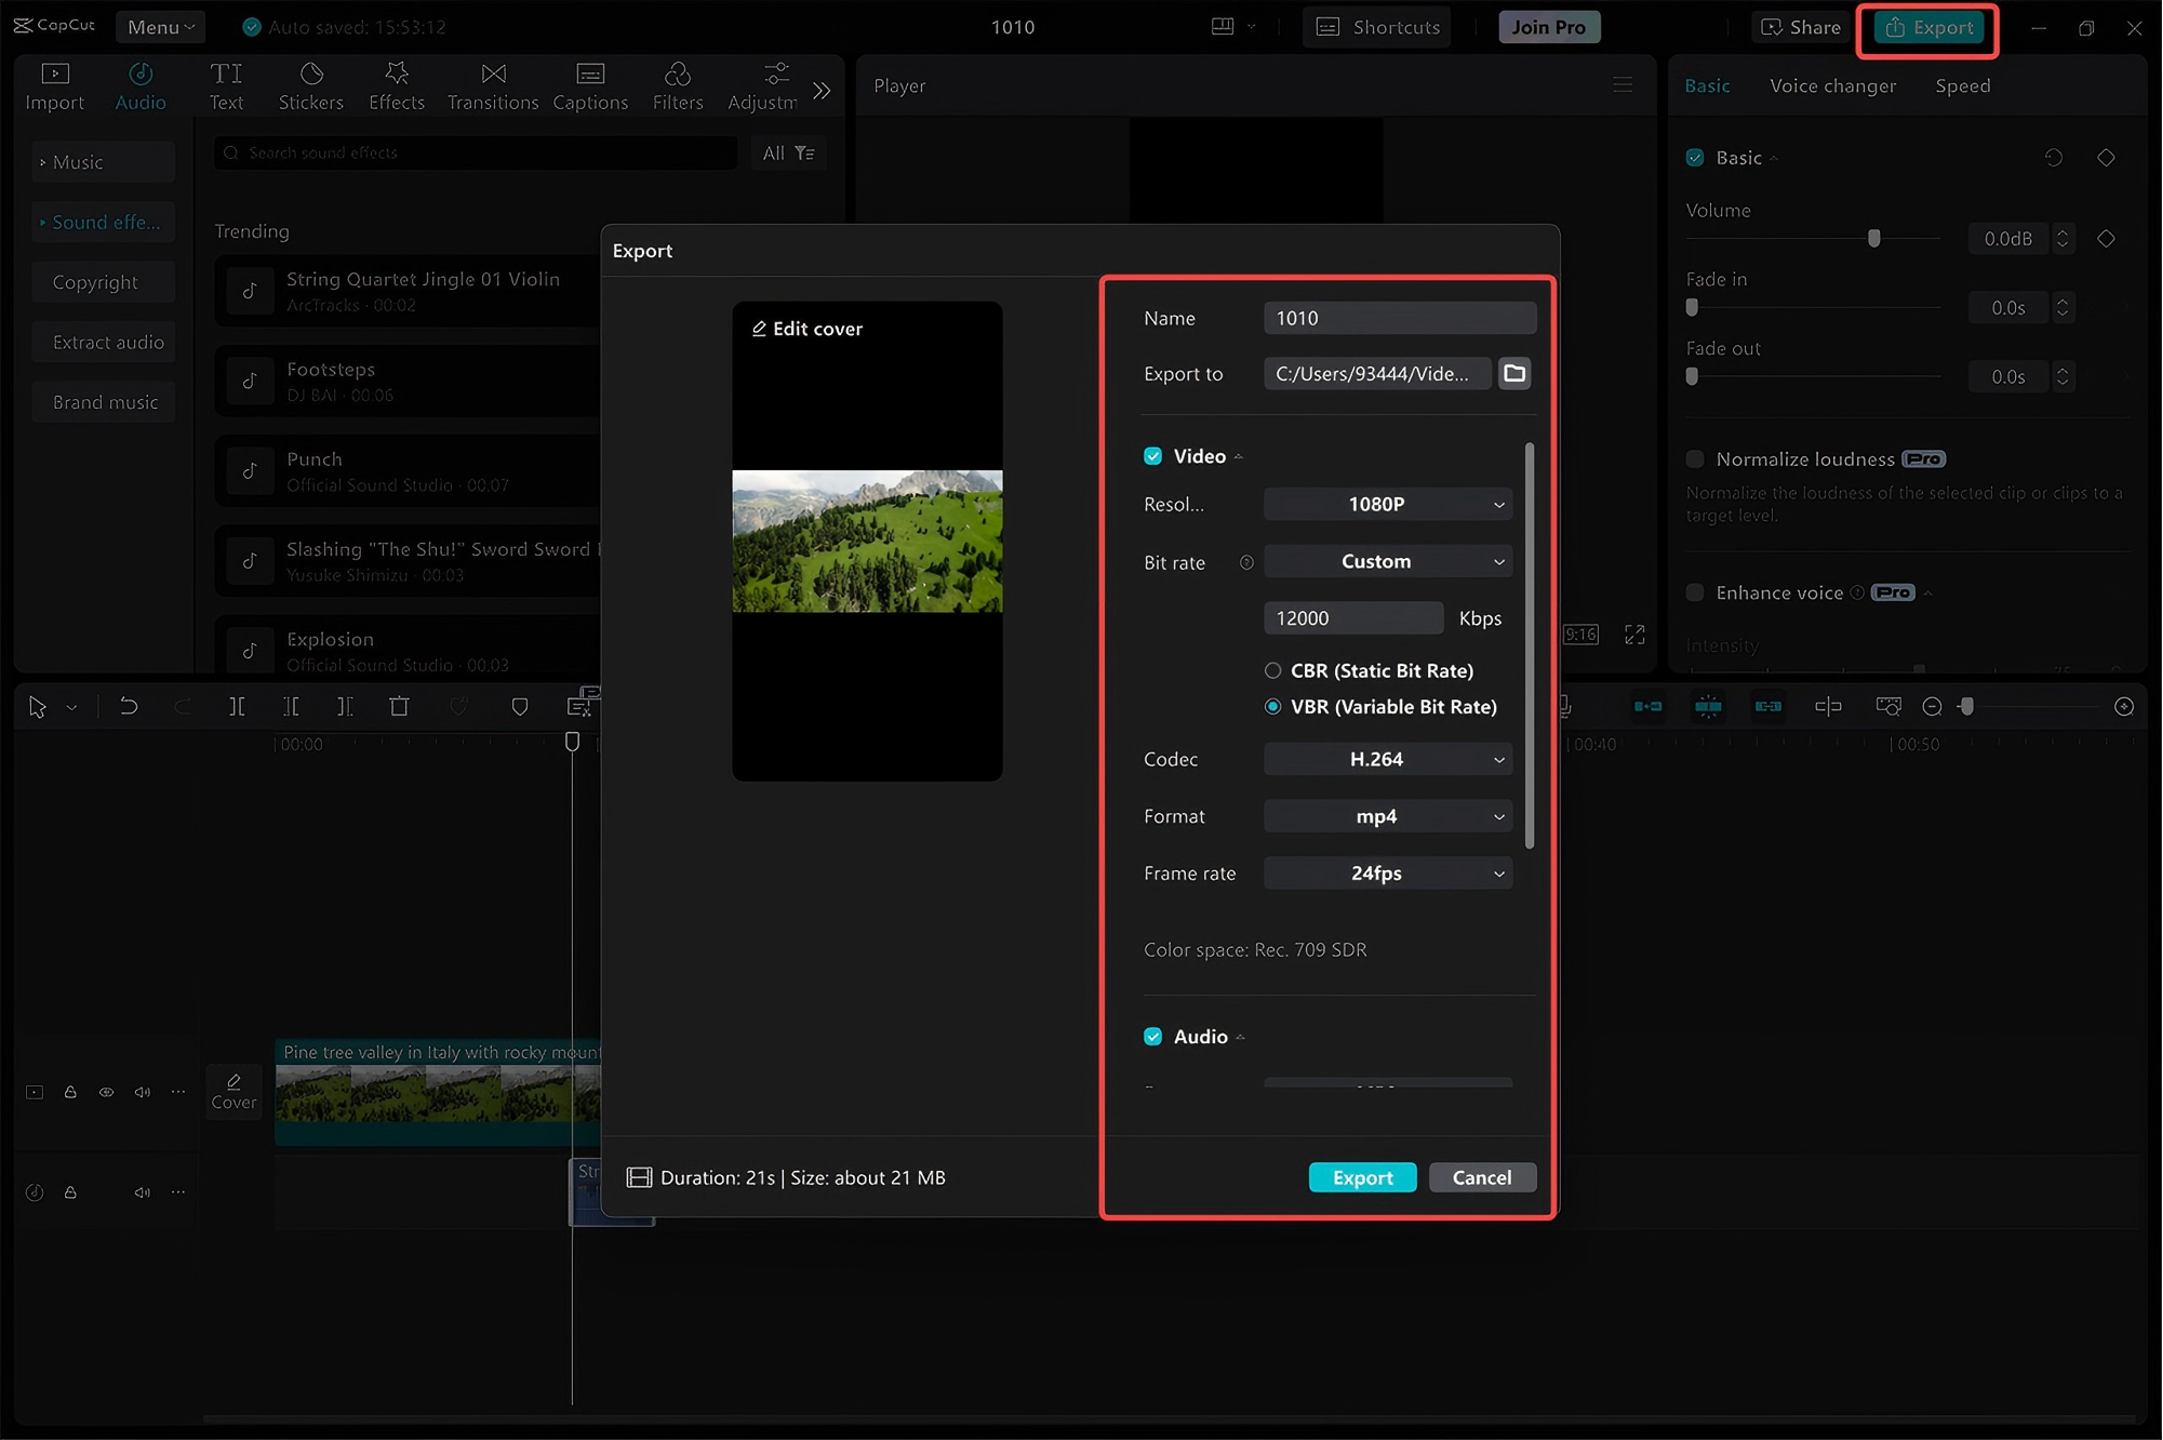
Let's map our learning to this window:
- Resolution & Frame rate: You set these to match your project settings (e.g., 1080p, 24fps).
- Bit rate: Here you can select
VBR(Variable Bit Rate) orCBR(Constant Bit Rate). Based on the YouTube table, you'd set a target. For a 1080p 24fps video, you'd aim for 8 Mbps (or 8000 Kbps). - Codec: You would select
H.264. - Format: This is the container. You'd select
mp4. - Audio: The standard audio codec is
AAC, which is usually the default. The recommended audio bitrate for stereo is384 kbps.
Test your understanding!
You've finished editing a short travel video for your YouTube channel. You shot and edited it in 4K (2160p) at 60 frames per second (fps).
Using the CapCut export window above and the knowledge from the YouTube guidelines, what are the ideal settings you should choose for:
- Format (Container)?
- Codec?
- Video Bitrate (for SDR)?
Show answer
- Format:
mp4. It's the universal standard recommended by YouTube. - Codec:
H.264. It's the most compatible and recommended codec. - Video Bitrate: According to the YouTube bitrate table for SDR uploads, a 2160p (4K) video at a high frame rate (48, 50, 60) should have a bitrate between 53–68 Mbps. So you would set your custom bitrate in CapCut to a value within this range, like 60 Mbps (or 60,000 Kbps).
Conclusion
You've made it through the most technical part of the post-production process! While the terms can be intimidating at first, the core principles are straightforward. Exporting is all about making deliberate choices to balance quality with file size for a specific destination.
For your goal of creating YouTube content, you now have a reliable recipe for success.
Key Takeaways:
- Exporting is a form of lossy compression that trades a small amount of imperceptible data for a massive reduction in file size.
- Your go-to export settings for YouTube should be:
- Container: MP4
- Video Codec: H.264
- Audio Codec: AAC
- Bitrate: Use a Variable Bitrate (VBR) and consult the official YouTube guidelines for the target value based on your project's resolution and frame rate.
- Always keep a high-quality master file of your final edit before you create compressed versions for delivery. Storage is cheap, but re-rendering is time-consuming!
In our next lesson, we'll cover the final step in getting your video seen: writing effective metadata (titles, descriptions, tags) for YouTube. Now that your video file is technically perfect, we'll focus on how to make sure the YouTube algorithm and your potential audience can find it.