Hello and welcome back!
In our last lesson, you took a massive step in your journey as a filmmaker by mastering the exposure triangle. You now understand how to creatively manipulate aperture, shutter speed, and ISO to control not just the brightness of your image, but also its depth of field and motion blur.
However, controlling exposure is one thing; measuring it accurately is another. Relying solely on the camera's LCD screen can be deceptive—its perceived brightness changes depending on the ambient light you're in. This is where professional cinematographers turn to objective tools.
Today's lesson is designed to help you use in-camera tools like the histogram, waveform, and zebras to measure exposure with scientific precision. This will allow you to move from guessing to knowing, ensuring your footage is perfectly exposed every single time—a non-negotiable skill for creating professional-looking short films and YouTube videos.
Why We Need to Measure Light
Before we dive into the tools, let's establish why we need them. As we discussed, your camera's sensor has a limit to the range of light and shadow it can capture. This is called its dynamic range. The scene in front of you also has its own range of brightness, from the darkest shadows to the brightest highlights, called its tonal range. The challenge is to fit the scene's tonal range within your camera's dynamic range. If parts of the scene are too bright or too dark, you get "clipping"—pure white or pure black areas with zero detail, which can't be recovered in post-production.
The exposure tools we'll cover today give you a data-driven view of your image, so you can make informed decisions to avoid clipping and capture the best possible image.
Histogram vs Waveform: Tonal Range vs Dynamic Range
To understand this foundational concept of fitting a scene's light into your camera's capabilities, watch this excellent explanation from the Pull My Focus channel. It clearly defines the difference between tonal range (the scene) and dynamic range (the camera).
Watch the first 4 minutes and 40 seconds of the video. Focus on understanding the core problem cinematographers face: ensuring the scene's tonal range doesn't exceed the camera's dynamic range, which leads to lost detail.
Now that you understand the problem we're trying to solve, let's explore the tools that help us do it. We will be referencing one main video guide and a comprehensive article throughout this lesson.
1. The Histogram: Your Overall Exposure Snapshot
The histogram is the most common exposure tool, available on almost every digital camera today. Think of it as a bar graph that shows you the distribution of brightness values across your entire image.
- The horizontal axis (X-axis) represents the brightness scale, from pure black (0% IRE) on the left to pure white (100% IRE) on the right.
- The vertical axis (Y-axis) represents the number of pixels at each brightness level.
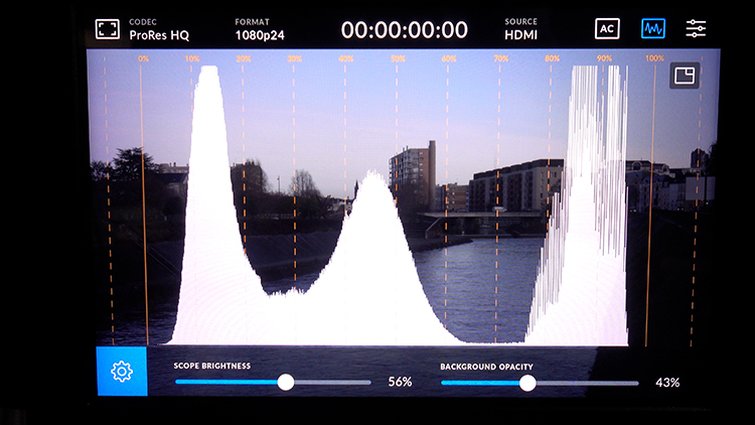
A "healthy" histogram often looks like a mountain range concentrated in the middle, tapering off at both ends.
- If the graph is bunched up on the left, your image is likely underexposed ("crushed blacks").
- If it's bunched up on the right, it's likely overexposed ("clipped highlights").
ULTIMATE Exposure Guide: Histogram, Waveforms, Zebra, False colors - Camera Monitor Tools
Let's watch a practical guide on reading and using the histogram.
Watch the section from 00:58 to 03:20. Pay attention to how the histogram changes in real-time and, crucially, the common pitfalls, like how a bright sky can mislead you into underexposing your subject.
The histogram's main limitation is that it tells you what the tonal range is, but not where the bright and dark spots are in your frame.
For a detailed written breakdown, please refer to the following article.
Mastering In-Camera Exposure Tools for Video
This article from B&H Photo Video offers a clear, concise text explanation of the histogram that will reinforce what you just saw.
Read the section titled 'Histogram'. This will solidify your understanding of how to interpret the graph and the importance of focusing on your subject's exposure, not just the overall scene.
2. Zebra Stripes: Pinpointing Problem Areas
Zebra stripes are an overlay that shows a pattern of diagonal lines over any part of your image that exceeds a specific brightness level that you set. They are your direct warning system for overexposure.
You can typically use them in two ways:
- To Prevent Clipping: Set your zebras to a high value, like 95% or 100% IRE. If you see stripes appear, you know that part of your image is on the verge of being or is already blown out. You can then adjust your exposure (by changing aperture or ISO, or by adding an ND filter) until the stripes just disappear.
- To Expose Skin Tones: You can set your zebras to the IRE value considered ideal for skin tones (e.g., around 70% IRE). You then adjust your exposure until the zebra pattern appears on your subject's face.
ULTIMATE Exposure Guide: Histogram, Waveforms, Zebra, False colors - Camera Monitor Tools
Let's see how Zebra stripes work in practice.
Watch the segment from 04:17 to 05:18. Notice how you can use zebras for two distinct purposes: protecting highlights and targeting skin tones.
Zebras are incredibly useful because they show you exactly where the potential exposure problems are, which is the histogram's biggest weakness.
Mastering In-Camera Exposure Tools for Video
Let's turn back to the B&H article for a written summary of Zebra Stripes.
Read the section titled 'Zebra Stripes'. It provides a great recap of how to set and use them effectively.
3. The Waveform Monitor: The Best of Both Worlds
The waveform monitor is like a more sophisticated version of the histogram. It also displays brightness on a 0-100 IRE vertical scale, but it preserves spatial information along the horizontal axis.
- The vertical axis (Y-axis) is brightness, from black (0) at the bottom to white (100) at the top.
- The horizontal axis (X-axis) corresponds to the horizontal position in your frame. A bright object on the left of your shot will create a high signal on the left of the waveform.

This tool is powerful because it allows you to see the exposure of your image from left to right. You can instantly tell if your highlights are clipped (hitting 100), your shadows are crushed (hitting 0), and where in the frame this is happening. It's especially useful for checking if a background is evenly lit or if your subject's face is properly exposed relative to their surroundings.
ULTIMATE Exposure Guide: Histogram, Waveforms, Zebra, False colors - Camera Monitor Tools
The waveform can seem intimidating, but this next clip breaks it down clearly.
Watch the segment from 03:20 to 04:17. Focus on the core idea: the waveform maps brightness spatially, giving you more context than a histogram.
Test your understanding!
Imagine you are filming an interview with a person sitting next to a bright window.
- How would the histogram likely appear?
- How would the waveform appear, and what crucial information would it give you that the histogram doesn't?
Show answer
- The histogram would likely show two large peaks at opposite ends of the graph—one on the far left (representing the subject, who is likely in shadow relative to the window) and one on the far right (representing the bright window). It tells you the scene has very high contrast.
- The waveform would also show signals near the top and bottom, but it would show them spatially. For instance, if the window is on the right side of the frame, you would see a high plateau on the right side of the waveform (the window's brightness) and a low area corresponding to the subject's position. This tells you where the bright and dark areas are, helping you decide if you need to add light to the subject or reduce the light from the window.
4. False Color: The Ultimate Exposure Map
False color is the most detailed exposure tool, though it's typically found on external monitors and higher-end cinema cameras. It overlays your image with a "heat map" of colors, where each color corresponds to a specific IRE value.
Your monitor will have a key showing you what each color means—for example:
- Red: Overexposed / Clipped (100 IRE)
- Pink: Bright skin tones / Highlights (~70 IRE)
- Green: Mid-gray (~50 IRE)
- Blue/Purple: Shadows / Crushed blacks (near 0 IRE)
This tool is the gold standard for precision. When filming a person, for example, you can adjust your lighting and exposure until their face is consistently in the "pink" or "light green" range, ensuring perfect skin tone exposure from shot to shot.
ULTIMATE Exposure Guide: Histogram, Waveforms, Zebra, False colors - Camera Monitor Tools
Let's see this powerful 'predator vision' in action.
Watch from 05:18 to 06:47. Note how false color removes all guesswork, allowing you to see the exact IRE value of every part of your image.
Mastering In-Camera Exposure Tools for Video
Finally, let's read the section on False Color in our guide.
Read the section 'False Color'. This will explain why it's so helpful for achieving accurate skin tones and consistent lighting ratios.
Conclusion
Today, you've moved beyond simply trusting your eyes and learned to use objective, data-driven tools to guarantee perfect exposure. This is a massive leap forward that separates amateur video from professional cinematography.
Key Takeaways:
- Exposure tools are essential for fitting a scene's tonal range into your camera's dynamic range and avoiding clipped highlights or crushed shadows.
- The Histogram gives you a quick, overall snapshot of the brightness distribution across the entire image.
- Zebra Stripes are a direct, visual alarm that pinpoints exactly where parts of your image are overexposed.
- The Waveform Monitor provides a detailed, spatial map of your exposure from left to right, making it excellent for judging balance and key elements like skin tones.
- False Color is the most precise tool, providing a color-coded map of the exact IRE value for every pixel in your frame.
In our next lesson, we will tackle another critical "in-camera" setting that profoundly impacts your image: White Balance. You'll learn how to set it correctly to ensure the colors in your scene are rendered accurately, moving you one step closer to achieving a truly cinematic look.