Hello! Welcome back to our course.
In the last lesson, we demystified the digital camera, breaking it down into its core components: the lens (the camera's eye), the image sensor (its digital retina), and the viewfinder (your window into the scene). You now have a solid mental model of how a camera physically captures light.
Today, we're going to learn how to control that light. The brightness of your image, known as exposure, is the most fundamental creative decision you'll make when filming. This lesson is designed to help you adjust exposure using the exposure triangle (aperture, shutter speed, ISO). Mastering this will empower you to move beyond your camera's "auto" mode and take full creative control, which is the hallmark of a true filmmaker.
The Exposure Triangle: A Balancing Act
At any given time, three primary settings work together to determine your image's exposure. These are aperture, shutter speed, and ISO. They are often called the "exposure triangle" because they are interconnected; you can't adjust one without affecting the others. If you make the image brighter with one setting, you must make it darker with another to maintain the same overall exposure.
Let's begin with a quick overview of this core concept.
The Exposure Triangle For Beginners | Explained In Under 15 Minutes
This video from Creative Tech Lab provides a fantastic, concise introduction to what the exposure triangle is and why it's a balancing act between three key settings.
Watch the segment from 01:19 to 01:47. The key idea to grasp here is that all three elements—aperture, shutter speed, and ISO—work together to control the brightness of your image.
To help you visualize this relationship throughout the lesson, here is a helpful infographic.
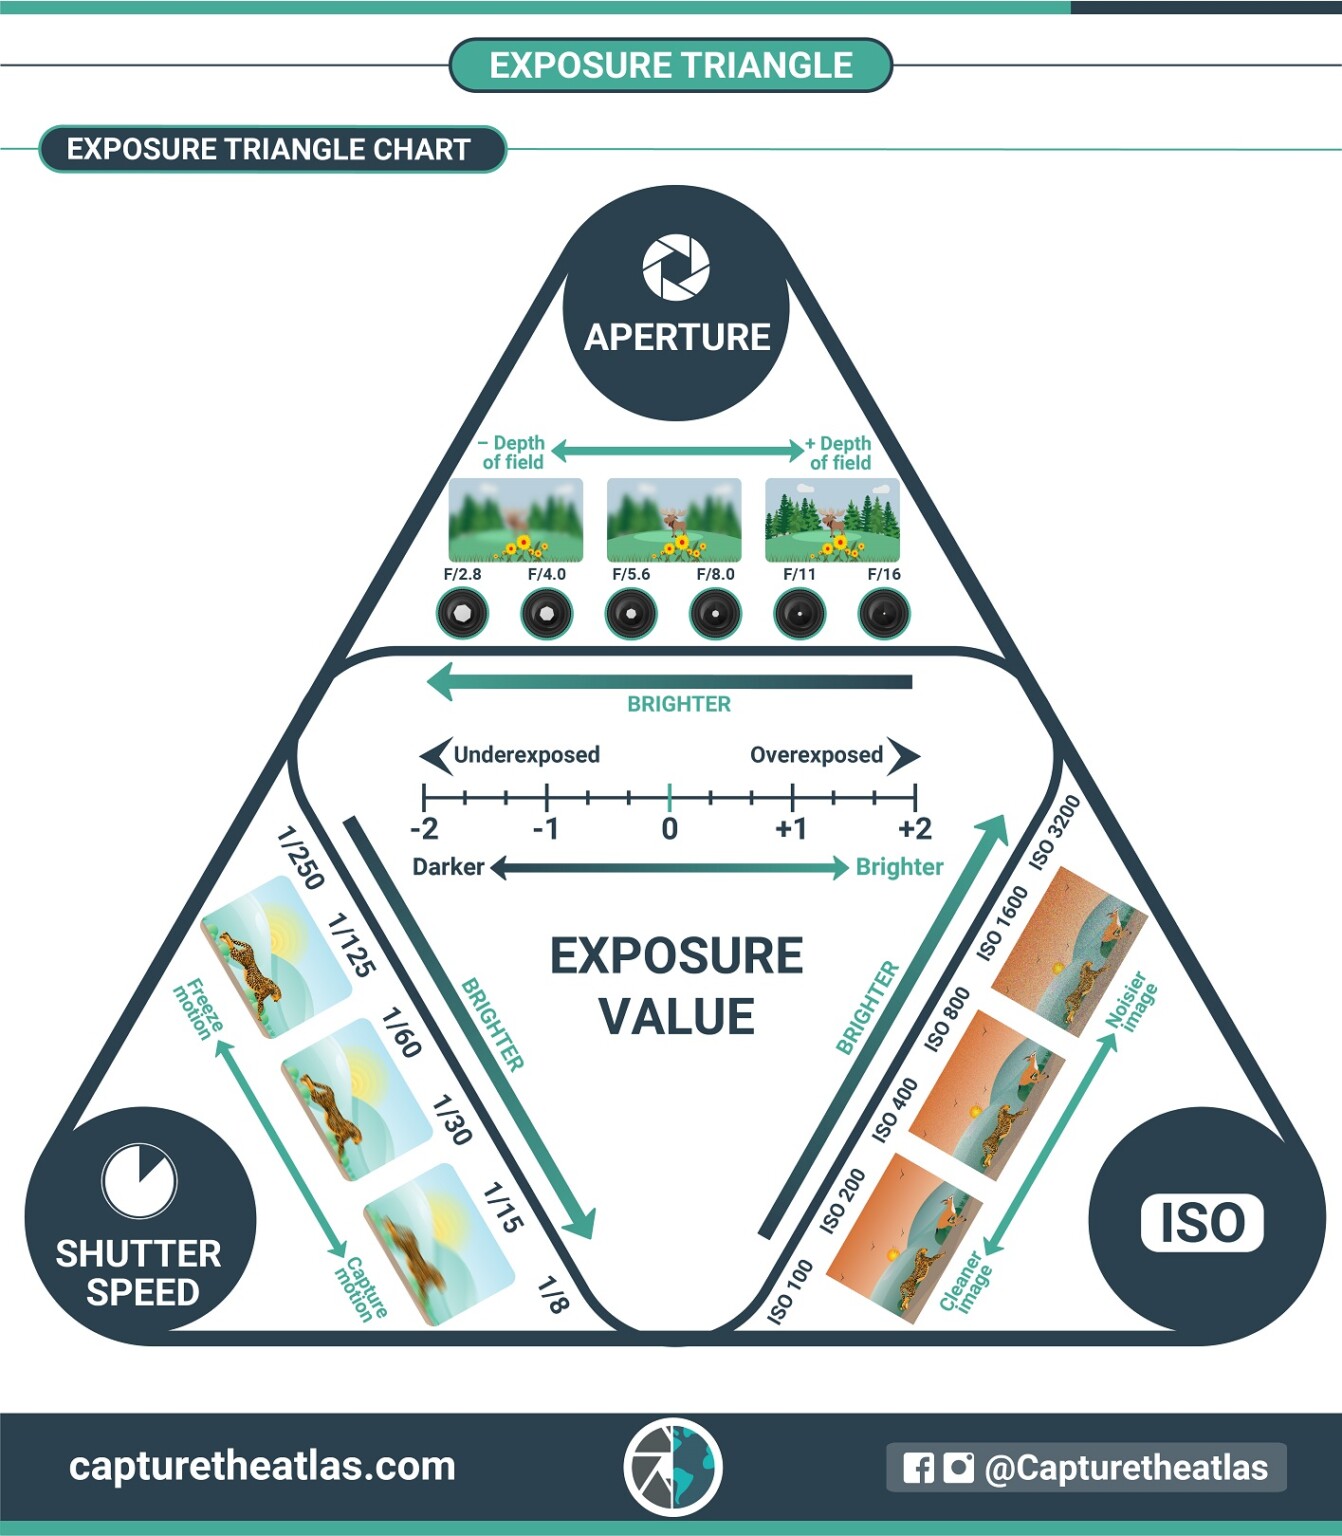
Now, let's break down each corner of the triangle.
1. Aperture: The Opening in the Lens
As we touched on in the last lesson, the aperture is the adjustable opening inside your lens that controls how much light passes through to the sensor. It functions just like the pupil of your eye.
- How it's measured: Aperture is measured in f-stops (e.g., f/1.4, f/2.8, f/8, f/16).
- The tricky part: The numbering is counter-intuitive. A low f-stop number (like f/1.8) means a large opening, which lets in more light. A high f-stop number (like f/16) means a small opening, letting in less light.
The Creative Effect: Depth of Field
Aperture's role goes far beyond just controlling brightness. It is your primary tool for controlling depth of field (DoF)—the portion of your image that is in sharp focus. This is a powerful storytelling device.
-
Shallow Depth of Field: A large aperture (low f-stop number) creates a shallow DoF. This means only a narrow plane is in focus, and the background (and foreground) becomes beautifully blurred. This is perfect for isolating a character from their environment, drawing the viewer's attention, and creating that "cinematic" look often seen in portraits.
-
Deep Depth of Field: A small aperture (high f-stop number) creates a deep DoF, where nearly everything in the frame, from front to back, is in focus. This is ideal for establishing shots, like a wide landscape, where you want the viewer to see the character and the world they inhabit with equal clarity.
To see how master filmmakers use aperture for storytelling, let's watch a few examples.
Ultimate Guide to Camera Aperture — What is Aperture & the Exposure Triangle Explained [Ep 1]
The team at StudioBinder are experts at breaking down cinematic techniques. This video uses examples from major films like 'Joker' and '1917' to show how aperture and depth of field are used to convey emotion and context.
Watch the sections from 01:41 to 07:27. Pay close attention to: How a small aperture (deep focus) is used in '1917' to establish the setting (01:41). How a large aperture (shallow focus) is used in 'Joker' to communicate the character's isolation (03:21). How a medium aperture is used in 'Marriage Story' to balance the focus between characters and their environment (05:10).
2. Shutter Speed: The Element of Time
While aperture controls the amount of light, shutter speed controls the duration of time that light is allowed to hit the sensor. Think of it as how long your camera's "eyelid" stays open for each frame of video.
- How it's measured: In fractions of a second (e.g., 1/50, 1/250, 1/1000).
- A slower shutter speed (like 1/50) lets in more light.
- A faster shutter speed (like 1/1000) lets in less light.
The Creative Effect: Motion Blur
Just like aperture affects depth of field, shutter speed dramatically affects how motion is rendered in your video.
- Slow Shutter Speed: A slower shutter captures more movement within a single frame, resulting in more motion blur. This can create a dreamy, streaky effect.
- Fast Shutter Speed: A faster shutter "freezes" motion, resulting in a crisp, sharp image with very little motion blur.
The 180-Degree Rule for Cinematic Video
For film and video, there's a very important convention called the 180-degree shutter rule. To achieve motion blur that looks natural and pleasing to the human eye, your shutter speed should be double your frame rate.
- If you're shooting at 24 fps (the standard for cinema), your shutter speed should be 1/48 s (or the closest setting, typically 1/50 s).
- If you're shooting at 60 fps (common for YouTube or slow motion), your shutter speed should be 1/120 s.
For most narrative filmmaking, you will set your shutter speed to follow this rule and then leave it there.
The following video explains this concept and its effect on your image.
The Exposure Triangle For Beginners | Explained In Under 15 Minutes
Let's return to the Creative Tech Lab video to understand shutter speed and its specific application to video.
First, watch from 03:20 to 05:03 for a clear explanation of what shutter speed is and how it affects motion. Then, watch the section specifically on video from 11:00 to 12:20, which explains the crucial 180-degree rule.
Test your understanding!
You are directing a short film and want a dream sequence to feel hazy and surreal. Your actor is walking slowly across the room. To enhance the dream-like feeling, would you stick to the 180-degree rule, or would you use a much slower or faster shutter speed? Why?
Show answer
You would likely use a much slower shutter speed (e.g., 1/20s or 1/15s). Breaking the 180-degree rule in this direction would introduce significantly more motion blur, making the actor's movements feel streaky and less defined, which perfectly contributes to a hazy, surreal, and dream-like aesthetic.
3. ISO: The Sensor's Sensitivity
ISO (from the International Organization for Standardization) is a measure of the sensor's sensitivity to light. Unlike aperture and shutter speed, which physically control the light entering the camera, ISO is a digital amplification of the signal after the light has been captured.
- How it's measured: In numbers like 100, 200, 400, 800, 1600, etc.
- A low ISO (like 100) means the sensor is less sensitive and produces a darker image.
- A high ISO (like 3200) means the sensor is more sensitive, producing a much brighter image. Each time you double the ISO number (e.g., 400 to 800), you double the brightness of the image.
The Trade-Off: Digital Noise
ISO seems like a magic bullet for shooting in dark situations, but it comes with a significant cost: digital noise. As you increase the ISO, you are amplifying the light signal, but you are also amplifying imperfections, which appear as a staticky, grainy texture in your image.
- Low ISO: Produces a clean, high-quality image with minimal noise.
- High ISO: Can save a shot in a low-light situation, but at the cost of image quality.
Most cameras have a Native ISO (often around 400 or 800), which is the sensitivity at which the sensor performs optimally with the least noise. Your goal is to stay as close to this as possible.
This article from 'The Filmmaker's Blog' offers a fantastic, in-depth explanation of ISO, including the crucial concepts of digital noise and Native ISO.
Please read the section titled 'ISO'. Focus on understanding what ISO is, how it affects noise in your image, and the definition of 'Native ISO'.
Putting It All Together: The Filmmaker's Workflow
Now that you understand the three components and their creative side effects, how do you use them in practice? For video, the process is usually quite methodical:
- Set Your Frame Rate: Decide this first based on the desired feel (e.g., 24fps for cinematic).
- Lock Your Shutter Speed: Set it to double your frame rate (e.g., 1/50s for 24fps) and forget about it. This ensures natural motion blur.
- Set Your Aperture: This is your main creative choice. Do you want a blurry background (shallow DoF) or for everything to be in focus (deep DoF)? Set your f-stop accordingly.
- Adjust Your ISO: With shutter and aperture set, use ISO as your final exposure control. Start at your camera's native ISO. If the image is too dark, increase it. If it's too bright, decrease it.
But what if you're shooting outside on a sunny day? You want a shallow DoF (e.g., aperture at f/1.8), and your shutter is locked at 1/50s. Even at your lowest ISO, the image will be completely white (overexposed). What do you do?
This is where filmmakers use Neutral Density (ND) Filters. These are essentially sunglasses for your lens. They reduce the amount of light entering the camera without affecting the color, allowing you to maintain your desired wide aperture and cinematic shutter speed even in bright light. We'll cover these in more detail when we discuss camera gear.
Let's look at how these choices play out in a real-world scenario.
What is the Exposure Triangle? A Beginner's Guide
The StudioBinder article 'What is the Exposure Triangle?' provides excellent breakdowns of how cinematographers balance these settings in different lighting conditions, with examples from famous films.
Read the section 'Exposing with limited light', which analyzes a low-light scene from the film '1917'. Notice the cinematographer's thought process: shutter speed is fixed for motion, aperture is opened wide to let in light, and ISO is pushed as high as possible without introducing too much noise.
Conclusion
You've just unlocked the most fundamental technical skill in cinematography. By understanding the exposure triangle, you've moved from being a camera operator to a visual storyteller who can intentionally craft the look and feel of an image.
Key Takeaways:
- The Exposure Triangle is the relationship between Aperture, Shutter Speed, and ISO.
- Aperture controls the amount of light and creates depth of field. A low f-number (f/1.8) gives you a shallow, blurry background.
- Shutter Speed controls the duration of light and creates motion blur. For cinematic video, you should follow the 180-degree rule (shutter speed = 2x frame rate).
- ISO is a digital boost to brightness that comes at the cost of digital noise. Use it as a last resort in low-light situations.
- For filmmakers, the standard workflow is: Set Frame Rate -> Lock Shutter Speed -> Set Aperture for creative effect -> Adjust ISO for final exposure.
In our next lesson, we'll equip you with the tools to make these adjustments with precision. You'll learn how to use in-camera tools like the histogram, waveform, and zebras to scientifically measure exposure, so you can be confident that every shot is perfectly exposed.