Hello and welcome back to your cinematography training!
In our last lesson, you learned how to use professional tools like the histogram, waveform, and zebras to precisely control the quantity of light in your image, or its exposure. This is a cornerstone of technical filmmaking.
Today, we're shifting our focus from the quantity of light to its quality—specifically, its color. Have you ever filmed something and noticed the footage looked strangely orange or blue, even though it looked normal to your eyes? This is a problem of white balance.
This lesson is designed to help you set white balance manually and using presets for accurate color reproduction. Mastering this skill is non-negotiable for creating professional-looking short films and YouTube videos. It ensures that white objects look white, colors appear natural, and skin tones are rendered accurately, which is crucial for connecting with your audience.
1. What is White Balance and Color Temperature?
In simple terms, white balance is the process of telling your camera what the color "white" should look like under a specific light source. Once the camera knows what true white is, it can reproduce all other colors in the scene accurately.
Our brains are incredibly good at this. We automatically perceive a white wall as white, whether it's lit by the warm, orange glow of a household lamp or the cool, blue light of a cloudy day. A camera sensor, however, is not so smart. It simply records the color of the light as it is.
White Balance For Video EXPLAINED: How Cameras See Color & Light
To see what happens when a camera gets this wrong, watch the first 30 seconds of this video from Matt WhoisMatt Johnson. He provides a perfect visual demonstration of footage that is too 'cool' (blue) and too 'warm' (orange).
Watch from the beginning to 00:32.
The Kelvin Scale
The reason different light sources produce different color casts is because they have different color temperatures. This is a characteristic of visible light that is measured on a scale in units of Kelvin (K).
- Lower Kelvin values (e.g., 2000-3500K) correspond to "warmer" light, which appears orange or yellow. Think of a candle flame or a traditional incandescent (tungsten) light bulb.
- Higher Kelvin values (e.g., 5500-10,000K) correspond to "cooler" light, which appears blue. Think of direct sunlight at noon, a cloudy sky, or the light from a monitor.
To get accurate colors, you need to set your camera's white balance to match the Kelvin temperature of your main light source.
White Balance For Video EXPLAINED: How Cameras See Color & Light
Let's continue with Matt's video for a clear explanation of the Kelvin scale and why your camera needs you to tell it the color temperature of the light.
Watch from 00:32 to 02:12. Focus on the core concept: your camera doesn't know what color the light is unless you define it using the white balance setting.
2. How to Set Your White Balance
Most digital cameras offer three primary ways to set white balance: automatic, presets, and manual. For high-quality video, you will almost always want to avoid the automatic setting.
Auto White Balance (AWB)
In this mode, the camera analyzes the scene and makes its best guess at the correct color temperature. While this can be convenient for casual photos, it's a major pitfall for video.
- Inconsistency: If the lighting changes slightly or a new dominant color enters the frame, the AWB can shift in the middle of a recording. This results in a distracting color change in your final shot that is very difficult to fix.
- Mismatches: If you're shooting a scene with multiple cameras, their AWB settings will likely produce slightly different results, making it a nightmare to match the colors in post-production.
For these reasons, professional filmmakers and serious video creators always set their white balance manually.
White Balance Presets
Presets are the next step up from Auto. They are pre-programmed settings for common lighting situations, each corresponding to a specific Kelvin temperature.
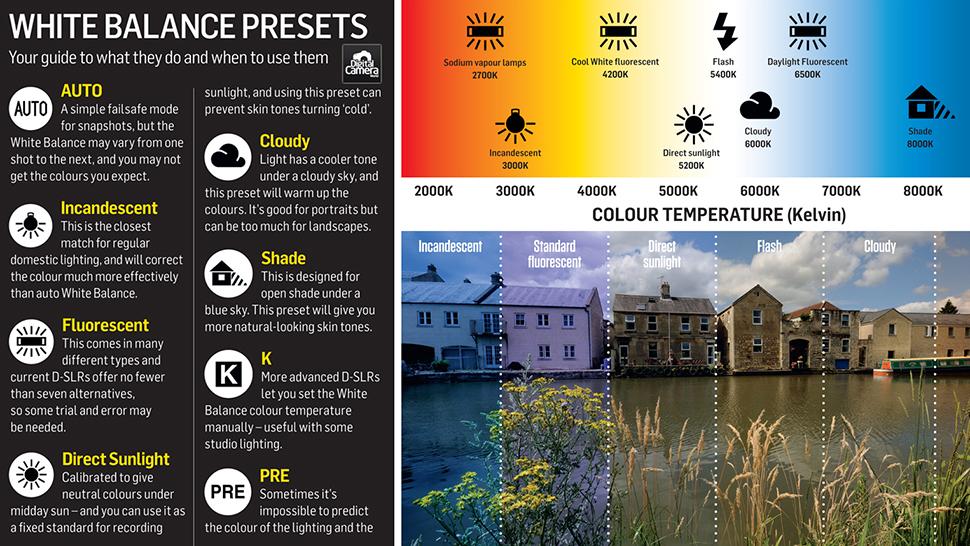
The most common presets you'll find are:
- Tungsten/Incandescent (Icon: 💡): For indoor lighting from traditional warm light bulbs (~3200K).
- Fluorescent (Icon: a long tube): For office-style tube lighting. This can be tricky as fluorescent lights vary, but it's often around 4000K.
- Daylight/Sunny (Icon: ☀️): For shooting outdoors in direct sunlight (~5500K).
- Cloudy (Icon: ☁️): For overcast conditions, which produce a cooler, bluer light than direct sun (~6500K).
- Shade (Icon: a house casting a shadow): For shooting in open shade, which is lit by the blue sky and is even cooler than a cloudy day (~7500K).

White Balance For Video EXPLAINED: How Cameras See Color & Light
Let's return to Matt's video one last time. He gives an excellent, memorable analogy to help you remember the Kelvin scale and shows how the common presets match up with specific Kelvin values.
Watch from 02:12 to 05:26. Pay close attention to his 'campfire' analogy and the four key Kelvin temperatures to memorize: Incandescent (3200K), Fluorescent (~3800-4000K), Daylight (5500K), and Cloudy (6500K).
Presets are a fantastic starting point and are much more reliable than AWB.
Manual White Balance: The Professional's Choice
For the most accurate and consistent results, you'll want to set your white balance manually. There are two ways to do this.
1. Manual Kelvin (K)
If you know the exact color temperature of your lights (professional LED lights often display this), you can dial that number directly into your camera. In your camera's white balance menu, look for the 'K' or 'C.Temp' setting. This gives you precise control to match your light source perfectly.
2. Custom White Balance (The White Card Method)
This is the most accurate method, especially when you're in a location with mixed light sources (e.g., a tungsten lamp and daylight from a window) or when you don't know the exact Kelvin temperature.
The process involves taking a photo of a neutrally colored object (a white or 18% grey card) in your scene's light, and then telling the camera to use that image as its reference for "true neutral."
HOW TO WHITE BALANCE A CANON CAMERA - How To Set The White Balance On A Canon M50 - Filmmaking 101
The white card method might sound complex, but it's quite simple in practice. Watch this excellent, step-by-step demonstration from Merle Becker on how to perform a custom white balance.
Watch from 03:33 to 05:34. Follow the steps closely: place the card where your subject will be, fill the frame with it, take a picture, and then navigate your camera's menu to set the custom white balance using that picture.
Here is a summary of the steps from the Artlist.io blog:
How to use a white balance card or grey card
For a clear, written guide that recaps the custom white balance process, please read the following section.
Read the section titled 'How to use a white balance card or grey card'. The numbered list provides a simple, universal workflow you can apply to most cameras.
Test your understanding!
You are hired to film an interview for a short documentary. The subject is sitting in their living room. The main light on their face is coming from a floor lamp with a warm bulb, but a large window behind them is letting in cool, bluish light from the overcast sky.
Which white balance method would you use, and why is it the best choice for this scenario?
Show answer
The best method is Custom White Balance using a white or grey card.
Here's why:
- Presets are not ideal: You have mixed lighting (warm tungsten and cool daylight). A 'Tungsten' preset would make the window light intensely blue, while a 'Cloudy' preset would make the subject's face look overly orange.
- Manual Kelvin is difficult: You don't have one single color temperature to dial in.
- Custom White Balance solves this by analyzing the actual light falling on your subject. By placing the white card in front of your subject's face, you allow the camera to calculate a neutral balance that best accommodates the mix of warm and cool light in the scene, resulting in the most natural-looking skin tones.
3. Creative White Balance
While the goal is usually accurate color, rules are made to be broken. Your interest in film aesthetics will appreciate that white balance is also a powerful storytelling tool. Intentionally setting an "incorrect" white balance can create a strong mood.
What is White Balance — How it Works and Why It Matters
To see a famous example of this, read this short section from the StudioBinder blog. It explains how director Steven Soderbergh used extreme white balance settings to create the distinct visual styles in his film 'Traffic'.
Read the section 'Using white balance creatively'. This is a great example of moving from technical correctness to artistic expression.
Conclusion
Congratulations! You've just unlocked a fundamental aspect of cinematic imaging. Getting your color right in-camera not only makes your work look more professional but also saves you countless hours of frustration in the editing room.
Key Takeaways:
- Color Temperature is the color of light, measured in Kelvin (K). Lower K is warm (orange), higher K is cool (blue).
- Auto White Balance (AWB) is unreliable for video because it can change mid-shot and create inconsistencies.
- Presets (Tungsten, Daylight, etc.) are a good starting point for common lighting conditions.
- Manual White Balance is the most professional method. You can either dial in a specific Kelvin value or use the Custom WB function with a white/grey card for the most accurate results, especially in mixed lighting.
In our next lesson, we will continue exploring the essential camera settings by diving into frame rates. You will learn why films look different from sports broadcasts and how to choose the right frame rate (e.g., 24, 30, or 60 fps) to control the look of motion in your storytelling.