Hello and welcome back!
In our last lesson, we laid the technical groundwork for our video projects by learning how to configure project and export settings. With your project organized and your sequence set up, it's time to move into the heart of video editing: manipulating clips on the timeline.
Today, we're focusing on the most fundamental actions in any editor. The learning outcome for this lesson is to perform basic cuts, trims, and ripple edits on a timeline. These are the essential building blocks you'll use to sculpt your raw footage into a coherent story. Mastering these actions is the first step toward controlling the pace, rhythm, and flow of your short films and YouTube videos.
Let's begin by understanding not just how to cut, but why.
Part 1: The Art and Science of the Cut
Before we jump into the software, it's important to recognize that a "cut" is more than just a technical action; it's the primary tool for shaping a narrative in film. Every cut you make guides the viewer's attention and influences the story's rhythm.
A Precise Cut: A Beginner Guide to Video Editing Cuts and Techniques
To understand the foundational role of cuts, let's start with the article 'A Precise Cut' from LWKS. It explains the origin of the term and its importance in storytelling.
Please read the first two sections, 'What is a Cut?' and 'The Role of Cuts in Storytelling'. Focus on the idea that cuts are like punctuation in a sentence.
As the article notes, the simplest form is the Standard Cut, where one shot immediately replaces another. However, editors use many different types of cuts to create specific effects. You don't need to master all of them right now, but being aware of them will help you think more creatively as you edit.
This infographic provides a great overview of some common editing cuts and their purpose.
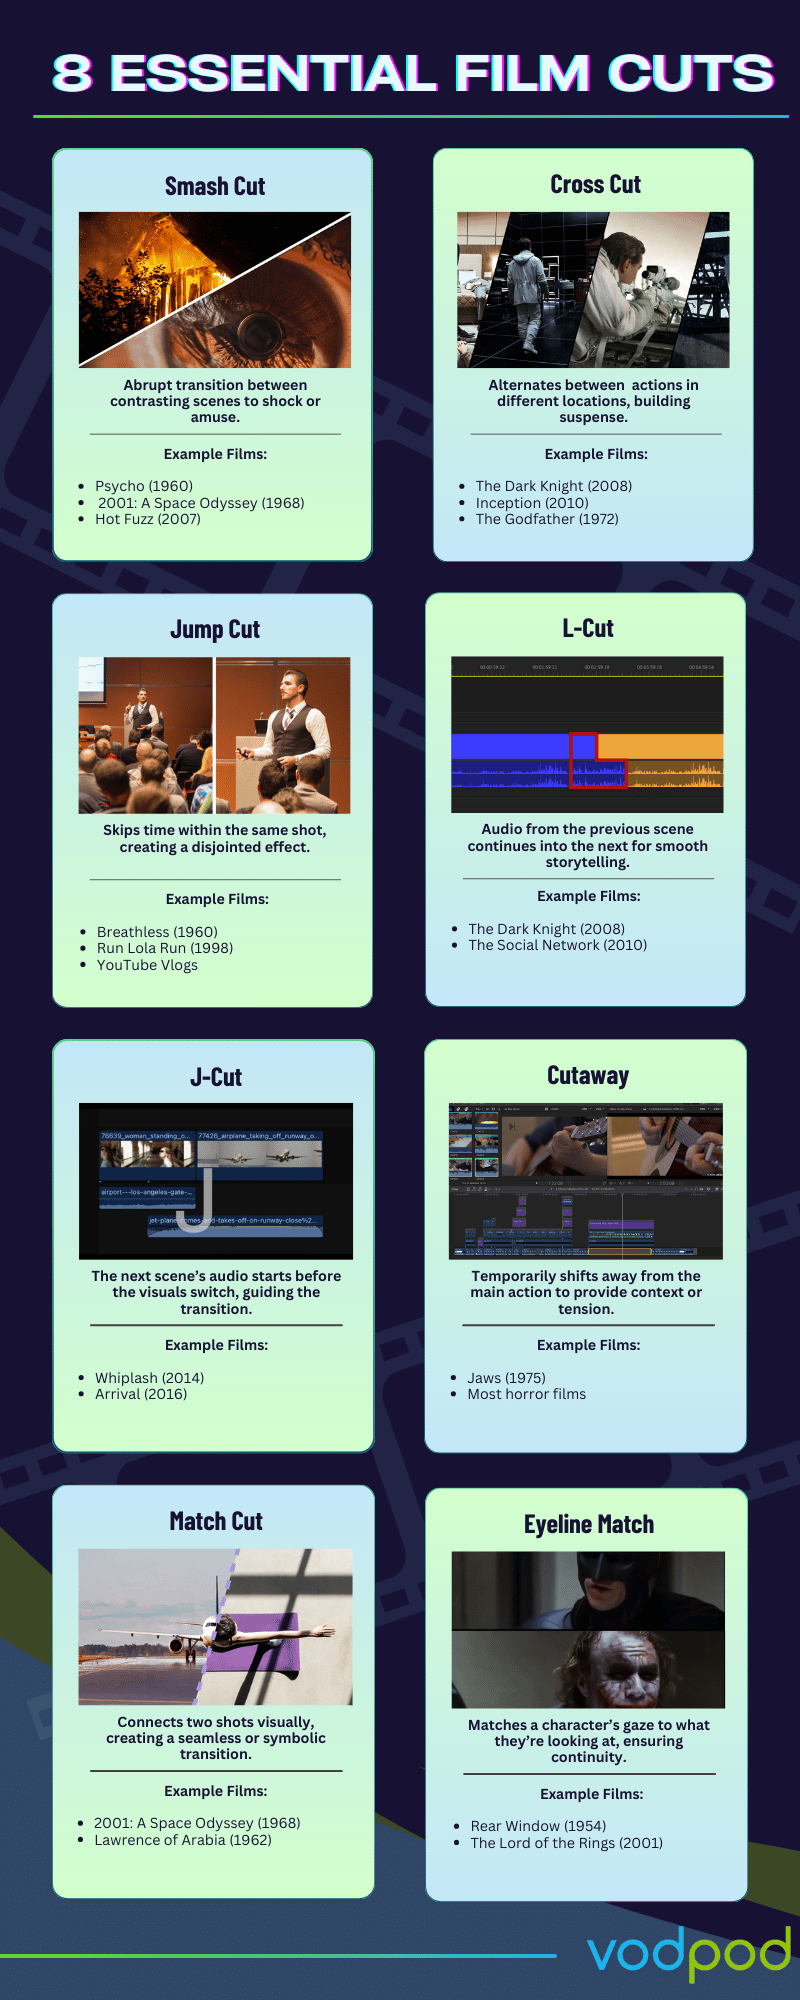
We'll revisit many of these concepts, like J-cuts and L-cuts, when we discuss audio editing later in the course. For now, let's focus on the mechanics of making the most basic cuts and trims.
Part 2: Making the First Cut
Since you have some experience with Shotcut, we'll use it as our primary example. The principles we cover, however, are universal and apply to CapCut, DaVinci Resolve, and any other editor you might use.
There are two main ways to select the portion of a clip you want to use.
Method 1: Trimming Before the Timeline
A clean and efficient workflow often involves trimming your clips before you even place them on the timeline. You do this in the Source or Preview monitor by setting an In-point (where the clip should start) and an Out-point (where it should end).
The following video will demonstrate this process.
Let's watch a segment from the 'Shotcut Video Editor Tutorial' by Kevin Stratvert. This will show you how to set In and Out points on a source clip.
Watch from 08:41 to 10:43. Pay close attention to the use of the 'I' key for the In-point and the 'O' key for the Out-point to select the desired portion of the clip.
This method is great for making your initial clip selections and keeping your timeline organized from the start.
Method 2: Editing on the Timeline
Once your clips are on the timeline, you'll inevitably need to refine them further. This involves three basic actions:
- Splitting: Cutting a clip into two or more separate pieces at the position of the playhead (the vertical line that shows your current position).
- Trimming: Adjusting the start or end point of a clip by dragging its edge.
- Deleting: Removing a clip or a section of a clip.
These actions are the bread and butter of editing. Let's see them in action.
We'll return to the same Shotcut tutorial to see how to split and trim directly on the timeline.
Watch from 12:22 to 15:10. This is a dense and important section. Focus on three key things: Using the 'S' key to split a clip. The problem that arises when you trim a clip using just the 'I' or 'O' keys (it leaves a gap). The introduction of a 'ripple' trim using 'Shift + I' and 'Shift + O'. We'll explore this next.
Part 3: The Power of the Ripple Edit
As you just saw, simply trimming or deleting a clip in the middle of your timeline creates an empty space, or gap. Closing this gap by manually moving all subsequent clips is tedious and can lead to errors.
This is where the ripple edit comes in. A ripple edit is a type of trim that automatically shuffles everything down the timeline to close the gap, preserving the sequence. It's one of the most important concepts for efficient editing.

You already had a preview of this, but let's solidify the concept. The 'Shift + I' (ripple trim start) and 'Shift + O' (ripple trim end) shortcuts in Shotcut are your best friends for quickly tightening up an edit.
Let's watch a full editing sequence where these ripple trims are used repeatedly. This will help you see how they function in a real workflow.
This final clip from the Shotcut tutorial is a practical demonstration of building a sequence almost entirely with ripple trims.
Watch from 17:09 to 20:20. Notice how every time a clip is trimmed with 'Shift + I' or 'Shift + O', the rest of the timeline automatically 'ripples' to fill the space. This is the workflow you should aim to adopt.
Test your understanding!
You have three clips (A, B, and C) on your timeline in that order. You decide that clip B is too long and you want to remove the last 5 seconds of it. You want clip C to immediately follow the new, shorter version of clip B without any gaps.
Which action should you perform?
- Place the playhead 5 seconds before the end of clip B and press 'S' to split it, then select and delete the small segment.
- Drag the end of clip B to the left by 5 seconds.
- Place the playhead 5 seconds before the end of clip B and press 'Shift + O'.
Show answer
The most efficient action is 3. Place the playhead 5 seconds before the end of clip B and press 'Shift + O'. This performs a ripple trim, simultaneously shortening clip B and moving clip C to close the resulting gap in a single step. The other two methods would require you to manually move clip C afterwards.
Conclusion
Today you've learned the fundamental hands-on skills of video editing. You now know how to get clips onto your timeline and, more importantly, how to shape them using cuts, trims, and ripple edits. This is the core skill set upon which all other editing techniques are built.
Key Takeaways:
- Cuts are storytelling tools. The way you cut influences the rhythm and meaning of your video.
- You can trim clips in the source monitor (with In/Out points) before adding them to the timeline for a cleaner workflow.
- On the timeline, you can Split ('S' key) clips or Trim them by dragging their edges.
- Ripple Editing is the most efficient way to trim and delete clips, as it automatically closes gaps and keeps your sequence intact. Mastering shortcuts like Shift + I and Shift + O will dramatically speed up your editing.
In our next lesson, we will focus on what happens at the cut. You'll learn how to apply transitions between clips, such as fades and dissolves, and more importantly, understand when they enhance your story versus when a simple, hard cut is more effective.