Hello! Welcome back to our course.
In our last lesson, we built the foundation for any successful video project: a solid organizational system. You learned how to create a master project folder, use subfolders for different types of media, and apply consistent naming conventions. This "outside the editor" work is complete. Now, it's time to step inside your editing software and set up the canvas for your story.
Today's lesson focuses on a critical step that happens before you even make your first cut: configuring your project settings for different output formats. We'll be tackling the technical specifications that define your video, such as its size, smoothness, and quality. Your goal is to understand how to choose the right settings for your intended destination, whether that's a high-quality short film for YouTube or a snappy vertical video for social media.
Getting this right from the start is crucial. It ensures your video looks its best, plays correctly on your chosen platform, and prevents frustrating technical issues down the line.
Part 1: The Building Blocks of Digital Video
Before we open any software, we need to understand the three fundamental properties of a digital video file: Resolution, Frame Rate, and Bitrate. These settings work together to determine the look, feel, and size of your final video.
To get a clear overview of these concepts, let's start with a video that explains them simply and effectively.
Video Frame Rate, Bitrate, & Resolution MADE SIMPLE
The video 'Video Frame Rate, Bitrate, & Resolution MADE SIMPLE' from the Adventures in Video channel does an excellent job of breaking down these technical terms. We'll watch it in a few parts.
First, please watch from 00:46 to 03:14 to understand resolution, and then from 05:01 to 07:36 to learn about frame rate. Pay attention to the trade-offs mentioned for each setting.
Let's quickly recap and add one more key term:
- Resolution: This is the size of your video, measured in pixels (width x height). Common resolutions are 1080p (1920x1080) and 4K (3840x2160). Higher resolution means a sharper, more detailed image, but also a much larger file size.
- Frame Rate (fps): This is the number of individual images, or frames, shown every second.
- 24fps: The standard for movies. It creates a "cinematic" look with slight motion blur that feels natural to our eyes. This is ideal for your short films.
- 30fps / 60fps: Common for broadcast TV, vlogs, and gameplay. The motion is smoother and feels more "live" or hyper-realistic. 60fps is great for capturing fast action.
- Aspect Ratio: This is the proportional relationship between the video's width and its height. It's determined by your resolution.
- 16:9: The standard for widescreen TVs and YouTube. Resolutions like 1920x1080 and 3840x2160 have a 16:9 aspect ratio.
- 9:16: The standard for vertical video on platforms like TikTok, Instagram Reels, and YouTube Shorts. This is simply a 16:9 frame turned on its side (e.g., 1080x1920).
Part 2: Setting Up Your Project (The Sequence)
Now that you know the building blocks, how do you apply them? The first step inside your editing software is to create a "sequence" (this is the term used in Premiere Pro and CapCut) or set a "video mode" (in Shotcut). This is essentially your timeline, and its settings should define the video you want to create.
The Golden Rule: Your sequence settings should match your intended final output, not necessarily your source footage. If you're making a vertical video for TikTok, you should set up a vertical (9:16) sequence, even if your footage was shot horizontally.
Let's watch a practical demonstration of how this is done. While this tutorial uses Adobe Premiere Pro, the principles and terminology are universal and apply directly to CapCut and Shotcut.
Adobe Premiere Pro Tutorial (2025) - Sequence Settings and Export Settings
In this 'Adobe Premiere Pro Tutorial' from Kellan Reck, you'll see how to create a custom sequence from scratch. Focus on the decisions being made about Timebase (Frame Rate) and Frame Size (Resolution/Aspect Ratio).
Watch from 00:21 to 05:50. Notice how he changes the settings for a standard horizontal video, a 4K video, and a vertical video.
Whether you're using CapCut, Shotcut, or Premiere Pro, you will always be presented with these same choices when starting a new project or sequence.
- In CapCut, you'll find these options in the 'Project settings' window when you start a new project. You can set the resolution and then later modify the aspect ratio easily.

- In Shotcut, this is done by choosing a Video Mode when you create a new project.
How To Use Shotcut Video Editor 2017: Path to Stunning Videos
This guide for Shotcut explains the initial project setup. It will show you where to find the equivalent settings.
Read the short section 'Creating and Setting Up a Project'. Pay close attention to step 4, which describes selecting the 'video mode'. This is where you choose your resolution and frame rate.
Test your understanding!
You've decided to create an atmospheric short film for your YouTube channel. You shot all your footage in 4K at 24fps. What resolution and frame rate should you choose for your project's sequence settings?
Show answer
You should set your sequence to a resolution of 3840x2160 (4K) and a frame rate of 24fps (or 23.976fps). This matches your source footage and the desired cinematic look for your final output on YouTube.
Part 3: Exporting Your Final Video (The Delivery)
Once your edit is complete, you need to export it into a single video file. This is where you define the settings for the final deliverable. A key concept here is the codec, which is the software used to compress (and decompress) your video. For web and social media, the standard is H.264.
This is also where bitrate becomes critically important. Bitrate determines the amount of data used to encode the video each second. A higher bitrate means better quality but a larger file. A lower bitrate means more compression, a smaller file, but potentially lower quality.
Let's return to our first video to understand bitrate and then see how it's applied in the export process.
Video Frame Rate, Bitrate, & Resolution MADE SIMPLE
Let's watch two more clips. The first defines bitrate, and the second shows a practical export workflow.
First, watch the 'Video Frame Rate, Bitrate, & Resolution' video from 08:33 to 11:04. This section explains bitrate and gives recommended settings for YouTube.
Now let's see these settings in action during an export.
Adobe Premiere Pro Tutorial (2025) - Sequence Settings and Export Settings
We'll now watch the second half of the Premiere Pro tutorial, which focuses entirely on export settings.
Watch from 05:50 to 10:25. Focus on the key choices: Format (H.264), Preset (Match Source), and the Bitrate Settings (VBR 2 pass).
The key takeaways on exporting are:
- Format/Codec: Choose H.264 (often found in an .MP4 container) for almost all online distribution.
- Resolution & Frame Rate: Start by matching your sequence settings.
- Bitrate: This is the main setting you'll adjust to balance quality and file size. Using VBR (Variable Bitrate), especially 2-pass, is very efficient. It uses a higher bitrate for complex, high-motion scenes and a lower bitrate for simple, static scenes, optimizing the overall quality and file size.
Again, these options are present in all editing software. In Shotcut, the 'Export' panel gives you access to presets like 'YouTube' and allows you to customize the resolution, frame rate, and bitrate.
Part 4: Platform-Specific Settings
Now, let's bring everything together and look at recommended settings for the platforms you're interested in.
The Best CapCut Video Export Settings to Use
Since you have experience with CapCut, this article provides excellent, up-to-date export settings tailored for the most popular social media platforms.
Read the sections 'Best CapCut settings for social media' and 'How to stop ruining your video quality'. This will give you concrete numbers for TikTok, Instagram, and YouTube Shorts, along with some crucial best-practice tips.
Based on these resources, here's a cheat sheet:
| Platform | Aspect Ratio | Resolution | Frame Rate | Bitrate (Mbps) | Notes |
|---|---|---|---|---|---|
| YouTube (HD) | 16:9 | 1920x1080 | 24 / 30 | 8-12 Mbps | The standard for most web video. A great balance of quality/size. |
| YouTube (4K) | 16:9 | 3840x2160 | 24 / 30 | 35-45 Mbps | For high-quality showcases, like your short films. |
| YT Shorts/Reels/TikTok | 9:16 | 1080x1920 | 30 fps | 8-16 Mbps | Vertical format is key. Note the lower bitrates for Insta/TikTok. |
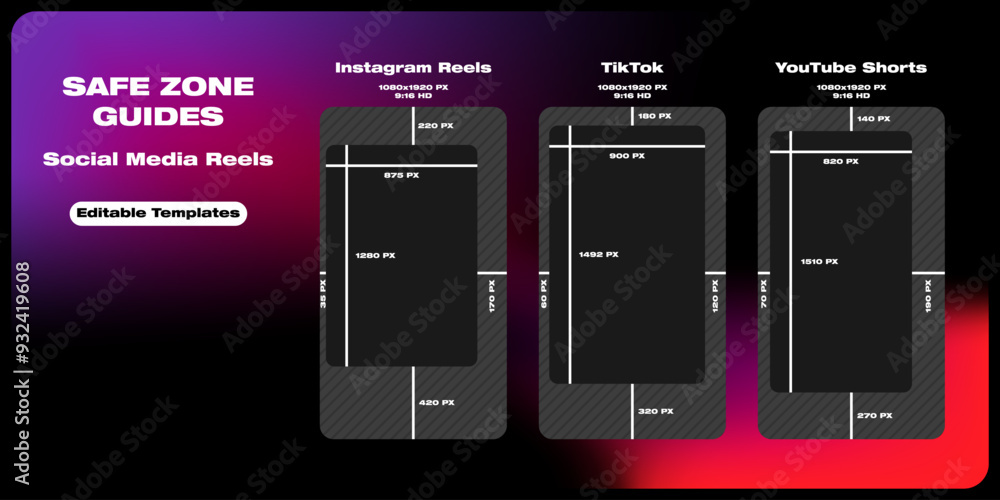
A Note on "Safe Zones"
For vertical video, it's not enough to just get the aspect ratio right. The apps themselves place overlays (like usernames, captions, and like/share buttons) over your video. You need to keep your important visual information within the "safe zone" to avoid it being covered.
Conclusion
You've now covered the essential technical knowledge needed to start and finish any video project correctly. By understanding and applying the right settings for resolution, frame rate, and bitrate, you ensure your creative vision is delivered to your audience with the best possible quality for that platform.
Key Takeaways:
- The three pillars of video settings are Resolution, Frame Rate, and Bitrate.
- Project/Sequence settings define your editing environment and should match your intended final output (e.g., 16:9 for YouTube, 9:16 for TikTok).
- Export settings prepare your video for a specific platform. H.264 is the standard codec for the web.
- Bitrate is the key to balancing video quality and file size during export.
- Always consider the aspect ratio and safe zones for your target platform, especially for vertical video.
In our next lesson, we'll finally get our hands dirty on the timeline. With our project organized and our sequence configured, you'll be ready to learn how to perform basic cuts, trims, and ripple edits, the fundamental actions of video editing.