Hello! Welcome back to our module on "Visual Polish: Color Correction and Grading."
In our last lesson, we laid the technical groundwork by learning how to perform primary color correction. You learned to adjust exposure, contrast, and saturation to take a flat, raw image and turn it into a clean, balanced starting point. We focused on the luminance, or brightness, of the image, using the Luma Waveform as our guide.
Today, we're taking the next logical step. Our learning outcome is to correct color casts and white balance issues in your footage. Now that we know how to control the intensity of color with saturation, we'll learn how to ensure the accuracy of those colors. This process is called white balancing. It's the final key to achieving a truly neutral and professional-looking image, which is the perfect canvas for creative color grading later on.
For your short films and YouTube videos, mastering white balance is essential for continuity. If you cut between two shots filmed at different times or under different lights, a mismatch in white balance can be jarring for the viewer. Getting this right will make your edits seamless and your projects look far more polished.
1. What is Color Temperature and White Balance?
Have you ever noticed how a photo taken indoors under a standard lightbulb can look very yellow or "warm," while a video shot on a cloudy day can look very blue or "cold"? This is because different light sources emit light with different color characteristics. This characteristic is called color temperature.
Our brains are incredible at automatically adjusting our perception, so a white piece of paper looks white to us whether we're under a warm lamp or the cool light of an overcast sky. A camera, however, simply records the light as it is. It needs to be told what is "white" under a given light source. The process of giving it this reference point is called white balance.
To get a clear and practical understanding of this concept, let's watch a video that breaks it down.
White Balance For Video EXPLAINED: How Cameras See Color & Light
The video 'White Balance For Video EXPLAINED' by Matt WhoisMatt Johnson does an excellent job of explaining the science behind how cameras perceive color and why managing white balance is crucial.
Please watch the video from the beginning until 02:12. Pay close attention to: The visual examples of incorrect white balance. The explanation of the Kelvin scale for measuring color temperature. The definition of what white balance fundamentally does.
As the video explains, color temperature is measured on the Kelvin (K) scale:
- Lower Kelvin values (e.g., 2000-3500K) correspond to warmer, more orange/yellow light, like a candle or a tungsten bulb.
- Higher Kelvin values (e.g., 6000-10000K) correspond to cooler, bluer light, like an overcast sky or shade.
- Mid-day sunlight is considered relatively neutral, around 5500-5600K.
When you set your white balance, you are essentially telling your camera (or editing software) the Kelvin temperature of your light source. The device then compensates by adding the opposite color to neutralize the color cast and make white objects appear pure white.
Here is a helpful chart that visualizes the relationship between light sources, Kelvin temperature, and the corresponding camera settings.

To solidify these concepts, let's turn to a short article that recaps what we've just seen.
Understanding Colour Temperature & White Balance
The article 'Understanding Colour Temperature & White Balance' provides a concise written summary of these core ideas.
Please read the sections titled 'Colour Temperature' and 'White Balance (WB).' This will reinforce what you learned in the video about the Kelvin scale and the function of white balance.
2. Correcting White Balance in Post-Production
While it's always best to get your white balance right in the camera, it's not always possible. Fortunately, we have powerful tools in post-production to fix color casts. This is where your skills as an editor come into play.
In the last lesson, we introduced video scopes. We used the Luma Waveform to judge brightness. To judge color, our primary tool is the Vectorscope.
Let's quickly review what the Vectorscope shows us from an article we looked at previously.
In Depth: What Are Color Correction vs. Color Grading in Film
We'll revisit the article 'In Depth: What Are Color Correction vs. Color Grading in Film' to focus on the tools and steps for white balance.
First, navigate to the section 'TERMS AND TOOLS' and re-read the paragraph about the 'Vectorscope.' Notice its circular shape represents the color wheel. Then, read 'Step 3: White Balance' under the 'COLOR CORRECTION STEPS' section. This explains how the Vectorscope is used to diagnose and fix white balance issues.
The key takeaway is that the center of the Vectorscope represents a complete lack of color—pure neutral grey, white, or black. The further the plot (often called a "trace" or "blob") strays from the center, the more saturated the colors are. If the entire plot is shifted towards one color—like blue or yellow—it means your image has a color cast.
Your goal during white balance correction is to move that cluster of color information back to the center of the scope, creating a neutral image.
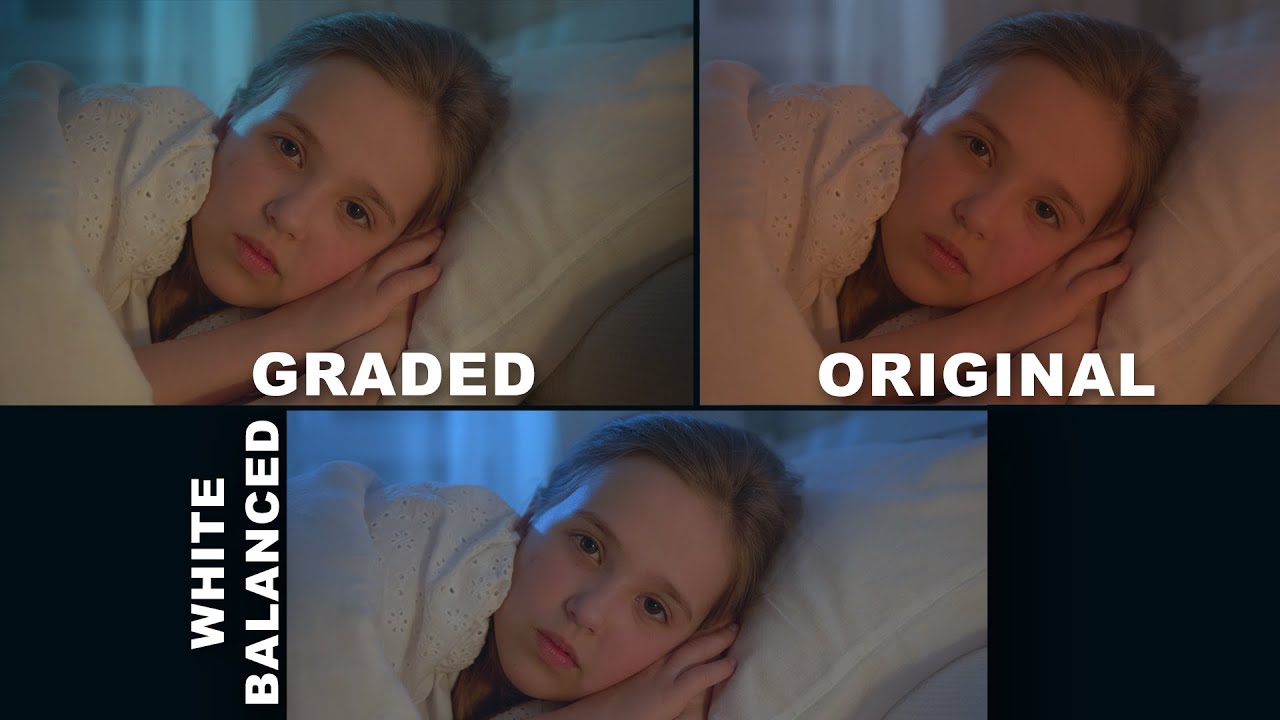
Now, let's see this process in action. The following video demonstrates how to correct white balance in DaVinci Resolve. The software might be different from CapCut or Shotcut, but the tools (Vectorscope, color wheels) and the principles are universal in professional editing.
Color Correction in DaVinci Resolve: A Walkthrough
The video 'Color Correction in DaVinci Resolve: A Walkthrough' from B&H Photo Video offers a clear, practical demonstration of correcting white balance using professional tools.
Please watch the following segments: Intro to the Vectorscope (03:36 - 04:34): This will show you how to read the scope to identify a color cast. Using the Color Wheels (04:34 - 06:08): Observe how the color wheels for shadows, midtones, and highlights are used to push the colors back towards the center of the scope. Practical Example (08:49 - 11:35): This is a great real-world example of fixing a shot with a very strong blue color cast. Notice how the colorist relies on the scopes, not just his eyes.
To summarize the workflow you just saw:
- Analyze: Look at your image and your Vectorscope to identify the direction of the color cast.
- Use the Eyedropper (optional): Most software has an eyedropper tool. Clicking on an area of your image that should be neutral white or grey can often get you 80% of the way there automatically.
- Adjust with Wheels/Sliders: Use your main Temperature and Tint sliders (or the Offset color wheel) for a broad adjustment. Push the color away from the cast (e.g., if it's too blue, push towards yellow/orange).
- Refine: Fine-tune the balance separately in the Shadows, Midtones, and Highlights using their respective color wheels. This gives you precise control, ensuring that your shadows don't, for example, stay blue when the rest of the image is neutral.
Test your understanding!
You're editing footage shot indoors, and the skin tones of your subject look too yellow and unhealthy. You open the Vectorscope.
- In which direction would you expect the main color trace to be shifted?
- To correct this, which direction would you push the color using your Temperature slider or color wheel?
Show answer
- The color trace would be shifted towards the Yellow/Red quadrant of the Vectorscope.
- To correct this, you would push the color in the opposite direction, towards Blue/Cyan. On a Temperature slider, this means moving it to a cooler (lower) setting. This will neutralize the yellow cast and bring the skin tones back to a more natural look.
Conclusion
You have now completed the essential technical foundation of color correction! You started by learning to control luminance (exposure, contrast) and saturation. Today, you've added the crucial skill of controlling hue by correcting color casts and white balance issues. You are now fully equipped to take any piece of raw footage and transform it into a clean, accurate, and professional-looking neutral image.
Key Takeaways:
- Color Temperature, measured in Kelvin (K), describes the warmth or coolness of a light source.
- White Balance is the process of neutralizing the color temperature so that white objects appear pure white, and all other colors are rendered accurately.
- The Vectorscope is your primary tool in post-production for diagnosing color casts. A neutral image will have its color information centered on the scope.
- Use Temperature/Tint sliders and Color Wheels (for Shadows, Midtones, and Highlights) to push the color information back to the center of the Vectorscope and eliminate color casts.
Next Lesson Preview:
With our canvas now perfectly primed, we can finally begin to paint. In our next lesson, we will move from technical correction to creative grading. You'll learn how to use color grading to create a consistent look across multiple shots, ensuring your entire scene or film feels like it belongs in the same visual world.