Hello! Welcome to the fourth module of our course, Cinematic Language: Framing and Movement.
In the last module, we focused on the technical foundations of using a camera and, in our final lesson, we established a professional workflow for managing your media to keep your footage safe. You now have the essential skills to capture and protect high-quality video.
Now, we shift from the technical to the artistic. This module is about learning the language of cinematography—how you use the camera not just to record reality, but to shape it, guide the audience's eye, and tell a story.
Today, we'll start with a fundamental concept: creating visual hierarchy using foreground, midground, and background elements. By the end of this lesson, you will understand how to compose a shot with a clear sense of depth, making your visuals more dynamic, professional, and immersive—a key step in crafting compelling short films and YouTube videos.
1. The Three Planes of Composition
Every image you frame can be thought of as having three distinct spatial planes or layers. Understanding and controlling these layers is the first step toward creating a sense of depth, which separates a flat, uninteresting image from a rich, cinematic one.
These three planes are:
- Foreground: The area of the frame closest to the camera.
- Midground: The area where your main subject usually resides, situated between the foreground and background.
- Background: The area furthest from the camera, providing context and environment.
To get a solid grasp of these definitions, let's turn to an excellent article on the topic.
Mastering Foreground, Middleground, and Background
The article 'Mastering Foreground, Middleground, and Background' from PremiumBeat clearly defines these three layers using classic film examples.
Please read the short sections titled 'The Foreground,' 'The Middleground,' and 'The Background.' Note how the examples from 'Apocalypse Now' are outlined to clearly show each layer.
As the article illustrates, these layers work together to build a complete picture. The foreground can be used to frame the action, the midground typically holds the focal point, and the background establishes the world.
Here is a very clear visual breakdown of these layers.
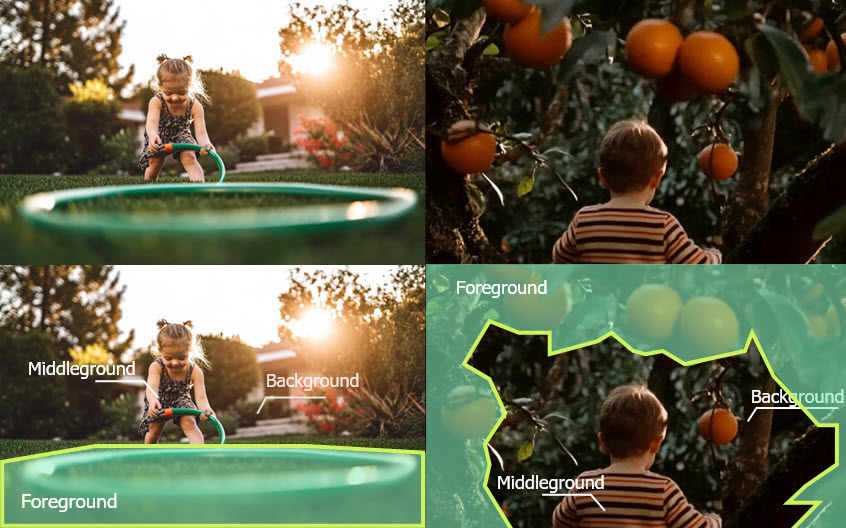
By consciously thinking in terms of these three planes, you move from simply pointing the camera at a subject to actively designing the visual space of your shot.
2. From Flat to Deep: Why Layers Matter
Why is this so important? Because arranging elements in the foreground, midground, and background is the primary way you create the illusion of three-dimensional depth on a two-dimensional screen. A shot with distinct layers feels more immersive and is generally more visually engaging than a shot that appears "flat."
This concept is just as crucial in video game design, where creators build entire worlds that need to feel vast and navigable.
Why it looks 'amazing': The foundational rules of visual ...
The article 'Why it looks 'amazing': The foundational rules of visual composition' from Magnopus, though focused on game art, has a perfect section on this principle. It explains why layering is a fundamental way to enhance visual depth.
Read the section titled 'Depth.' Focus on the paragraphs that begin with 'Another fundamental way to enhance visual depth...' and observe the examples from 'Hogwarts Legacy' and 'The French Dispatch.'
As the article notes, a shot with a layered structure is more compelling because it gives the viewer's eye distinct planes to explore. This creates what we call visual hierarchy—an intentional arrangement of elements to guide attention from most important to least important. Your job as a filmmaker is to decide what the audience should look at, and in what order.
Test your understanding!
Think of a scene from a favorite video game with a beautiful environment (like The Witcher 3, Elden Ring, or Red Dead Redemption 2). Pause and analyze the composition. What elements are in the foreground (e.g., tall grass, a rocky outcrop), midground (e.g., your character, a campfire), and background (e.g., distant mountains, a castle)? How does this layering make the world feel more real and expansive?
Show answer
There's no single right answer, but you'll likely notice that game designers are masters of this. In Red Dead Redemption 2, you might have tall grass (foreground) partially obscuring your view of a deer (midground), with a vast mountain range under a setting sun (background). The layers work together to create a sense of scale and immersion. The foreground grass adds texture, the midground provides the subject, and the background provides the epic context.
3. A Filmmaker's Toolkit for Controlling Hierarchy
Once you understand the layers, the next step is to control them to direct the viewer's focus. You have a powerful toolkit at your disposal to establish a clear visual hierarchy.
Tool 1: Focus and Depth of Field
The most direct way to tell an audience "look here" is with focus. By using a shallow depth of field, you can render your subject in the midground tack-sharp while the foreground and background blur away. This isolates your subject and removes distractions.
Conversely, using deep focus, where all three planes are sharp, invites the audience to scan the entire frame and see the relationship between all the elements.
Let's return to our first article to explore this.
Mastering Foreground, Middleground, and Background
This article also provides a great explanation of how focus can be used to emphasize different layers, including the classic 'deep focus' technique.
Read the sections 'Using Focus and Depth of Field' and 'Understanding Deep Focus.' Pay attention to how changing the focus on the background in the flower photos dramatically changes the viewing experience.

Tool 2: Other Compositional Techniques
Focus is powerful, but it's not your only tool. You can also guide the eye using light, color, shape, and lines. These techniques can be used to make your subject in the midground "pop" from the other layers.
Why it looks 'amazing': The foundational rules of visual ...
The article from Magnopus offers a fantastic breakdown of these techniques, again using compelling examples from video games and film.
Read the section 'Directing attention.' You don't need to memorize every point, but aim to understand the core idea behind each technique: Contrast, Brightness, Shape, Lines, and Movement.
Here's a summary of your expanded toolkit for creating visual hierarchy:
- Contrast: The human eye is automatically drawn to the area of highest contrast. You can make your subject stand out by making them much brighter or darker than their background (value contrast), or by placing them against a complementary color (color contrast), like the characters in Hades.
- Brightness: A simple pool of light on your subject or a key object acts like a spotlight on a stage.
- Leading Lines: Use elements within the frame—like roads, fences, or tree branches—to create lines that point directly to your subject.
- Framing: Use a foreground element, like a doorway or a window, to create a natural frame around your midground subject.
- Movement: A moving subject in a static frame (or a static subject in a moving frame) will instantly grab attention.
By combining these tools, you can create sophisticated compositions. For instance, you could use a shallow depth of field to soften the background, place your character in a pool of light, and use a foreground tree branch to frame them and lead the eye toward them.
Conclusion
Today you've taken your first step into the art of cinematic language. You've learned that a compelling shot is rarely an accident; it's a construction. By consciously designing your frame with a foreground, midground, and background, you can create a powerful sense of depth and guide your viewer's attention exactly where you want it to go.
Key Takeaways:
- See in Layers: Train your eye to see the foreground, midground, and background in every composition.
- Create Depth: Layering elements across these planes is the key to transforming a flat image into a three-dimensional, immersive world.
- Establish Hierarchy: Use your toolkit—focus, contrast, brightness, lines, and framing—to make your intended subject the clear focal point of the shot.
- Guide the Eye: Your ultimate goal is to control the viewing experience, telling the audience what is most important in the frame.
Next Lesson Preview:
Now that you know how to compose a space, we'll move on to composing the people within it. In our next lesson, we will explore how to block and frame scenes with multiple subjects to show relationships and power dynamics. You'll learn how the placement of characters within the frame can tell a story all on its own.