Hello! Welcome back to our course.
In our last few lessons, you've learned how to control the camera to capture beautiful, well-exposed, and perfectly focused footage. But capturing the footage is only half the battle. What happens after you press the stop button is just as critical. This brings us to the final topic in our "Mastering the Camera" module.
Today's lesson is dedicated to a crucial, practical skill: how to format and manage your storage media to prevent data loss. There is little in filmmaking as heartbreaking as losing a great shot—or an entire day's work—due to a corrupted card or a mistaken deletion. By the end of this lesson, you will have a clear, professional workflow for handling your memory cards and backing up your footage, ensuring that the short films and YouTube videos you work so hard to create are always safe.
1. What is Formatting and Why Is It Essential?
A common mistake beginners make is to "clear" a memory card by connecting it to a computer and deleting the files, or by deleting them one by one in the camera. This is not a reliable practice and can lead to problems. The correct method is formatting.
Formatting does more than just delete your visible files. It completely wipes the card's file system, removes hidden data and old folder structures, and sets it up to work perfectly with the specific camera you're using. Think of it less like tidying a room and more like a factory reset.
To understand why this is so important, let's start with a foundational article.
How Do You Format an SD Card for a Camera? (Step-by- ...
The article 'How Do You Format an SD Card for a Camera?' from DiskGenius explains the core difference between formatting and simply deleting files. It lays out the technical reasons why formatting is a non-negotiable step for reliability and performance.
Please read the first two sections of the article, down to the heading 'First, make a backup for your SD card before formatting'. Focus on understanding the arguments in the section 'Why Formatting Is Better Than Deleting Files?'.
As the article explains, formatting regularly:
- Removes leftover system files that can cause conflicts.
- Resets the card's data structure for a clean slate.
- Improves write speed, which is crucial for high-quality video.
- Prevents compatibility errors, especially if a card is used across different devices (like a camera, drone, or computer).
2. The Golden Rule: Format In-Camera, Every Time
Now that you know why formatting is important, here is the single most important rule for how to do it:
Always format your memory card in the camera you are about to use for shooting.
Even if you've formatted the card on a computer, you should always perform a final format in the camera. This ensures the card's file system is perfectly tailored to that specific camera model's needs.
The process is simple and similar across most cameras:
- Insert the memory card.
- Turn on the camera.
- Navigate to the Menu, usually in a "Setup" or "Tools" section (often marked with a wrench icon 🔧).
- Find the "Format Card" or "Initialize" option.
- Confirm your choice. The camera will warn you that this will erase everything.
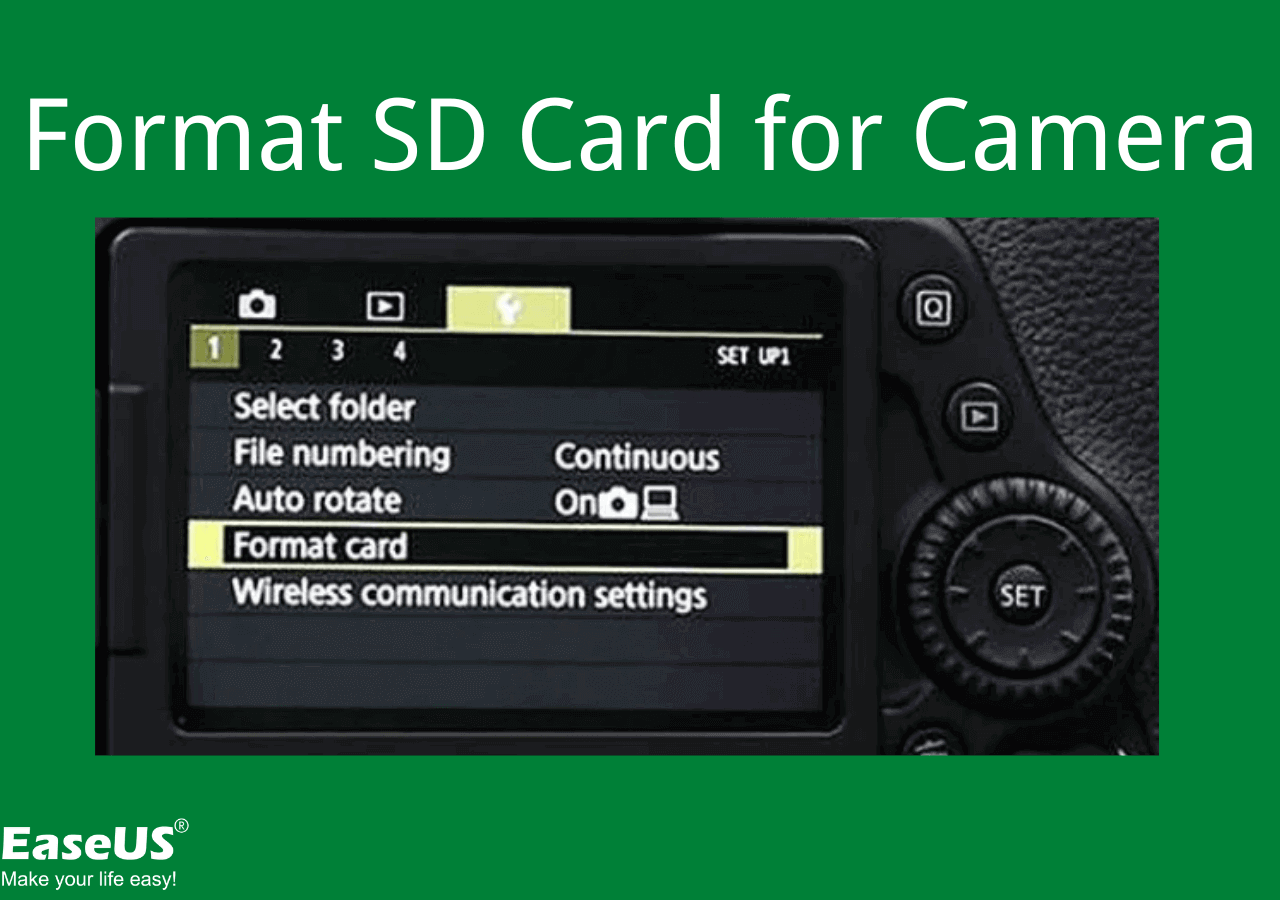
Let's watch a short video that demonstrates this and introduces a few key workflow habits.
How To Format SD Memory Cards (On Any Camera!)
This video from Think Media quickly shows the formatting process on a camera and introduces three essential workflow tips that we'll be building on.
Watch the first part of the video, from the beginning to 02:20. The host demonstrates formatting on a Canon M50, but the principle is universal. Notice his emphasis on formatting on the device that uses the card.
3. A Professional Media Management Workflow
To avoid errors and data loss, you need a system. Relying on memory alone is a recipe for disaster. Here is a simple, four-step workflow you can adopt immediately for your projects.
Step 1: Before the Shoot → Start Fresh
As the Think Media video advised, always start a shoot with a freshly formatted card. This ensures you have the maximum recording time and minimizes the risk of the card filling up or corrupting mid-take. This also applies to brand new cards; you should format them in your camera before their first use.
Step 2: After the Shoot → Offload Immediately
Once you're done shooting for the day, transfer your footage to a computer or hard drive as soon as possible. Don't leave your valuable footage sitting on the memory card in your camera bag overnight. The card is temporary storage; your hard drives are for safekeeping. This practice also frees up your card to be formatted for the next shoot.
Step 3: After Transferring → Verify the Copy
Simply dragging and dropping files isn't always enough. Data can get corrupted during a transfer. You must verify that the footage was copied correctly. Professionals use two simple methods.
Digital Media Management Best Practices
The article 'Digital Media Management Best Practices' from The Black and Blue, while written for professional film sets, contains universal advice. We'll look at its section on verifying data.
Read section 4, 'Checksums, Spot Check, and Scrub Through Clips'. Don't worry about the term 'D.I.T.' for now; focus on understanding the two verification techniques.
- Checksums (or a "File Size Check"): The easiest way to do this is to compare the properties of the folder on your memory card with the folder you copied to your hard drive. Check the total file size and the number of items. They should match.
- Spot-Checking: Randomly open a few of the copied video files and scrub through them to ensure they play correctly and aren't corrupted.
Only after you have verified the backup should you consider the card "safe to format."
Step 4: Physical Organization → Know Your Cards
When you have multiple memory cards, you need a physical system to track which ones contain footage ("full") and which ones are backed up and ready to be formatted ("empty").
A common method, as mentioned in the Think Media video, is to use a memory card case and flip the cards.
- Label up: The card has been backed up and is safe to format.
- Label down: The card contains footage that has not been backed up. Do not format!
Test your understanding!
You've just finished filming for the day and have three full SD cards. You copy all the files to your laptop's main hard drive. One of your collaborators immediately asks for one of the cards to shoot some B-roll. What is the crucial step you must take before you can confidently format that card and hand it over?
Show answer
You must verify the backup and ideally create a second backup. Before formatting, you should at least check the file sizes and spot-check a few clips from that card on your laptop to confirm the copy was successful. Ideally, following the 3-2-1 rule, you would copy the footage to a second hard drive as well before wiping the original card. The card itself acts as a backup until the data is safely stored in at least two separate locations.
4. The Ultimate Safety Net: The 3-2-1 Backup Rule
A single copy of your footage on one hard drive is not a backup; it's a future point of failure. Hard drives fail. Laptops get stolen. To truly protect your work, you need a robust backup strategy. The industry standard is the 3-2-1 Rule.

Let's break it down for your filmmaking workflow:
- 3 Copies of Your Data:
- Your "working" files on your primary external hard drive.
- A first backup on a second external hard drive.
- A second backup on a third drive or in the cloud. (The original memory card can count as a copy until it's formatted).
- 2 Different Media Types: This reduces the risk of a specific technology failing. For example, you could use a fast SSD for your working drive and a cheaper, larger traditional spinning hard drive (HDD) for your backup.
- 1 Off-Site Copy: This protects you from disaster (fire, flood, theft). Keep one of your backup drives at a different physical location (like a friend's house or an office) or use a cloud storage service for your most critical files.
For a YouTube video, this might seem like overkill. But for a short film that you've invested weeks or months into, this is an absolutely non-negotiable insurance policy against losing your entire project.
5. Essential Best Practices
To wrap up, let's review a list of essential Do's and Don'ts for memory card care.
Are You Caring for Your Memory Cards?
This video from Forest Chaput de Saintonge, 'Are You Caring for Your Memory Cards?', is a fantastic source of professional tips. We'll use it to create a final checklist of best practices.
You don't need to watch the whole video, as we've covered many points. Just focus on these specific tips: (02:02 - 02:30) Why you should never delete individual images/clips in-camera. (05:08 - 05:40) The importance of buying cards from a reputable brand. (06:20 - 06:40) The simple step of safely ejecting a card from your computer. (06:40 - 07:22) The danger of removing a card while the camera is writing to it (the blinking light!).
Your Final Checklist:
- ✅ DO buy cards from reputable brands like SanDisk, Lexar, ProGrade, or Sony. Cheaper, off-brand cards have higher failure rates.
- ✅ DO use a protective case for your cards.
- ✅ DO safely "Eject" the card from your computer before physically unplugging it.
- ❌ DON'T delete individual files in-camera. Format the whole card instead.
- ❌ DON'T ever remove the card from the camera when the little red or orange access light is blinking. This means the camera is still writing data, and removing the card can corrupt the entire card, not just the last clip.
- ❌ DON'T reformat a card until you are 100% certain the footage has been successfully backed up in at least two separate places.
Conclusion
Congratulations on completing the "Mastering the Camera" module! You've moved from the basics of exposure and focus to the critical professional habits of media management. While it may seem tedious, a disciplined data workflow is what separates amateurs from professionals. It frees you to be creative, knowing your work is secure.
Key Takeaways:
- Format In-Camera: This is the most reliable way to prepare a card for a shoot.
- Build a Workflow: Establish a routine of shooting, offloading, verifying, and organizing your media.
- Embrace Redundancy: The 3-2-1 Rule is your best defense against catastrophic data loss.
- Mind the Details: Small habits, like safely ejecting cards and never pulling them while the light is blinking, make a huge difference.
Next Lesson Preview:
Now that your technical foundations for camera operation and data management are secure, we'll dive into the next module: Cinematic Language: Framing and Movement. We'll begin exploring the artistic language of cinematography, starting with our next lesson on how to create visual hierarchy using foreground, midground, and background elements to add depth and guide the viewer's eye.