Hello! Welcome to the final lesson in our module on music and audio mastering.
In our previous lessons, we've focused on crafting the internal balance of your project's soundscape. You've learned to mix dialogue, music, and effects, and even used auto-ducking to ensure your dialogue remains the star of the show. Your audio mix now sounds balanced and coherent within your project timeline. But what happens when it leaves your editor and enters the wider world of YouTube and other platforms?
Today, we address that crucial final step. Your learning outcome is to normalize final audio to ensure consistent volume across the entire project. This process ensures your video will be heard at a comfortable and professional level, without forcing your audience to constantly reach for the volume knob. It's the last thing you'll do to your audio before exporting your finished film.
1. The "Why" of Normalization: A Consistent Listening Experience
Have you ever watched a YouTube playlist where one video is blaringly loud and the next is barely a whisper? It's a frustrating experience. Audio normalization is the technique used to prevent this, making sure your content plays at a similar perceived volume to other professional content on the same platform.
To get a clear understanding of what normalization is and what it does to your audio, let's start with a foundational video.
Audio Normalization: Make Your Video Consistently Loud
This video from audio expert Curtis Judd provides an excellent, clear explanation of audio normalization. It defines the core concept and introduces the two main types.
Please watch the first minute of the video (00:00 - 00:57). Focus on the definition of normalization: applying the same amount of gain (volume change) to an entire audio track to reach a target level.
As the video explains, normalization adjusts the entire audio signal up or down to a specific target. It is a global adjustment applied to your final mix, unlike the relative adjustments (like ducking) you made between individual tracks.
There are two main ways to approach this, and understanding the difference is key to producing professional-sounding audio.
2. Peak vs. Loudness Normalization: What Your Ears Actually Hear
The two main types of normalization are Peak Normalization and Loudness Normalization. While they sound similar, they work on fundamentally different principles.
Peak Normalization
This is the older, simpler method. It works by scanning your entire audio track to find the single loudest point (the highest "peak"). It then raises or lowers the volume of the entire track so that this one peak hits a target level, usually 0 dB (the maximum level before distortion, or "clipping").
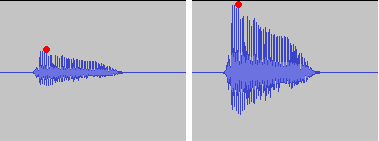
The problem? Our ears don't judge volume based on instantaneous peaks. A single loud sound effect, like a door slam or a drum hit, could be the loudest peak. If you normalize based on that one sound, the rest of your audio—especially dialogue—might still be far too quiet.
Loudness Normalization (LUFS)
This is the modern, professional standard. Instead of looking for a single peak, loudness normalization analyzes the audio over time to measure the perceived loudness—how loud it actually sounds to the human ear. It then adjusts the track to meet a target average loudness.
This method is far more effective because it aligns with how we actually experience sound. It ensures that a dialogue-heavy scene in one of your videos will sound just as loud as a high-action sequence in another, even if their peak levels are completely different.
To measure perceived loudness, we use a special unit: LUFS (Loudness Units Full Scale).
Now, let's return to the Curtis Judd video to see a brilliant demonstration of why LUFS-based loudness normalization is superior.
Audio Normalization: Make Your Video Consistently Loud
This part of the video clearly explains the limitations of peak normalization and the benefits of loudness normalization using a practical comparison.
Watch from 00:57 to 04:33. Pay close attention to the example comparing a short transient sound and a continuous tone—both have the same peak level, but one sounds much louder. This is the core problem that LUFS solves.
3. LUFS and Platform Standards
The adoption of LUFS has been a game-changer for audio on the internet. For years, producers were stuck in a "Loudness War," trying to make their tracks louder and louder to stand out, often by using heavy compression that crushed the dynamic range and made the audio fatiguing to listen to.
Streaming platforms like YouTube and Spotify ended this war by implementing loudness normalization on their end. They now automatically turn down audio that's too loud and (in some cases) turn up audio that's too quiet.
Your job as a creator is to deliver your audio at their preferred target level. By doing so, you ensure your audio isn't altered by the platform in a way you can't control.
This article provides a fantastic, detailed overview of normalization, LUFS, and platform standards.
Audio normalization explained: a complete guide
This article from Waves System is a comprehensive guide to audio normalization. We'll focus on the sections that define the units and list the standards for streaming platforms.
Please read the following sections: Start at 'LUFS, dB, RMS: explanation of units and standards'. Continue through 'Recommended standards and levels for audio normalization', paying close attention to the targets listed under 'Streaming (Spotify, YouTube, Apple Music)'. This will give you the specific targets you need for your projects.
Here are the key targets to remember, especially for your goal of creating YouTube content:
- YouTube: -14 LUFS
- Spotify: -14 LUFS
- Apple Music: -16 LUFS
A Crucial Detail: True Peak
When a platform like YouTube re-encodes your video for streaming, the process can sometimes cause your audio peaks to go higher than they were in your original file. If your highest peak was already at the maximum (0 dB), it can now be pushed into digital distortion.
To prevent this, we use a True Peak Limiter. This ensures that the absolute highest peak of your signal never goes above a set ceiling. A safe target for web content is -1.0 dBTP (decibels True Peak). Most normalization tools allow you to set this limit.
4. Practical Application: Normalizing Your Audio in Shotcut
Now for the practical part. Since you have experience with Shotcut, let's look at how to apply loudness normalization there. Shotcut includes built-in filters for this exact purpose.
This short video demonstrates the normalization filters in Shotcut.
Shotcut How To Adjust Audio Levels (Normalize Audio, Balance Audio) | Shotcut Tutorial
This tutorial from Geek Outdoors shows how to find and use the normalization filters within Shotcut.
Watch from 03:06 to 03:53. The video introduces the 'Normalize: Two Pass' and 'Normalize: One Pass' filters. The 'Two Pass' filter is generally more accurate.
Here's the workflow in Shotcut:
- After you have finished your complete audio mix (dialogue, music, SFX are all balanced), select your master audio track or the entire timeline output.
- Go to the Filters panel, click the
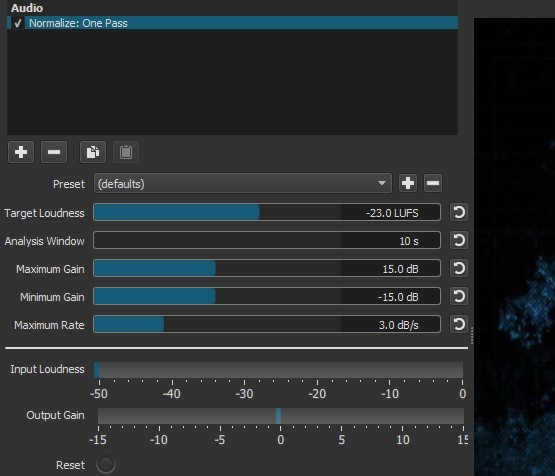
+icon, and search for the Normalize: Two Pass audio filter. - In the filter's settings, you'll see a Target Loudness parameter. Set this to -14.0 LUFS for a YouTube video.
- Click the Analyze button. Shotcut will scan your entire project's audio and calculate the gain needed to hit your target.
Test your understanding!
You've finished editing a short film. The final mix includes quiet dialogue scenes and a loud action sequence with explosions. You want to upload it to YouTube.
What two values are most important to set in your normalization tool to ensure a professional result, and what would you set them to?
Show answer
- Target Loudness: You would set this to -14 LUFS, which is YouTube's standard. This ensures the perceived volume of your entire film—both the quiet and loud parts—will be consistent with other content on the platform.
- True Peak Limit: You would set this to -1.0 dBTP (or -2.0 dBTP to be extra safe). This creates a safety margin to prevent any distortion when YouTube re-encodes your audio for streaming.
Conclusion
You've now reached the final stage of audio post-production. By mastering normalization, you are taking control of how your work is presented to the world, ensuring a consistent, professional, and enjoyable listening experience for your audience.
Key Takeaways:
- Normalization adjusts the overall volume of your final mix to meet a standard target.
- Loudness Normalization (measured in LUFS) is the industry standard because it matches human perception of volume, unlike the older Peak Normalization.
- Major platforms have specific LUFS targets. For YouTube, the target is -14 LUFS.
- Always set a True Peak Limit (e.g., -1.0 dBTP) to prevent distortion when your video is processed by a streaming service.
Next Lesson Preview:
You've mixed your audio, balanced it, and now normalized it to the perfect level. Your project is complete! What's next? In our final lesson of this course, we will cover the last step of the entire process: Export a final video file with appropriate codecs and compression settings. We will learn how to package your masterpiece for delivery, ensuring both high quality and manageable file sizes for platforms like YouTube.