Hello! Welcome to the final lesson of your course on filmmaking. This is an exciting moment—you've journeyed through storytelling, cinematography, editing, sound design, and mixing. Now, it's time to prepare your finished work for the world.
In our last lesson, you learned how to normalize your final audio mix to a consistent perceived loudness using LUFS. We focused on hitting the -14 LUFS target for YouTube, ensuring a professional and comfortable listening experience.
Today, we'll build on that knowledge. Your learning outcome is to export the final mix with appropriate levels for different distribution platforms. You'll discover that not all platforms are created equal when it comes to audio, and you'll learn the strategies to make sure your work sounds great everywhere, from YouTube to Instagram to a film festival screening. This is the final step that bridges your editing timeline and your audience.
1. Why Platform-Specific Levels Matter
You might wonder why we can't just use the -14 LUFS level from our last lesson for everything. The reason lies in the different ways people consume media on each platform.
- Mobile-First Platforms (Instagram, TikTok): Viewers are often on their phones in noisy environments (like a bus or cafe). To ensure dialogue and key sounds are clear, these platforms prefer a louder mix.
- Varied-Use Platforms (YouTube, Vimeo): Viewers might be watching on a phone, a laptop, or a large TV with a sound system. The -14 LUFS target is a versatile middle ground that works well across these different scenarios.
- Music & Hi-Fi Platforms (Spotify, Apple Music): These services often have their own standards, sometimes with a focus on preserving more dynamic range.
Because of this, each platform has established its own recommended loudness target. Adhering to these targets is the first step to ensuring a professional presentation.
To get a clear overview of these different standards, let's consult a helpful article.
10 Best Loudness Normalizers for Social Video (LUFS)
This article from Opus.pro provides an excellent summary of why LUFS standards are critical for social media and lists the specific targets for major platforms.
Please read the section titled 'Why LUFS Matters for Social Media Video'. Focus on the paragraph that lists the target LUFS levels for YouTube, Instagram, TikTok, and Facebook.
Here is a summary of the most common targets you'll encounter for your short films and YouTube content:
| Platform | Target Integrated LUFS | Common Use Case |
|---|---|---|
| YouTube | -14 LUFS | General video content |
| Instagram / TikTok | -10 to -12 LUFS | Short-form, mobile video |
| -13 LUFS | Social media video | |
| Spotify | -14 LUFS | Music and podcasts |
| Apple Music | -16 LUFS | Music (preserves dynamics) |

2. The Loudness Penalty vs. The "Too Quiet" Problem
Now that you know the targets, the next question is: what happens if your audio doesn't meet them? This is where platforms use loudness normalization.
-
If your audio is LOUDER than the target: The platform will simply turn it down. This is often called the "loudness penalty." You gain no advantage by submitting an overly loud mix; in fact, you likely sacrificed dynamic range for loudness that your audience will never hear.
-
If your audio is QUIETER than the target: This is where it gets tricky. Some platforms will turn your audio up (applying "positive gain"), but many do not.
This is a critical concept. If you upload a quiet video to a platform that doesn't apply positive gain, your video will simply be quiet, forcing viewers to turn up their volume and potentially delivering a subpar experience.
Let's watch a video that explains this crucial distinction.
How to get the RIGHT AUDIO LEVELS for YouTube videos! | YouTube volume normalization
This video from Aileé Zaga is focused on YouTube, but it clearly explains the platform's normalization policy and shows you how to check it for yourself.
Watch the first 3 minutes and 22 seconds of the video. The creator explains that YouTube reduces the volume of loud videos but does not increase the volume of quiet ones. She also introduces the 'Stats for Nerds' feature—a great tool for checking how YouTube has processed your audio after uploading.
As the video confirms, YouTube is one of the platforms that will not boost your quiet audio. This means mastering to the correct level isn't just a recommendation; it's essential for being heard correctly.
3. A Practical Strategy for Multi-Platform Delivery
So, what is the best strategy? You have two main options:
- The Meticulous Method: Create a separate video export for each platform, normalizing the audio to its specific LUFS target. This gives you the most control and is the most technically "correct" approach.
- The Pragmatic "Universal" Method: Create a single master that is loud enough to sound good on all platforms, even if it gets turned down by services like YouTube. This avoids the risk of being too quiet on services that don't apply positive gain.
For many independent creators making short films and YouTube content, the pragmatic method is often the most efficient. A good "universal" target is around -12 to -13 LUFS Integrated.
- On YouTube (-14 LUFS), this mix will be turned down slightly, which is perfectly fine.
- On Instagram (-11 LUFS), it will be loud and competitive without needing to be turned up.
- Crucially, you avoid being too quiet anywhere.
Let's watch a clip from a professional audio engineer who advocates for a similar strategy.
Don't Make This Loudness LUFS Mistake
In this clip, the creator from Mixdown Online discusses the risk of mastering too quietly and shares his personal strategy for ensuring his music sounds impactful across all services.
Watch from 07:48 to 11:07. First, he demonstrates that platforms like Amazon Music and YouTube Music do not apply positive gain to quiet tracks. Then, he explains his strategy of mastering slightly louder to create a punchy, consistent master for all platforms.
4. Workflow: Using a Limiter and Loudness Meter
Whether you're creating a universal master or platform-specific exports, the technical process is the same. In the previous lesson, we used Shotcut's Normalize: Two Pass filter, which is a great all-in-one tool. The professional standard workflow separates this into two tools: a Loudness Meter and a Limiter.
- Loudness Meter: This plugin measures the LUFS and True Peak of your audio in real-time. You place it at the very end of your audio effects chain.
- Limiter: This plugin acts as an unbreakable volume ceiling. You place it just before the loudness meter. Its job is to raise the overall level of your mix without ever letting the peaks exceed a set threshold.
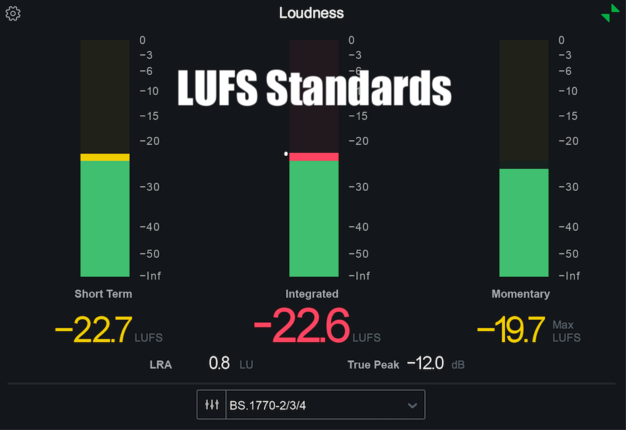
Here is a video demonstrating this exact workflow.
How to get the RIGHT AUDIO LEVELS for YouTube videos! | YouTube volume normalization
This clip demonstrates the standard professional workflow for hitting a specific loudness target using a limiter and a loudness meter.
Watch from 06:26 to 08:04. Notice the two key steps: Set the Limiter's 'True Peak' ceiling to -1.0 dB. This is your safety net against distortion. Slowly increase the Limiter's gain while watching the Loudness Meter's 'Integrated' LUFS reading until it hits the target (-14 LUFS in this example).
This workflow gives you precise control. While Shotcut's built-in filters are good, if you move to more advanced software like DaVinci Resolve or Adobe Premiere Pro, you will find yourself using this meter/limiter combination.
Test your understanding!
You have just finished a short film that you want to upload to both YouTube and Instagram. You decide to use the "pragmatic universal" method for your export.
What Integrated LUFS and True Peak values would you aim for in your final mix, and why?
Show answer
- Integrated LUFS Target: Around -12 LUFS. This level is loud enough for Instagram's preferred range (-10 to -12 LUFS) while still being high quality.
- True Peak Limit: -1.0 dBTP (or even -1.5 dBTP to be extra safe). This prevents any digital distortion when the platforms re-encode your video file.
Why: By aiming for -12 LUFS, your video will be loud and clear on Instagram. On YouTube, the platform will simply turn the volume down by about 2 dB to meet its -14 LUFS target, which results in a clean, professional sound without any loss of quality. This single file works well for both.
Conclusion and Course Wrap-Up
Congratulations! You have officially completed your filmmaking course. You have navigated the entire creative and technical pipeline, from structuring a narrative to composing shots, from editing scenes to designing a rich soundscape, and now, to delivering a final master that will sound professional on any platform.
Today's Key Takeaways:
- Different distribution platforms have different LUFS targets based on their typical viewing context.
- If your audio is too loud, platforms apply a "loudness penalty." If it's too quiet, it may not be turned up, resulting in a poor viewer experience.
- A pragmatic strategy for multi-platform delivery is to create a single "universal" master at around -12 to -13 LUFS Integrated.
- No matter your loudness target, always set a True Peak Limiter to -1.0 dBTP or lower to prevent distortion.
You now possess a comprehensive toolkit of skills. You understand the language of cinema, the craft of editing, and the science of sound. The next step is the most exciting one: to go out and create. Apply what you've learned to your short films and YouTube videos. Experiment, practice, and develop your unique voice as a creator. Well done, and best of luck on your filmmaking journey