Hello! Welcome to our lesson on audio ducking.
In our last session, we brought together dialogue, music, and sound effects into a final, balanced mix. We established the audio hierarchy—dialogue is king—and discussed how to manually lower music volume using keyframes to ensure dialogue remains clear. This manual process is effective but can be very time-consuming, especially for projects with a lot of talking, like YouTube videos or short films with extensive narration.
Today, we'll build directly on that concept. Your learning outcome is to apply ducking to automatically lower music volume when dialogue is present. We'll explore this powerful, time-saving feature found in most modern video editing software. You'll learn what it is, how it works, and how to control it to create a professional, dynamic mix efficiently.
1. What is Audio Ducking?
At its core, audio ducking is an automated process where the volume of one audio track (like background music) is temporarily lowered whenever another audio track (like dialogue) is present. Think of it as having a tiny, invisible audio engineer who listens for speech and instantly turns the music down for you, then turns it back up when the talking stops.
To get a formal definition and see some common use cases, please read the first two sections of the following article.
What is Audio Ducking and How Do You Use it?
This article from Boris FX provides a clear and concise definition of audio ducking and gives examples of when it's most useful.
Please read the sections titled 'What is Audio Ducking?' and 'When to Use Audio Ducking.' These will solidify your understanding of the concept and its application in projects just like the ones you aim to create.
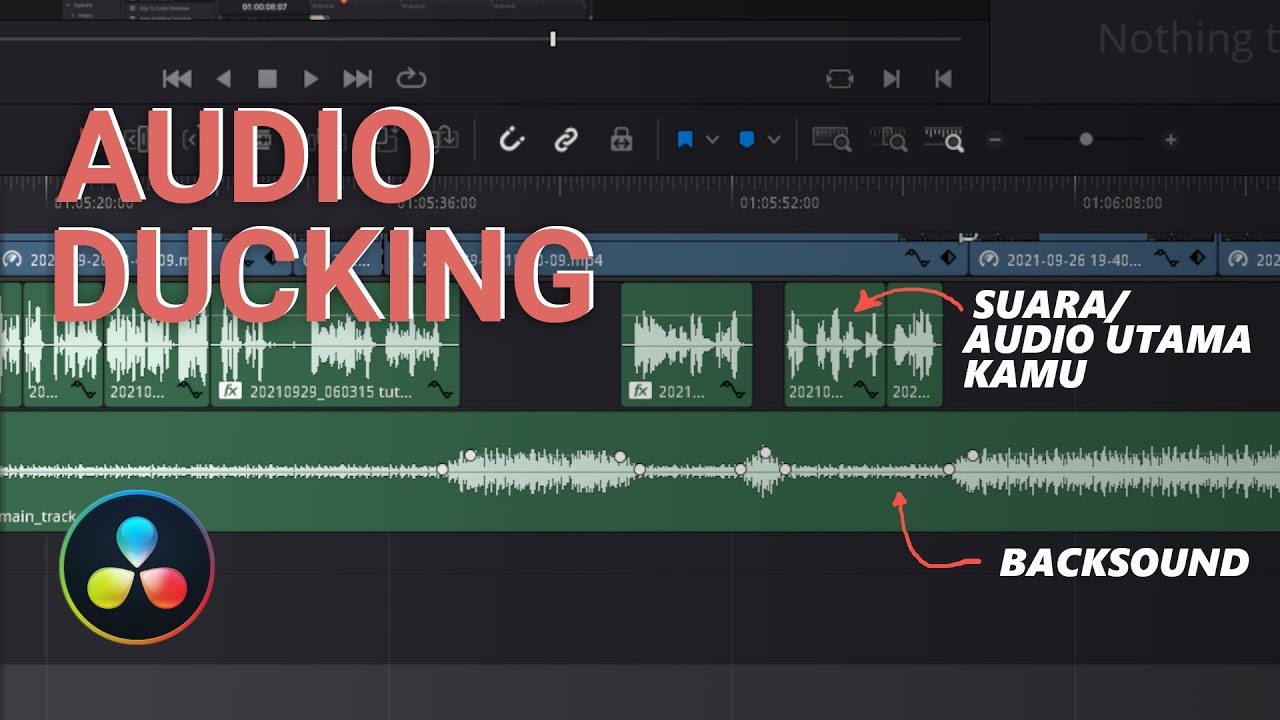
The result of ducking is a clean, professional mix where the dialogue is never fighting for attention. The image below shows what this looks like on an editor's timeline. The background music waveform (bottom track) visibly "ducks" or shrinks whenever there is dialogue on the main audio track (top track).
Since you have some experience with CapCut, you may be pleased to know this feature is also available there. It's often a simple toggle that makes a huge difference.
A Step-by-Step Guide to Importing Audio Into CapCut
This article on importing audio into CapCut has a small but relevant tip that mentions its auto-ducking feature.
Read the final paragraph of this excerpt. Notice how it's presented as a 'game-changer' for handling voiceovers.
This simple feature is built on a classic audio engineering technique called sidechain compression. In sidechaining, the audio level of one track is used to control a processor (in this case, a compressor that reduces volume) on another track. The dialogue track isn't actually mixed with the music; it just acts as a trigger signal.

2. How to Apply and Control Auto-Ducking
While the concept is simple, the real power lies in fine-tuning the effect. Different editing programs have slightly different interfaces, but the core parameters you can control are nearly universal. We'll use Adobe Premiere Pro as our main example, as its Essential Sound panel offers a very clear and powerful implementation of this tool.
This video provides an excellent walkthrough. We will break it down step-by-step.
Mixing dialog & music using ducking in Adobe Premiere Pro CC
This tutorial from VideoRevealed demonstrates the auto-ducking workflow in Adobe Premiere Pro. It clearly shows how to tag clips and adjust the ducking parameters.
Watch from the beginning to 05:19. We will analyze the key steps and parameters shown in the video right after.
Let's break down that process into a standard workflow that you can apply in most advanced editors.
Step 1: Assign Audio Types
As shown from 01:04 in the video, the first step is to tell the software what each audio track is. You select your dialogue clips and tag them as "Dialogue." Then, you select your music clip and tag it as "Music." This categorization is what allows the ducking feature to know which track should "listen" for the other.
Step 2: Enable Ducking and Set Parameters
Once your music track is tagged, you'll see the "Ducking" option appear. As shown at 02:16, you enable it and then configure its settings. This is where you, the editor, take creative control. The main parameters are:
- Duck against: Here you confirm that the music should duck against the "Dialogue" audio type you assigned in Step 1.
- Sensitivity: This determines how loud the dialogue must be to trigger the volume reduction. A higher sensitivity means even quiet speech will cause the music to duck. A lower sensitivity requires louder speech to trigger it, which can be useful if you want the music to remain full during brief pauses or breaths.
- Reduce By (or Duck Amount): This is arguably the most important setting. It's measured in decibels (dB) and controls how much the music volume is lowered. As the video demonstrates at 04:20, a reduction of -18 dB is quite noticeable, while -10 dB is more subtle. The right amount depends entirely on your specific music and dialogue tracks.
- Fades (or Fade Duration): This setting controls how quickly the music volume drops when dialogue starts and how quickly it returns to normal when dialogue ends. A very fast fade can sound abrupt, while a slow fade can sound smooth and more natural. This is usually measured in milliseconds (ms).
Step 3: Generate and Refine
After setting your parameters, you click a button like "Generate Keyframes" (03:35). The software analyzes the timeline and automatically creates all the volume keyframes on your music track for you.
The crucial thing to remember is that this is not a "live" process in most editors. If you move your dialogue clips, the keyframes on the music track won't move with them. You simply need to select the music track and regenerate the keyframes to update the mix, as shown at 04:00.
Test your understanding!
You are editing a short film. In one scene, a character whispers a secret while a dramatic orchestral score plays. You apply auto-ducking with default settings, but the whispering is still hard to hear over the music.
Which two ducking parameters would you adjust first to fix this, and what changes would you make?
Show answer
The two most effective parameters to adjust would be Sensitivity and Reduce By (Duck Amount).
- Increase the Sensitivity: Whispering is very quiet. By increasing the sensitivity, you lower the threshold required to trigger the ducking, ensuring the software recognizes the whisper as dialogue and lowers the music.
- Increase the 'Reduce By' value: An orchestral score can be very powerful. You would need to increase the amount of volume reduction (e.g., from -15 dB to -25 dB) to create a large enough volume difference for the whisper to be clear and audible.
Conclusion
Today you've added a powerful and efficient tool to your audio post-production toolkit. Auto-ducking automates the tedious process of manually adjusting music levels around dialogue, freeing you up to focus on the creative aspects of your mix.
Key Takeaways:
- Audio Ducking is an automated process that lowers the volume of one track (e.g., music) in response to a signal from another track (e.g., dialogue).
- The workflow involves tagging your audio types, enabling ducking on the background track, and adjusting key parameters.
- The three most important parameters are Sensitivity (what triggers the ducking), Reduce By (how much the volume drops), and Fades (how fast the volume changes).
- Auto-ducking generates keyframes that can be regenerated if you change the timing of your edit. It's a massive time-saver, but not always a "set it and forget it" solution. Always listen and refine.
Next Lesson Preview:
We have now completed our deep dive into the world of audio post-production. You've learned to edit music, balance a final mix, and now, to use auto-ducking. We are going to make a significant shift for the next module, "Mastering the Camera: Exposure and Settings." We'll rewind to the very beginning of the filmmaking process: capturing the image. In our next lesson, we will start by learning to identify the key components of a digital camera (sensor, lens, viewfinder). This will be the first step on our journey to understanding how to craft beautiful and cinematic images.