Hello! Welcome to the third lesson in our course.
In our last session, we explored the what of graphic design by identifying its major specializations: branding, print, digital, and UI/UX. We learned that designers create a wide range of materials, from logos and posters to websites and apps.
Today, we shift our focus to the how. This lesson will describe the typical graphic design workflow, a step-by-step process that professionals follow to take a project from an initial idea to a finished product. For your goal of becoming a working designer, understanding this process is like having a map for every project you'll ever undertake. It provides structure, manages expectations, and ensures that the final design successfully solves the client's problem.
By the end of this lesson, you will be able to describe the entire graphic design workflow, from receiving a client brief to delivering the final files.
The Phases of a Design Project
While the exact steps can vary, the professional design process can be broken down into a series of logical phases. We will explore this journey from start to finish. To get a high-level overview, take a look at the infographic below. It visualizes the entire process as a journey.
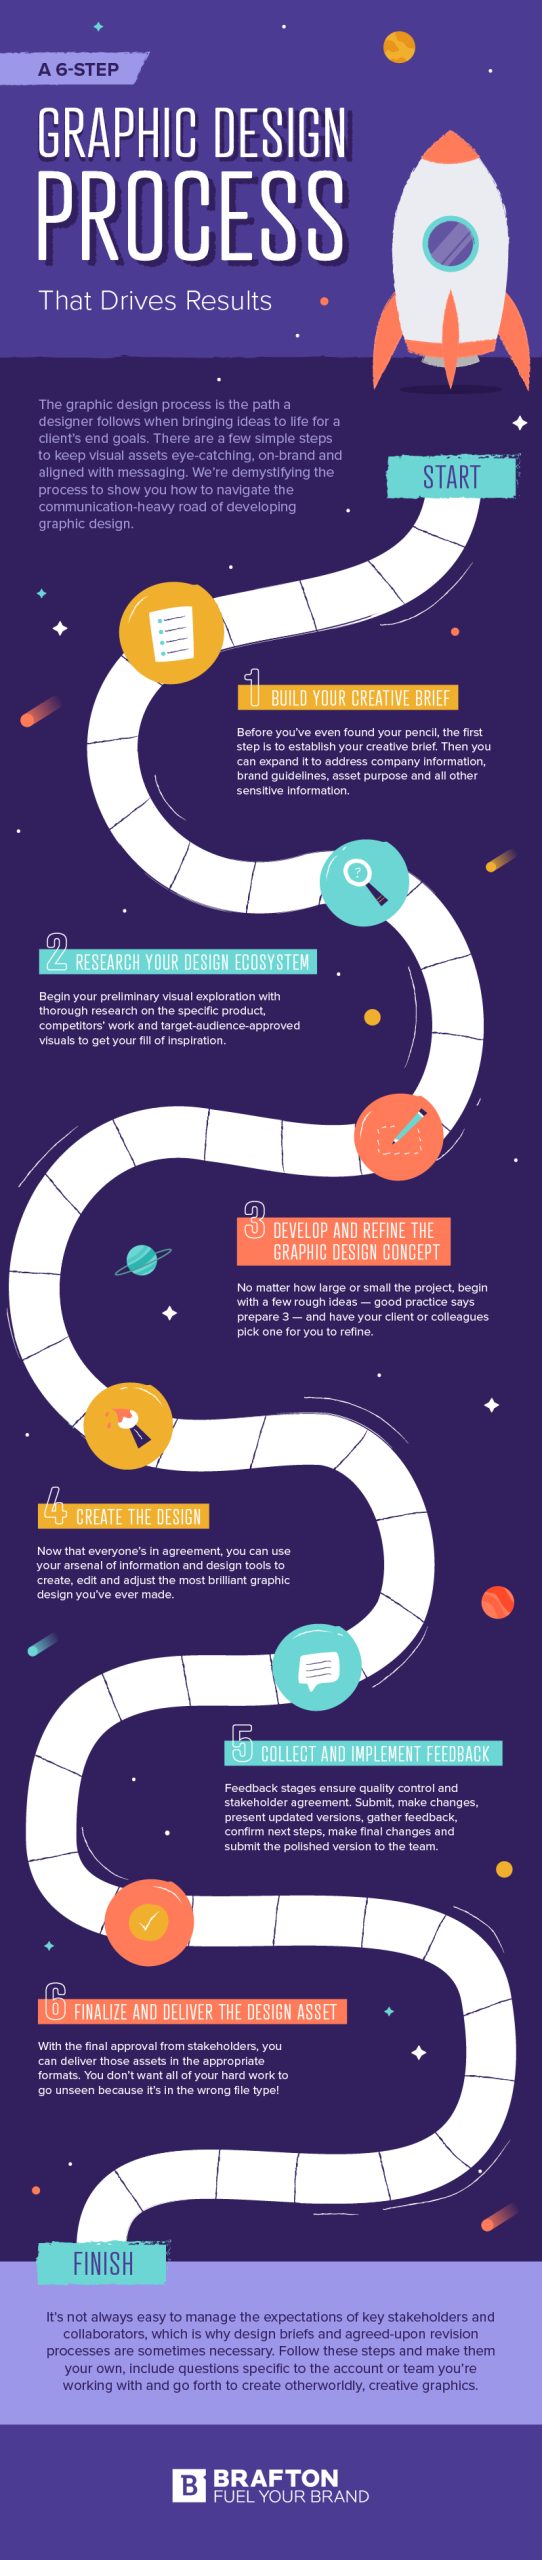
We'll structure our lesson around a similar path, breaking it down into four main phases:
- Discovery & Strategy: Understanding the problem.
- Concept & Ideation: Exploring potential solutions.
- Design & Refinement: Building and improving the solution.
- Delivery & Production: Finalizing and handing off the work.
Let's begin at the starting line.
Phase 1: Discovery & Strategy (The Brief and Research)
Before a single pixel is placed or a line is drawn, a designer's most important job is to listen and understand. Rushing into the design software without a clear plan is the fastest way to create work that misses the mark. This initial phase is all about defining the problem and gathering intelligence.
The Design Brief: Your Project's Foundation
Every design project starts with a design brief. This is a document or set of instructions that outlines the project's goals, requirements, target audience, and constraints. It is the single most important document in the entire process.
To understand why the brief is so critical, please watch the first few minutes of the following video.
The Design Brief (Ep1/4) | Free Example | Design Insights
In this video, 'The Design Brief' by Gareth David Studio, you'll learn what a design brief is and why a thorough brief is essential for preventing delays and achieving a successful outcome.
Watch from the beginning until 03:28. Focus on the explanation of what a brief contains and why it's considered the 'problem' that the design needs to solve.
As the video explained, the brief is your anchor. It ensures that both you and the client are aligned on the project's purpose. If you're ever given a project without a brief, it's your job as a designer to ask the right questions to build one.
Research: Understanding the Landscape
Once you have the brief, it's time to do your homework. The research phase is about gathering information to inform your design decisions. This isn't about looking for designs to copy; it's about understanding the context in which your design will live.
An excellent article from Shillington Education, "The 13 Step Graphic Design Process," breaks this down well.
The 13 Step Graphic Design Process (Simple & Effective)
This section of the article clearly outlines the key areas of market research for a designer.
Please read section 2, 'Market Research'. Pay attention to the three main areas of research mentioned: the client, their competitors, and the target audience.
To see how this works in practice, let's watch a designer apply these first steps to a real-world example: creating packaging for a soap brand.
Complete Graphic Design Course: The BEST Workflows & Processes (MUST KNOW)
This segment from Satori Graphics' 'Complete Graphic Design Course' shows a designer defining the project's objective and researching the audience and industry for a fictional soap brand. It's a perfect example of this first phase in action.
Watch from 00:19 to 03:08. Notice how the designer uses the brief's keywords ('organic', 'high-end') and audience profile (females who value eco-friendly products) to guide their thinking.
Phase 2: Concept & Ideation (From Ideas to Visuals)
With a solid understanding of the problem, the project, and the audience, you can now move into the creative phase. This is where you translate all your research and strategy into tangible visual ideas.
Moodboarding and Brainstorming
The first step is often to brainstorm keywords and create moodboards. A moodboard is a collage of images, colors, textures, and typography that establishes the overall look and feel—or "mood"—of the project. This helps you and the client agree on a visual direction before you invest time in creating detailed designs.
This stage is about exploring possibilities. You might generate word maps, sketch rough ideas (called thumbnailing), and gather inspiration that aligns with the project goals.
Developing Concepts
After brainstorming, you start developing concrete design concepts. A concept is a clear idea that drives the design. It's the "why" behind your visual choices. A strong concept connects everything back to the brief.
Watch the next segment of the Satori Graphics video to see how the designer translates the soap project's keywords into specific visual choices for colors, shapes, and fonts.
Complete Graphic Design Course: The BEST Workflows & Processes (MUST KNOW)
This clip continues the soap packaging example, showing how the research and keywords from the brief are used to make specific, justifiable design decisions.
Watch from 03:08 to 06:23. Pay close attention to the rationale behind each choice. For example, why a low-saturation purple? Why a circular shape? Why a thin sans-serif font? This is where design becomes problem-solving.
Test your understanding!
Imagine you're designing a logo for a new, eco-friendly children's toy company. Based on the workflow so far, what are the first three things you should do?
(A) Start sketching logo ideas in Figma, create a moodboard, research competitors.
(B) Get a design brief, research the toy market and target audience, create moodboards.
(C) Pick a color palette, get a design brief, sketch logos.
Show answer
The correct answer is (B). The process starts with understanding the project through a brief, followed by research into the industry and audience, and then exploring visual directions with moodboards. Starting to design or picking colors before these steps would be premature.
Phase 3: Design & Refinement (The Iterative Loop)
This is where the concepts are brought to life in your design software (which will be Figma for this course). This phase is a cycle: design, present, get feedback, and revise.
-
Visual Exploration: You take your strongest concept and start building it out digitally. You experiment with layout, typography, and imagery until you have a polished version ready to show the client.
-
Presentation & Feedback: You present your work to the client, explaining how your design decisions solve the problems outlined in the brief. This is a critical skill. You're not just showing a picture; you're presenting a solution. The client will then provide feedback.
-
Revisions: Almost no design is perfect on the first try. The revision stage is where you take the client's feedback and make adjustments. This is a normal and healthy part of the process. The key is to be open to constructive criticism while also knowing when to explain why a certain change might not align with the project goals. It's a collaborative dialogue. A good brief and contract will typically define how many rounds of revisions are included in the project scope.
-
Final Checks: Before sending the final version, a professional designer does a thorough check for any errors—spelling mistakes, alignment issues, etc. For print projects, this might involve printing a test copy.
This iterative process continues until the client is happy and gives their final approval.
Phase 4: Delivery & Production
You're at the finish line! The design has been approved, and it's time to hand it over.
-
Final Approval: Get written confirmation from the client that the design is approved. This is crucial as it formally concludes the design phase.
-
Final Delivery: You'll package all the necessary files and send them to the client. This package might include:
- Web-ready files: JPGs, PNGs, SVGs for use on websites or social media.
- Print-ready files: High-resolution PDFs with printer's marks (like bleed and crop marks, which we'll cover later in the course).
- Source files: The original, editable design files (e.g., your Figma file). Whether you provide these depends on your contract.
-
Production: This final step is often out of the designer's hands. It's where the design is made real. For a print design, it goes to a printing company. For a website design, it goes to a developer to be coded.
For a fantastic, practical demonstration of this entire process, from client discussion to final concepts, I highly recommend watching this detailed walkthrough of a real logo design project.
Complete Graphic Design Course: The BEST Workflows & Processes (MUST KNOW)
This final video from Satori Graphics is a deep dive into a complete logo design project. It puts all the steps we've discussed today into a single, cohesive narrative.
Watch from 21:31 to 30:22. This is a longer segment, but it's incredibly valuable. You'll see the designer discuss the project with the client, generate keywords, conduct research, build concepts from those keywords, and refine them into final logo options.
Conclusion
Congratulations on completing this lesson! You now have a comprehensive understanding of the professional graphic design workflow. This structured process turns a creative service into a reliable and effective business practice.
Here are the key takeaways:
- The workflow is a structured process: It moves from understanding the problem to delivering a solution in distinct, logical phases.
- It starts with the Brief: This is the foundation of any successful project, defining goals and expectations.
- Research informs creativity: Decisions on color, typography, and style are not random; they are based on research into the client, competitors, and audience.
- Design is an iterative loop: The process of designing, presenting, getting feedback, and revising is central to refining a concept into a final product.
- Final delivery is a technical step: Preparing and packaging the correct files for web or print is the final professional touch.
In our next lesson, we will finally jump into the practical side of things. Now that you have the "map" of the design process, it's time to get our primary tool ready. We will set up your free Figma account and get familiar with the workspace layout. This is where your hands-on journey to becoming a graphic designer truly begins