Hello! Welcome to the fourth lesson in your graphic design journey.
In our last lesson, we mapped out the professional graphic design workflow, from understanding the client's brief to delivering the final product. We learned that having a structured process is key to creating effective design solutions.
Today, we take our first major practical step. As you've chosen to learn with free, professional-grade tools, we will focus on getting you set up with Figma. It is a powerful, browser-based design tool used by freelancers and large companies alike, and it will be the "digital canvas" for all the projects we'll build in this course.
By the end of this lesson, you will be able to set up a free Figma account and navigate its workspace layout. This foundational skill will prepare you to start designing in our very next session.
Part 1: Why Figma and Setting Up Your Account
Before we jump in, what makes Figma a great choice? It's a collaborative design tool that runs in your web browser, meaning you don't need a powerful computer or a specific operating system to use it. All your work is saved to the cloud automatically, and the free "Starter" plan is incredibly generous, giving you everything you need to complete this course and build a professional portfolio.
Now, let's get your account set up. The process is straightforward.

For a guided walkthrough of the signup process, the following short video from Figma's official channel is perfect.
Set up your Figma account: Figma Design for beginners [2 of 13]
Watch this brief clip from Figma's official 'Figma Design for beginners' series. It will walk you through the exact steps to create your free account.
Watch from the beginning until 00:45. Follow along on your own computer by going to figma.com/signup to create your account.
During the setup, Figma will ask you a few questions about your work. Feel free to answer them as you see fit (e.g., "Freelancer"). When asked to choose a plan, select Starter, which is the free option.
Part 2: The Figma File Browser - Your Dashboard
Once you've signed up, you'll land in the File Browser. Think of this as your main dashboard or home screen. It's where you'll organize all your projects and files before you even start designing. Understanding how to navigate this space is key to keeping your work tidy.
This next video provides a clear and well-paced tour of the File Browser.
In this video, 'Figma Tutorial for Beginners' by Kevin Stratvert, you'll get a detailed tour of the File Browser. He explains the purpose of each section in a way that's easy for beginners to understand.
Watch from 03:47 to 07:53. Pay close attention to the distinction he makes between 'Drafts' and 'Teams'/'Projects'. This is a fundamental concept for organizing your work.
To summarize the key areas you just saw in the video:
- Recents: Shows the files you've recently opened, for quick access.
- Drafts: This is your personal sandbox. Files here are only editable by you. It’s the perfect place to experiment with ideas, work on tutorials (like the ones in this course!), and sketch things out before you're ready to share them. You can have unlimited files in your drafts.
- Teams & Projects: When you need to collaborate, you can create a Team. Within a team, you organize files into Projects. On the free plan, you have some limitations, but for now, your Drafts folder is all you'll need.
Before we move on, it's good practice to set up your profile. This is especially important as you start thinking about freelance work, as it's how clients and collaborators will identify you.
Set up your Figma account: Figma Design for beginners [2 of 13]
This short clip from the Figma video shows you how to quickly update your profile name and add a picture.
Watch from 02:40 to 03:05. Take a moment to add your name and a profile picture in your own Figma account via the settings menu.
Part 3: The Figma Editor - Your Workspace
Now that you're familiar with the File Browser, let's create your first file and explore the Editor. This is the main workspace where all the design magic happens.
From your Drafts folder, click the "+ Design file" button in the top-right corner. This will open a new, untitled file.
Welcome to the Figma Editor! At first, it might look a bit intimidating, but the layout is very logical. The image below provides a fantastic overview of the main areas.
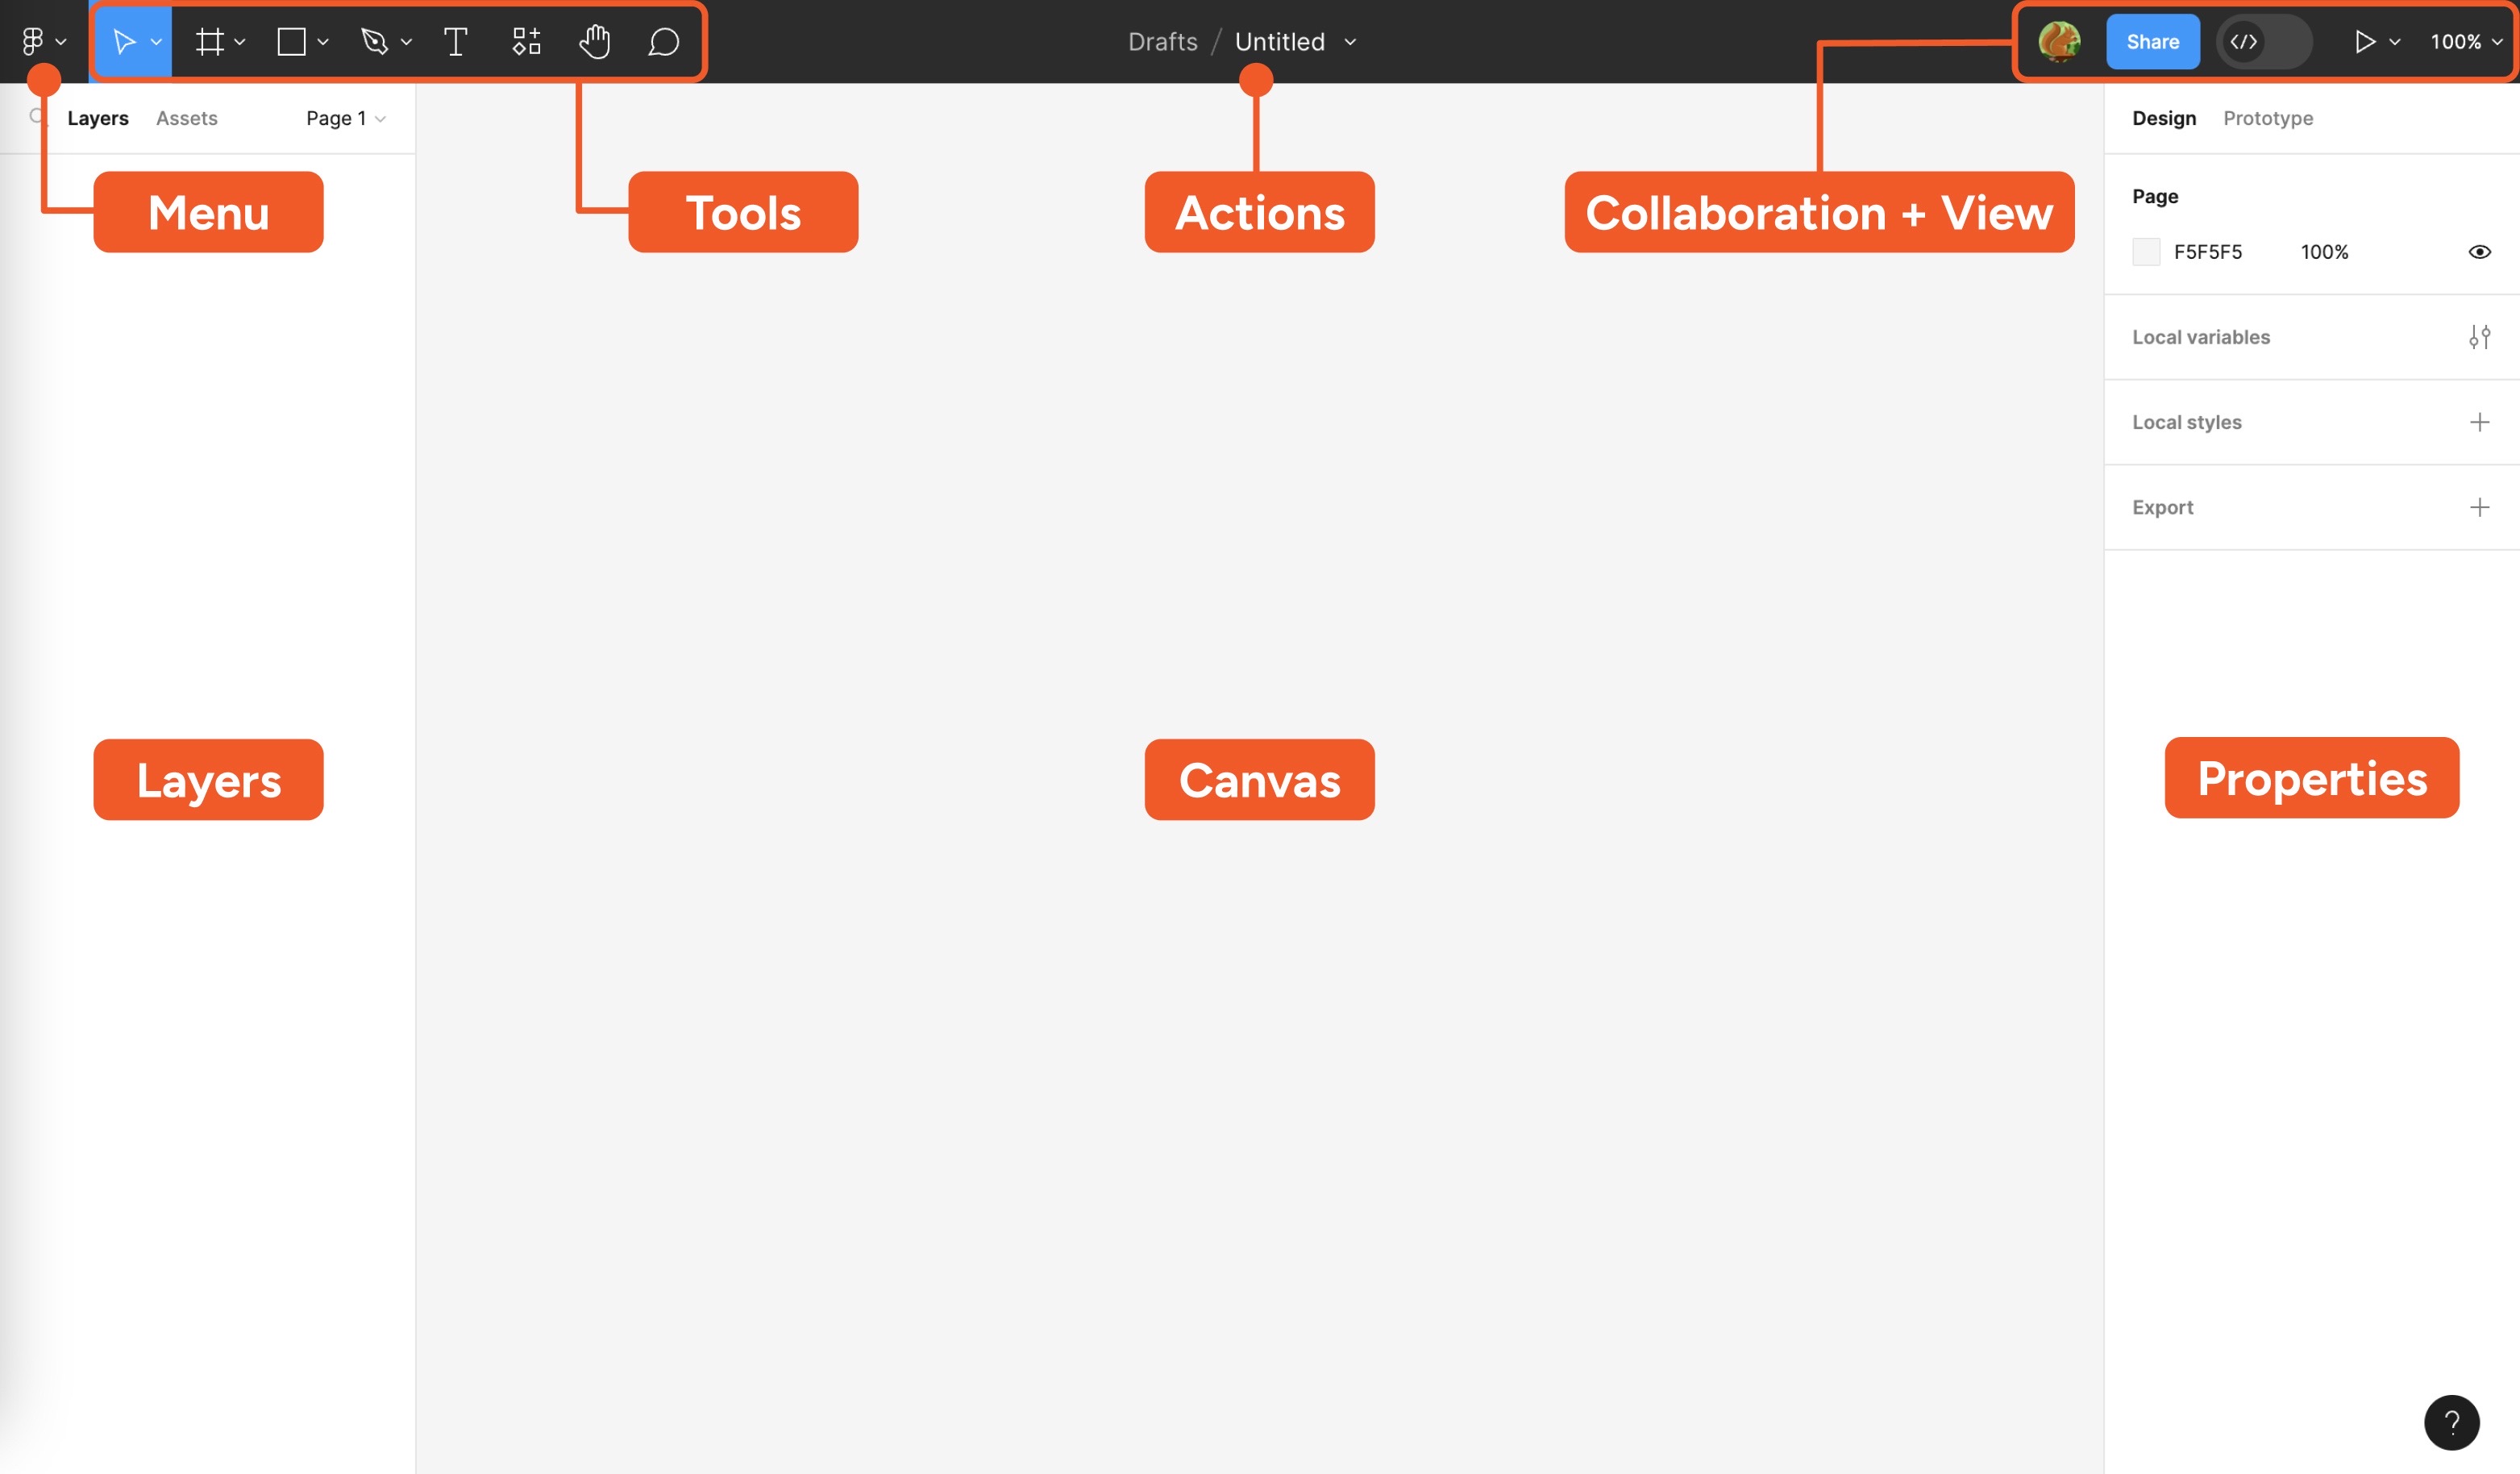
Let's break down each of these sections. For a detailed written explanation of each part, you can refer to the following resource.
Figma 101: Introduction to Figma
This article, 'Figma 101' from DesignLab, provides clear, concise descriptions for each part of the editor interface. It's a great reference to have open as you explore.
Read section 2, 'Take a look around the Figma interface'. Use the labeled image above to help you locate each area as you read about it.
Here's a quick summary of the essential areas you need to know:
-
The Canvas (Center): This is your main design area. It’s an infinite space where you will create all your visuals.
-
The Toolbar (Top): This bar holds your primary tools. From left to right, you'll see:
- The Main Menu (Figma logo)
- Move and Scale tools
- Frame and Slice tools
- Shape tools (Rectangle, Line, Ellipse, etc.)
- Pen and Pencil tools
- Text tool
- Comment tool
We will start using these tools in the very next lesson!
-
The Layers Panel (Left Sidebar): Every object you create on the canvas—a shape, a piece of text, an image—will appear as a layer in this panel. This is how you organize, select, and manage the elements of your design.
-
The Properties Panel (Right Sidebar): This panel is context-sensitive. When you select an object on the canvas, this panel will show you all the properties you can change for that object, such as its color, size, position, and effects like shadows. If nothing is selected, it shows properties for the canvas itself.
-
File Name & Collaboration (Center and Right of Toolbar): In the middle of the toolbar, you can click "Untitled" to rename your file. Let's do that now: name your file "My First Design File". To the far right, you'll see options to share your file and see who else is currently viewing it.
Test your understanding!
You've created a blue square on your canvas. Now you want to change its color to red. Which part of the Figma editor would you use to do this?
A) The Toolbar
B) The Layers Panel
C) The Properties Panel
Show answer
The correct answer is (C) The Properties Panel. After selecting the square, its properties (including its color, or "Fill") would appear in the right-hand sidebar, allowing you to change it.
Spend a few minutes clicking around in your new file. Select the different tools in the toolbar (but don't worry about using them yet). Click on the main menu to see what's inside. Get a feel for the space.
Conclusion
Excellent work! You've successfully taken the first practical step in your design education. You now have the main tool of your new trade set up and you know your way around its fundamental layout.
Let's recap the key points:
- You have created a free Figma account and know how to log in.
- You understand the purpose of the File Browser for organizing your work, especially the Drafts section for personal projects.
- You can identify the four main areas of the Figma Editor: the Toolbar, the Layers Panel, the Canvas, and the Properties Panel.
- You know how to create a new file and give it a name.
You are now perfectly positioned to start creating. In our next lesson, we will move from navigating the workspace to actively using it. You will learn how to create and manipulate basic shapes, frames, and text elements in Figma.