Welcome to the fourth lesson in your practical database course. In the previous two lessons, you successfully installed and configured a complete Oracle environment, culminating in the creation of a dedicated user account for our coursework. This gives you a solid foundation in the world of relational databases.
Today, we shift gears from the structured world of relational tables to the flexible realm of document databases. As we discussed in our first lesson, MongoDB is a leading NoSQL database that stores data in JSON-like documents. This lesson will guide you through installing the MongoDB Community Server and its command-line interface, the MongoDB Shell. By the end of our session, you will have a fully operational MongoDB instance on your machine, ready for the data operations we will explore in a later module.
1. The MongoDB Installation Process
The installation is straightforward and consists of two key components that are now distributed separately:
- MongoDB Community Server: This is the actual database engine (
mongod) that stores and manages your data. We will install this as a Windows service, meaning it will run automatically in the background. - MongoDB Shell (
mongosh): This is the command-line client you will use to interact with the database. It is the primary tool for administrators and developers to issue commands, run scripts, and manage the database.
The official MongoDB documentation provides the most accurate and up-to-date instructions. We will use it as our primary guide.
Install MongoDB Community Edition on Windows - Database Manual v7.0 - MongoDB Docs
This official guide from the MongoDB documentation covers the entire installation process for Windows.
First, read the instructions for downloading and running the installer. Focus on these sections: Download the installer: Follow the link to the MongoDB Download Center and ensure you select the "MSI" package for your version. Follow the MongoDB installer wizard: As you run the installer, pay close attention to two key steps: Choose Setup Type: Select the Complete option. This installs all necessary components in the default locations. Service Configuration: This is the most important step. Ensure that "Install MongoD as a Service" is checked. This configures MongoDB to run automatically. You can leave all other options in this section (service name, data/log directories) at their default values. It's also fine to leave "Install MongoDB Compass" checked; this is a graphical tool that we may explore later.
For a visual walkthrough that perfectly complements the official documentation, the following video demonstrates the entire process. Watching this will help you confidently navigate the installer prompts.
How to install MongoDB 8 on Windows 10/ Windows 11
This video from ProgrammingKnowledge provides a clear, step-by-step demonstration of the installation.
Watch the first part of the video, which covers the server installation. Downloading the Installer: The host shows how to navigate the MongoDB website to find and download the correct Community Server MSI file. Running the Installer: Pay close attention as the host walks through the setup wizard. Note how they select the Complete setup and explain the options on the Service Configuration screen. This will reinforce what you read in the documentation.
2. Installing the MongoDB Shell (mongosh)
As mentioned in the installation wizard, the interactive shell, mongosh, must be installed separately. The installer even provides a link to its download page. This tool is essential for completing today's learning outcome.
How to install MongoDB 8 on Windows 10/ Windows 11
Let's continue with the same video, as it seamlessly transitions to installing the shell.
Watch the next segment, which is dedicated to mongosh. Downloading the Shell: Here, the presenter revisits the MongoDB website to download the MSI installer for the MongoDB Shell. Installing the Shell: The shell's installation is much simpler. You can accept the default options and click through the wizard. The MSI installer will automatically add mongosh to your system's PATH, making it accessible from any command prompt.
3. Verifying the Installation
With both the server and the shell installed, the final step is to verify that they are working together correctly. We'll do this by opening a new command prompt and using mongosh to connect to our local server instance.
- Open the Windows Start Menu and search for
cmdto launch a new Command Prompt window. It's important to open a new window so it recognizes the changes made to your system's PATH during themongoshinstallation. - In the command prompt, simply type the following command and press Enter:
mongosh
If the installation was successful, the shell will connect to the server. Your command prompt will change to show the mongosh prompt (>), preceded by connection information and server details. It should look very similar to the image below.
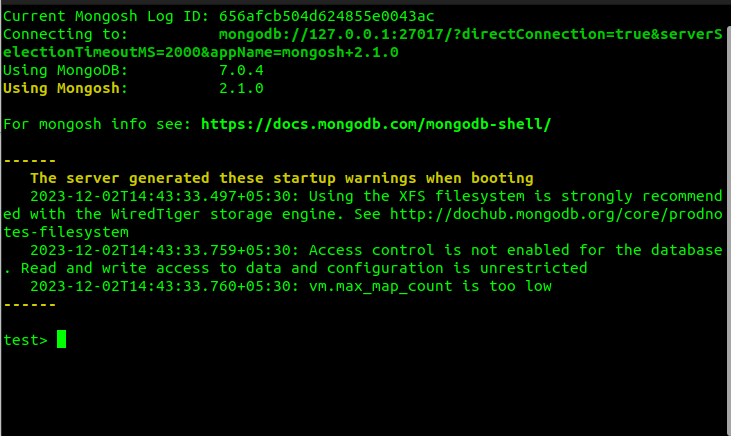
You may see some startup warnings, as shown in the image. This is normal for a default installation. The key indicator of success is the test> prompt, which means you are connected and ready to issue commands.
To perform one final check, let's ask the database to list all the databases it currently holds. At the test> prompt, type the following command and press Enter:
show dbs
The server should respond with a list of default databases, such as admin, config, and local.
The final part of the video demonstrates this exact verification process.
How to install MongoDB 8 on Windows 10/ Windows 11
The video concludes by showing the verification steps.
Watch the final segment from launching the shell. You will see the host open the command prompt, run the mongosh command, and then use show dbs to confirm the connection is live and operational.
Conclusion
Congratulations! You have now successfully installed MongoDB, the second of the three database systems in this course. You have a solid, working environment that we will build upon in future lessons.
Let's recap the key steps you've completed:
- You installed the MongoDB Community Server as a Windows service, ensuring it will be running whenever your computer is on.
- You installed the separate MongoDB Shell (
mongosh), the essential command-line tool for interaction. - You verified the entire setup by connecting to the server with
mongoshand running a basic command to list databases.
You now have both a leading relational database (Oracle) and a leading document database (MongoDB) installed. In our next lesson, we will complete our installation trifecta by setting up Neo4j, a powerful graph database. This will finalize the setup phase of our course and prepare you for diving into data definition and manipulation across all three platforms.