Welcome to the final lesson of our first module. Over the past few sessions, you've successfully set up both a relational database environment with Oracle and a document database with MongoDB. Today, we complete this foundational trilogy by turning our attention to the world of graph databases.
This lesson will guide you through installing Neo4j Desktop, the primary tool for developing with the Neo4j graph database. By the end of our session, you will have a fully functional local Neo4j database instance running on your machine. This completes the installation phase of our course and equips you with all the necessary environments to start exploring data manipulation in our upcoming modules.
1. Understanding and Installing Neo4j Desktop
Neo4j is the most popular graph database, designed to store and navigate data as a network of nodes and relationships. This model is exceptionally powerful for managing complex, connected data, such as social networks, recommendation engines, or network security analysis.
Neo4j Desktop is an integrated local development environment that bundles the database server, a management console for your projects, and the Neo4j Browser—a web-based interface for executing queries and visualizing your graph data.
Our first step is to download and install the application.
The official Neo4j documentation is the best place to start. It provides the direct download link and outlines the process for different operating systems.
On this page, locate the section titled "Download and install". Read the instructions relevant to your operating system to understand the process. The most important step here is to follow the link to the Deployment Center to get the installer.
The installation process for Neo4j requires you to obtain a free developer activation key. The following video provides a clear walkthrough of the entire process on a Windows machine, from registering for the key to running the installer.
Neo4j (Graph Database) Crash Course
This segment from the "Neo4j (Graph Database) Crash Course" by Laiture will guide you through the download and activation process.
Please watch the section from downloading and installing. The presenter covers: Navigating the download page. Filling in the form to receive your activation key. Crucially, copying and saving this key, as you will need it to activate the software. Running the installer and using the key to complete the setup.
2. Creating a Local Database Instance
Once Neo4j Desktop is installed and activated, you'll be greeted with the main dashboard. The application organizes work into "Projects." Within each project, you can create one or more database management systems (DBMS). For our purposes, we will create a single project and a single local DBMS instance within it.
The following article provides a well-illustrated guide to the Neo4j Desktop interface.
Getting started with Graph database using Neo4j - DEV Community
This DEV Community article contains helpful screenshots that map directly to the steps you'll be taking.
Please review the steps under the heading "Create new project". Focus on the sequence of actions illustrated in the screenshots, from creating the project to adding and starting the local DBMS. This will familiarize you with the user interface.
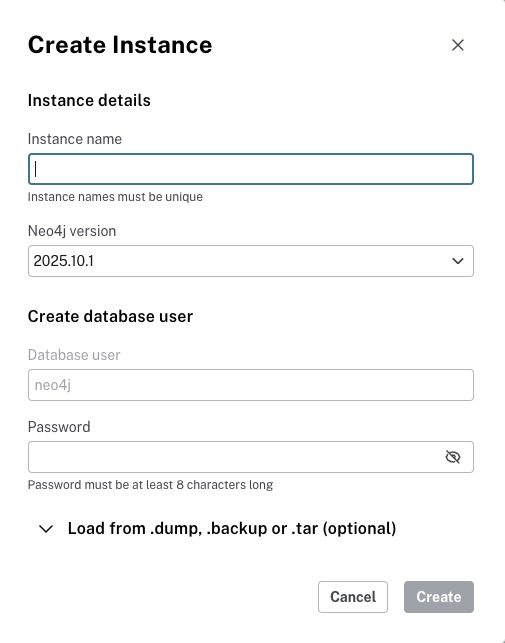
Now, let's walk through this process with a video guide. We will create a new project and then add our first local database to it. This involves naming the database and setting a password—be sure to remember this password, as you'll need it to connect.
Neo4j (Graph Database) Crash Course
Let's continue with the same video. The presenter will now demonstrate how to create a fresh project and a new database instance.
Watch the segment on creating a project and DBMS. Follow along to: Create a new, empty project. Click "Add" and select "Local DBMS". Provide a name and a password for your database instance. Click "Create".
3. Starting the Instance and Verifying Access
With your database instance created, the final step is to start it up and verify that you can connect to it. Within Neo4j Desktop, you'll see a "Start" button next to your new DBMS. Clicking this will boot up the database server. Once it's active, the "Open" button will become available, which launches the Neo4j Browser.
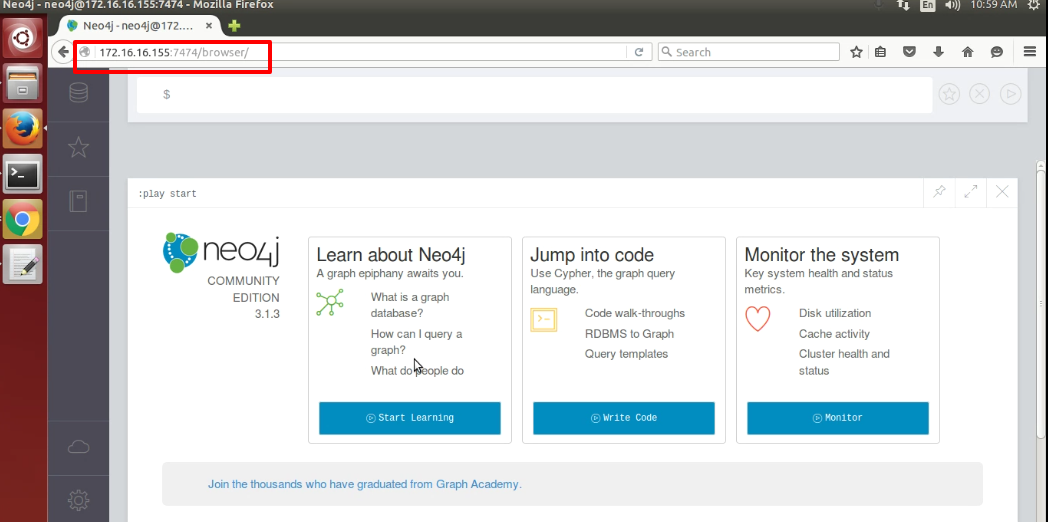
The video below shows this final sequence.
Neo4j (Graph Database) Crash Course
This final clip demonstrates how to launch and connect to your database.
Watch the section on starting the instance and opening the browser. The video will show you how to start the database and open the Neo4j Browser application.
Once the Neo4j Browser opens in a new window or tab, you are connected and ready to interact with the database. To confirm everything is working correctly, you can use the query input bar at the top of the screen. Type the following system command and press Enter or click the "play" icon:
:sysinfo
This command doesn't query any data but instead asks the database for system information. If the installation was successful, it will return a table of details about your database instance, such as its name, version, and store location. This confirms that your Neo4j environment is fully operational.
Conclusion
Excellent work! You have now successfully installed Neo4j Desktop, created your first graph database instance, and verified its accessibility. This concludes the first module of our course, focused on installation and configuration.
Let's quickly review what you've accomplished:
- You installed Neo4j Desktop, the all-in-one development tool for Neo4j.
- You learned about the activation key process required for the developer license.
- You created a new project and a local database instance with a unique name and password.
- You started the database and verified your connection using the Neo4j Browser.
You are now equipped with working installations of Oracle (relational), MongoDB (document), and Neo4j (graph). With our environments fully prepared, we are ready to move from setup to practical application.
In our next lesson, we will begin Module 2, "Oracle: Data Definition and Structure." You will start writing your first SQL statements to create tables and define the rules that govern them, putting your new Oracle installation to immediate use.