Welcome to your third lesson. In our last session, you successfully installed the Oracle Database and the SQL Developer client, setting up the complete environment we need. You should now have the master password for the administrative accounts (SYS, SYSTEM) safely stored.
Today, we will bring that environment to life. This lesson is all about performing the initial configuration of your Oracle database. We'll start by connecting to the database as an administrator, and then, following security best practices, we will create a dedicated, non-administrative user for our coursework. By the end of this lesson, you will have created this new user, granted it the necessary permissions, and verified that you can connect to the database with it. This process is a fundamental first step in any database development or administration workflow.
1. Understanding Your Oracle Environment: CDB and PDB
Before we connect, it's crucial to understand a key concept in modern Oracle architecture (versions 12c and newer, including the 21c you installed): the multitenant architecture.
An Oracle database instance now consists of:
- A Container Database (CDB): This is the root container. Think of it as the main administrative hub that manages the overall instance. The
SYSandSYSTEMusers exist here. - One or more Pluggable Databases (PDBs): These are the individual databases that "plug into" the container. A PDB is where your application data, tables, and users will reside. For development, all our work will happen inside a PDB.
Oracle 21c Express Edition (XE) creates a CDB and one PDB by default. The default PDB is typically named XEPDB1.
This distinction is vital. Creating a user in the wrong place or connecting to the wrong database are the most common sources of errors for beginners. We will be creating a local user inside the XEPDB1 pluggable database.
The following video provides an excellent visual explanation of this concept.
How to Create a New User in Oracle Database
The video "How to Create a New User in Oracle Database" from Database Star clearly explains the difference between container and pluggable databases.
Watch the segment from the beginning. Focus on understanding the distinction between a "common user" (in the CDB) and a "local user" (in a PDB). We want to create a local user.
2. Connecting as an Administrator (SYS)
Our first task is to connect to the database with administrative rights to create our new user. We will use the SYS account for this.
-
Launch Oracle SQL Developer.
-
In the "Connections" panel on the left, click the green plus icon to open the "New / Select Database Connection" dialog.
-
Fill in the connection details as follows. This tells SQL Developer to connect to your local pluggable database with administrative privileges.
- Connection Name:
sys_admin_xepdb1(This is just a label for you) - Username:
sys - Password: The password you set during the Oracle Database installation.
- Role: Select
SYSDBAfrom the dropdown. This is crucial for admin tasks. - Connection Type:
Basic - Hostname:
localhost - Port:
1521(This is the default listener port) - Service name:
xepdb1(This directs your connection to the pluggable database)
- Connection Name:
Your dialog should look similar to this, though some details may vary slightly.
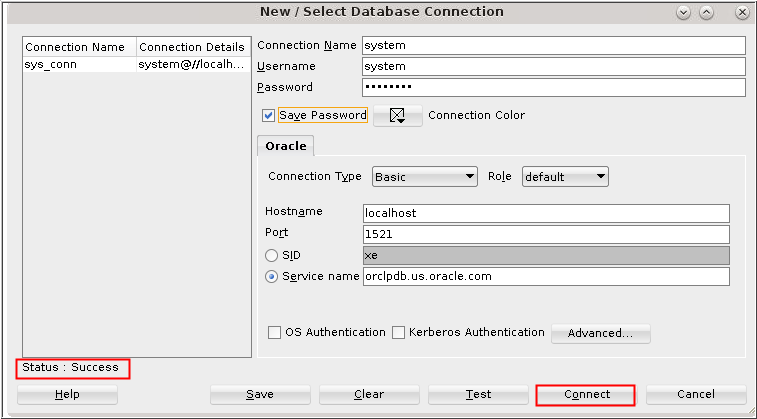
- Click Test. You should see a "Status: Success" message in the bottom-left corner.
- If the test is successful, click Save, and then click Connect. A new worksheet will open, linked to your
sys_admin_xepdb1connection.
You are now connected to the database as the super-administrator.
3. Creating a New User for Coursework
Using the SYS account for everyday development is a security risk. It has unlimited power and can damage the database if used incorrectly. We will follow the Principle of Least Privilege—a core concept in IT security—by creating a new user with only the permissions it needs to do its job.
We'll use SQL Developer's graphical interface to create the user, which is a convenient way to perform this task.
Create A New User and Connection in SQL Developer - Qurosity | Learning Never Stops
This article from Qurosity provides a step-by-step walkthrough of the user creation process. We will adapt its steps slightly for our specific needs.
In the article, follow the steps in the section "Create a New User and Connection". Specifically: Locate "Other Users": In the SQL Developer connections panel, expand your new sys_admin_xepdb1 connection, find "Other Users," right-click it, and select "Create User." Enter User Info: In the dialog, provide a User Name (e.g., course_user) and a secure Password. Write this password down! Assign Roles: Go to the "Granted Roles" tab. The article suggests granting DBA, which is far too powerful. Instead, grant only CONNECT and RESOURCE. CONNECT: Allows the user to log in to the database. RESOURCE: Allows the user to create objects like tables, sequences, and procedures. Set Quota: Go to the "Quotas" tab. For the USERS tablespace, set the Quota to Unlimited. This allows the user to store data in the default user data location. After clicking "Apply," SQL Developer will generate and execute the necessary SQL commands.
The SQL generated by the wizard will look something like this. Seeing the underlying code is a great way to understand what the graphical interface is doing for you.
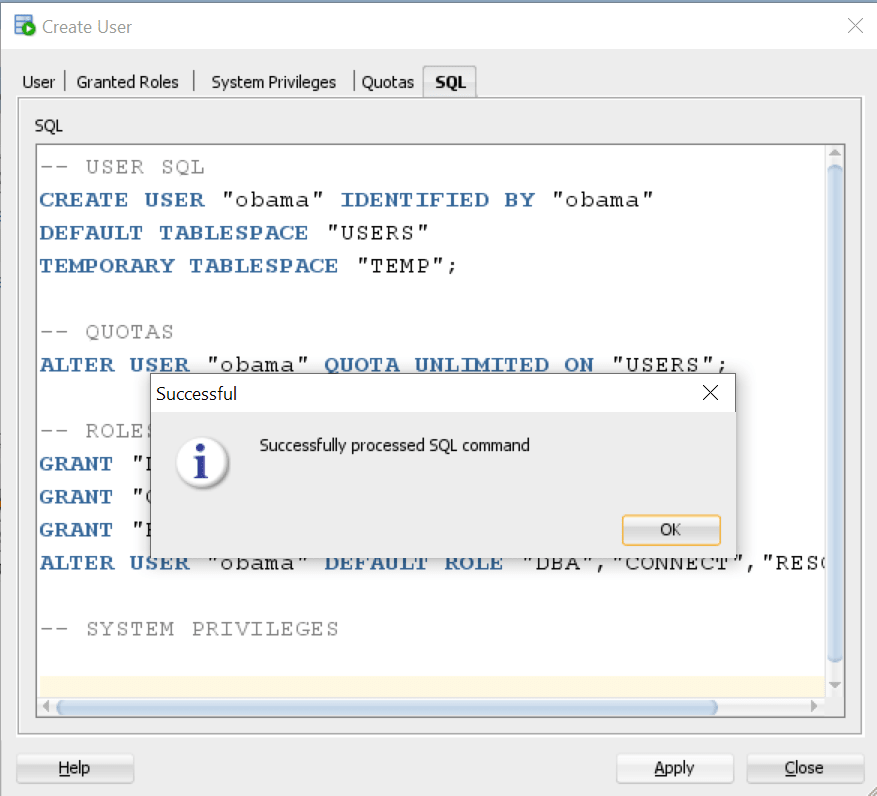
For a more in-depth look at the CREATE USER and GRANT commands, the Oracle SQL blog provides excellent reference material.
How to Create Users, Grant Them Privileges, and Remove ...
This official Oracle blog post explains the SQL commands for user management.
Read the sections on the basic create user command and granting privileges. This will solidify your understanding of the CREATE USER and GRANT statements you just used via the GUI.
4. Verifying the New User Connection
The final step is to prove that our new user works. To do this, we will create a new, separate connection for course_user.
- Click the green plus icon again to open the "New / Select Database Connection" dialog.
- Fill in the details for your new user:
- Connection Name:
course_user_conn - Username:
course_user(or whatever you named it) - Password: The password you just created for this user.
- Role: Leave this as
default. A standard user does not need a special role likeSYSDBAto connect. - Service name:
xepdb1(the same PDB as before)
- Connection Name:
- Click Test. You should see "Status: Success". This confirms your user was created correctly and has the
CONNECTprivilege. - Click Save, and then Connect.
A new worksheet will open for course_user_conn. To perform a final check, run a simple query that asks the database for the current date.
Type the following into the new worksheet and press the "Run Statement" button (a green arrow).
SELECT SYSDATE FROM DUAL;
You should see the current date and time appear in the "Query Result" panel below.
Conclusion
Excellent work. You have now completed the fundamental configuration of your Oracle Database instance. This is a critical milestone that bridges the gap between a raw installation and a usable development environment.
Let's review what you've accomplished:
- You learned the difference between a Container Database (CDB) and a Pluggable Database (PDB) and connected to your PDB as an administrator.
- Following security best practices, you created a dedicated local user (
course_user) for your development work. - You granted this user the appropriate roles (
CONNECT,RESOURCE) and storage quotas needed to perform its tasks. - You successfully created a new connection for this user and verified its functionality with a test query.
You are now fully prepared to start building things. In our next lesson, we will use this course_user connection to begin working with Data Definition Language (DDL). You will learn how to write the SQL statements necessary to create your first database tables with proper data types and constraints.