Hello! Welcome back to your CCNP ENCOR course.
In our last lesson, we examined the mechanics of wireless roaming, distinguishing between Layer 2 and Layer 3 mobility. We saw how the Cisco wireless architecture uses mobility groups and CAPWAP tunneling to ensure clients maintain seamless connectivity as they move across the network.
Today, we transition from theory to practice. Our learning outcome is to configure a wireless LAN controller and access points for secure client connectivity. We will apply the architectural concepts we've discussed to build a functional and secure Wireless LAN (WLAN) using the modern Cisco Catalyst 9800 series controller.
This lesson will focus on the Catalyst 9800's "Profiles and Tags" configuration model. This is a significant evolution from the legacy AireOS controllers you may have worked with in the past. Understanding this modular approach is fundamental for managing current-generation Cisco wireless networks and is a key topic for the ENCOR exam.
The New Paradigm: Profiles and Tags on Catalyst 9800
Before we dive into configuration, it's important to understand why Cisco moved to this new model. The legacy AireOS, while powerful, had a monolithic configuration that could be difficult to scale and automate. The Catalyst 9800, running on IOS-XE, introduces a modular, object-oriented approach that provides greater flexibility and reusability.
Cisco 9800 Rockstar Live Profiles & Tags - FREE Lesson Cisco 9800 Rockstar course @WiFiTraining
To start, let's get an expert's perspective on the shift from AireOS to the IOS-XE-based Catalyst 9800. This video from the "Cisco 9800 Rockstar" course explains the rationale behind the new architecture and introduces the core concepts we'll be working with.
Watch the video from 05:47 to 25:24. The first part (until 15:18) covers the "why"—the limitations of AireOS and the power of the new IOS-XE platform. The second part (from 19:29) introduces the central idea of modular profiles and tags, mapping old AireOS concepts to their new counterparts.
As the video explained, the new model separates the "what" (the services) from the "where" (the APs). This is achieved through two main constructs: Profiles and Tags.

This diagram from the article 'Cisco WLC C9800 - WLAN configuration using the new model' illustrates the relationship between Profiles, which define configurations, and Tags, which apply those configurations to Access Points.
Let's break down the key components based on this model.
1. Profiles: The Building Blocks
Profiles are containers for specific configuration settings. Think of them as templates for different aspects of your wireless service.
- WLAN Profile: This is where you define the wireless-specific parameters.
- What it does: Defines the SSID, security settings (WPA2/WPA3, 802.1X, PSK), and Layer 2 radio policies.
- AireOS equivalent: A portion of the settings under the "WLANs" tab.
- Policy Profile: This profile dictates how client traffic is treated once it hits the wired network.
- What it does: Defines the client VLAN, Quality of Service (QoS) policies, session timeouts, and switching mode (e.g., Central Switching).
- AireOS equivalent: Another portion of the settings under the "WLANs" tab. The key insight is that AireOS combined SSID and network policy, whereas the C9800 separates them for reusability.
- AP Join Profile: Defines settings related to the AP's connection to the controller.
- What it does: Sets CAPWAP timers, High Availability (HA) parameters, and AP management access (SSH, Telnet).
- Flex Profile: Used specifically for APs in FlexConnect mode.
- What it does: Defines local switching policies, VLAN mappings, and local authentication at a remote site.
- RF Profile: Governs radio behavior.
- What it does: Configures Radio Resource Management (RRM) settings like Transmit Power Control (TPC) and Dynamic Channel Assignment (DCA).
2. Tags: Applying the Configuration
Tags are the mechanism used to apply your carefully crafted profiles to the access points. Each AP is assigned a set of three tags.
- Policy Tag: This is the most important tag for deploying a WLAN. It creates the link between a WLAN Profile and a Policy Profile. This single tag tells an AP: "Broadcast this SSID, and when clients connect, apply this network policy to their traffic." An AP can only have one Policy Tag, but a single Policy Tag can contain up to 16 WLAN-to-Policy mappings.
- Site Tag: This tag groups APs that share common site-specific properties. It assigns an AP Join Profile and, if applicable, a Flex Profile. APs in the same roaming domain should typically share the same Site Tag.
- RF Tag: This tag applies RF Profiles to the AP's radios (e.g., one RF profile for the 2.4 GHz radio and another for the 5 GHz radio).
This modularity means you can create one WLAN Profile for your "Corporate" SSID and reuse it across multiple sites, each with a different Policy Profile that maps clients to a site-specific VLAN.
Configuring a Secure WLAN: A Step-by-Step Guide
Now, let's walk through the process of configuring a secure WLAN using the Profiles and Tags model. We will configure a common enterprise scenario: a WLAN using WPA3-Enterprise with 802.1X authentication.
For a comprehensive textual reference that covers all these steps, you can refer to the following article.
Cisco WLC C9800 - WLAN configuration using the new model
This article, 'Cisco WLC C9800 - WLAN configuration using the new model', provides an excellent written guide to the entire process. We will follow its structure.
Skim through this article to get a high-level view of the configuration flow. Pay special attention to the sections detailing the WLAN Profile, Policy Profile, and the final step of assigning tags to an AP. We'll refer back to the specific examples at the end.
Step 0: Prerequisites (AAA and VLANs)
Before configuring the WLAN itself, the underlying network infrastructure must be ready. This includes:
- VLANs: The VLANs for your wireless clients must be created on your switches and trunked to the WLC.
- AAA Server: For 802.1X, you need an external RADIUS server like Cisco Identity Services Engine (ISE). The WLC must be configured to communicate with it.
Configuring the AAA components is a critical first step.
Configure 802.1X Authentication on Catalyst 9800 Wireless Controller Series
Let's consult the official Cisco documentation for the precise steps to configure the WLC for 802.1X authentication. This guide provides both GUI and CLI instructions.
Read the section 'AAA Configuration on 9800 WLCs'. Focus on the three main tasks: (1) Declaring the RADIUS server, (2) Adding the server to a RADIUS group, and (3) Creating an Authentication Method List.
Step 1: Create the WLAN Profile
This profile defines the SSID and its security parameters.
- Navigate to Configuration > Tags & Profiles > WLANs.
- Click Add.
- General Tab:
- Profile Name: A descriptive name (e.g.,
Corp-WLAN). - SSID: The network name broadcast to users (e.g.,
Corporate-WiFi). - Status:
Enabled.
- Profile Name: A descriptive name (e.g.,
- Security > Layer2 Tab:
- Layer 2 Security Mode:
WPA2 + WPA3. This allows both WPA2- and WPA3-capable clients to connect. - WPA Parameters: Ensure
WPA3 Policyis checked. - Protected Management Frame (PMF): Set to
Required. This is mandatory for WPA3 and enhances security. - Auth Key Mgmt: Check
802.1x. You can also enableFT + 802.1xto support Fast BSS Transition (802.11r), which we discussed in the last lesson.
- Layer 2 Security Mode:
- Security > AAA Tab:
- Authentication List: Select the method list you created in Step 0. This tells the WLC to use your RADIUS server for authentication on this WLAN.
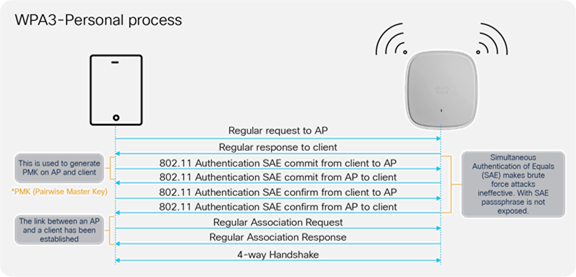
Step 2: Create the Policy Profile
This profile defines the network policy for clients connecting to the WLAN.
- Navigate to Configuration > Tags & Profiles > Policy.
- Click Add.
- General Tab:
- Name: A descriptive name (e.g.,
Corp-Policy). - Status:
Enabled. - Central Switching: Ensure this is enabled for traffic to be tunneled from the AP to the WLC via CAPWAP.
- Name: A descriptive name (e.g.,
- Access Policies Tab:
- VLAN/VLAN Group: Select the VLAN where your corporate wireless clients should be placed.
- Advanced Tab:
- AAA Policy: If you plan to have your RADIUS server dynamically assign settings (like VLANs or QoS), enable
Allow AAA Override. This is a very common and powerful feature in enterprise designs.
- AAA Policy: If you plan to have your RADIUS server dynamically assign settings (like VLANs or QoS), enable
Step 3: Create the Policy Tag
Now, we tie the WLAN and Policy profiles together.
- Navigate to Configuration > Tags & Profiles > Tags > Policy.
- Click Add.
- Name: A descriptive name (e.g.,
Corporate-PolicyTag). - WLAN-POLICY Maps:
- Click +Add.
- Select the WLAN Profile you created (
Corp-WLAN). - Select the Policy Profile you created (
Corp-Policy). - This creates the crucial link:
Corporate-WiFiSSID ->Corp-VLANpolicy.
Test your understanding!
You have successfully deployed the Corporate-WiFi SSID. A few months later, the network team decides to move the corporate wireless users from VLAN 100 to a new, larger subnet on VLAN 110. Which specific configuration object on the Catalyst 9800 do you need to edit to implement this change?
Show answer
You would need to edit the Policy Profile (Corp-Policy in our example). By changing the VLAN assignment within this single profile, the change is automatically applied to every AP that uses the associated Policy Tag, without needing to touch the WLAN profile or the tags themselves. This demonstrates the power of the modular design.
Step 4: Assign the Tag to an Access Point
The final step is to apply the new Policy Tag to your APs.
- Navigate to Configuration > Wireless > Access Points.
- Click on the AP you want to configure.
- Go to the General > Tags tab.
- From the Policy dropdown, select the
Corporate-PolicyTagyou created. - Click Update & Apply to Device.
The AP will briefly disconnect and then rejoin the controller with the new configuration, and it will start broadcasting the Corporate-WiFi SSID.
Practical Demonstration
Watching a live configuration can help solidify these steps. The following video provides an end-to-end advanced wireless setup using the GUI wizard, which packages these steps into a guided workflow.
Cisco C9800L Wireless LAN Controller - Advanced Wireless Setup
This video from Ingram Micro BTC demonstrates the advanced wireless setup wizard on a C9800L. It walks through creating the WLAN profile, policy profile, binding them in a policy tag, and applying them to an AP. This is a great visual summary of the process we just discussed.
Watch the video from 01:47 to 18:45. Follow along as the presenter: Creates a WLAN profile with security settings. Creates a custom Policy Profile and assigns a VLAN. Creates a Policy Tag to bind the two. Briefly covers Site and RF tags. Assigns the tags to an AP to complete the setup.
Conclusion
In this lesson, we moved from wireless theory to hands-on configuration, addressing the core task of setting up secure client connectivity on a modern Cisco wireless controller.
Key Takeaways:
- The Catalyst 9800 uses a modular Profiles and Tags model, separating the configuration "what" from the "where."
- WLAN Profiles define the SSID and its Layer 2 security (WPA2/WPA3, 802.1X).
- Policy Profiles define the network treatment for client traffic, such as VLAN assignment and QoS.
- Policy Tags are the essential glue, mapping specific WLANs to their corresponding network policies.
- The final step is to assign the Policy Tag (along with Site and RF tags) to the Access Points to activate the WLAN.
Preview of the Next Lesson:
We have successfully configured a WLAN for 802.1X, but we've only touched the surface of the authentication process itself. In our next lesson, we will do a deep dive to configure client authentication for a WLAN using WPA3 and 802.1X/EAP. We'll explore the different EAP types, the client and server-side requirements, and the full authentication flow with a RADIUS server like Cisco ISE. This will build directly on the foundation we've laid today.